Low frequency noise–commonly called bass–is the most difficult type of sound to keep from entering a room. Almost any soundproofing steps you take in a room–such as soundproof blankets, soundproof curtains, heavy bookcases and furniture–will help attenuate low frequencies. But because bass sounds can be so pervasive and difficult to eliminate, this article will concentrate on serious blocking techniques for low frequency noise.
For a little more detailed information on Low Frequency Noise, please see ‘End Notes’ at the bottom of the page.
How to Block Low Frequency Noise
Make sure you know the source of the low frequency sound. Not much point in soundproofing the window, then figuring out it is your refrigerator.
1) Low Frequency Room Soundproofing
Depending on where the noise is coming from, and how much you hear, you may have to soundproof the entire room, but with any luck you will have only one or two walls to deal with. Keep in mind that even if you are only blocking bass from one wall, it will still take time, effort, and money to get it done right.
All of the following options start with the same basics.
- Demolition. Remove all electrical and HVAC covers, remove all of the drywall. Using acoustic caulking, seal every gap and crack you can find–including the sill plate to the sub-floor, and around any wall penetrations. (If the gaps are too big for acoustic caulking alone, spray foam the gap, let it dry, cut it smooth, then apply acoustic caulking.) Install putty pads around any electrical boxes to make sure that gap is sealed when the drywall is installed.
- Insulation. Insulate the wall cavity with Roxul 80 sound absorbing batts.
- Mass Loaded Vinyl (MLV). Attach MLV to the studs. MLV is a sound blocking product with a high STC rating.
- Alternative Option. An alternative to ripping and tearing is blown-in cellulose fiber. You will need to cut a small hole in the drywall at the top of the wall between studs, insert the hose so it reaches the bottom of each wall cavity, and gently blow the material into the wall. (You should be able to rent the machine where you buy cellulose. You can also hire a professional.) Patch the holes (if required), then install Mass Loaded Vinyl over the existing drywall. (Note: This would be my ‘go to’ option because it is less expensive, provides great sound absorption, and is not near as messy.)
Once you have taken care of preparing the existing wall, then move on to one of the following soundproofing finishes.
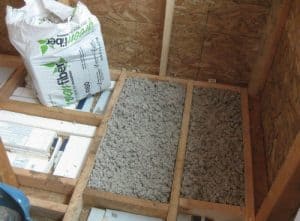 Cellulose Insulation
Double Drywall and Green Glue
Install a double layer of 5/8″ drywall with Green Glue sandwiched between them. The drywall adds mass and Green Glue is a very effective noise dampening compound–especially for low frequency sounds. Install the first layer of drywall, seal all of the gaps (using either drywall mud and tape or acoustic caulking), then apply Green Glue to the back of the second layer of drywall (according to manufacturer’s instructions) before installing. Make sure that you do not line up the joints of the two layers. Tape and mud drywall, and paint.
You can also use soundproofing drywall instead of the 5/8″. (Such as QuietRock or Certainteed.) This type of product has a viscoelastic polymer sandwiched between two layers of drywall that dissipates sound vibrations in small amounts of heat. More expensive than 5/8″ drywall but an easier install.
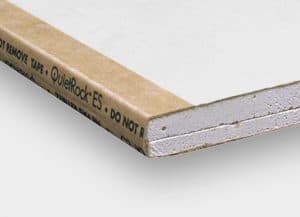 QuietRock Drywall
Decoupling
Decoupling is an extra step in blocking low frequencies by creating a dead air space between the existing wall structure and the final layer (or layers) of drywall. Install resilient channels or sound isolation clips c/w hat channels onto the existing studs (or over the existing drywall), then install either double 5/8″ drywall or 5/8″ soundproofing drywall to the channels without penetrating the wall framing. Tape and mud, then paint.
Note: You can find different isolation clip layouts and installation instructions at acousticalsolutions.com
Room Within-a-Room
Although building a room-within-a-room is the most time-consuming and expensive soundproofing method, it is also the one with an almost 100% guarantee of success. Not only for low frequency noise, but also for any other sounds. After you have accomplished the basics of demolition, insulation, MLV, you are going to move on to constructing a whole new room. To be effective, your new walls, ceiling, and floor need to be totally separated from the existing structure, leaving a 1″ – 2″ dead air space between them where sound waves go to die.
For detailed information please see our article ‘How to Build a Soundproof Room-Within-a-Room’.
2) Low Frequency Floor Soundproofing
Add Mass and Green Glue
Mass is your best friend when dealing with low frequency noise. Remove whatever floor covering is in the room. Screw the existing sub-floor to the joists to eliminate any squeaking. Then you can add either one, or two layers of 3/4″ plywood with Green Glue sandwiched between them. Extend your HVAC pipes as required, then install the finished flooring. For added soundproofing, use QuietWalk Plus under any laminate or hardwood floor. If you are planning on carpet, you can use RugPad USA 1/2″ underlayment, or the QuietWalk Plus, or both.
This should take care of most noise coming from below, or flanking noise that is seeping under the walls and through the floor construction members.
Note: The more you add to your floor, the more likely you will have to raise your door. Depending on the size of the gap between door slab and floor, you might get away with adding 3/4″. Any more than 3/4″ will probably require door modification.
Add Carpet and Soundproofing Underlayment
The easiest and quickest–but effective–floor soundproofing solution is to add a heavy wool carpet with sound absorbing underlayment like 1/2″ thick RugPad USA. Even if you already have carpet on the floor, adding more mass will cut down low frequency noise. You might want to use a good, double sided carpet tape to keep everything in place. For much more on soundproofing carpet underlayment, please see our article ‘Best Soundproof Underlayment’.
Room-Within-a-Room Isolated Floor
If you are going ‘all in’ on soundproofing your room please see ‘How to Build a Soundproof Room-Within-a-Room‘ for isolated floor construction details. Building a raised isolated floor should solve most low frequency noise problems. Before settling on this solution, keep in mind that your doors will likely have to be raised, and air vents extended.
3)Low Frequency Ceiling Soundproofing
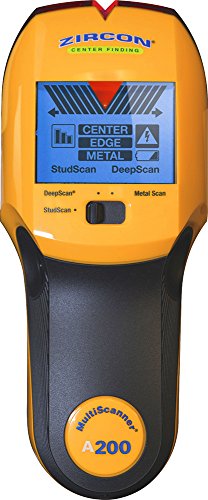
The most effective ceiling soundproofing is to soundproof the floor above. Because this is not always possible, you can use any of the soundproofing solutions listed above. Textured ceilings present a bit of a problem for resilient channels. Hard to keep them level. Isolation clips c/w hat channels are much easier to keep level, because you are only scraping small 3″ x 4″ sections down to the existing drywall. (Make sure you have a stud finder so you are screwing them into ceiling joists–not just drywall.)
Once you have the the grid attached to the ceiling, you can install drywall–either double 5/8″ with Green Glue sandwiched between or 5/8″ soundproofing drywall like QuietRock or Certainteed. Tape, mud, and paint. You can also texture the new ceiling with a popcorn finish or a knock-down finish.
And yes, you can blow cellulose into the space between floors just like the walls. You can also hang Mass Loaded Vinyl on the ceiling. You should have at least one helper. The stuff is heavy (one lb. per square foot) and tough to hold in place while attaching it–specially if you only have two hands.
Our ‘How to Build a Soundproof Room-Within-a-Room’ article has more detail about how to totally isolate a ceiling.
4) Low Frequency Window and Door Soundproofing
Windows and doors are low frequency noise weak spots. Wherever air can go, so can noise. Remove the casing from the window and one side of the door. Remove any existing insulation. Spray insulating foam into the cavity between jambs and wall framing–only about 1″ – 1 1/2″ thick. Spray in as deeply as possible. Fill the rest of the cavity with Roxul 80. (Do not pack tight.) Re-install casing and use paintable caulking to seal it to the wall and jambs.
Install Keliiyo soundproofing weatherstrip on both door and window. Add Holikme Draft Stopper to the door bottom. You should also change the hollow core door slab to a solid wood or solid core unit at least 1 3/4″ thick, and change the window to either dual or triple glazed with at least one pane of laminated glass.
All of this is usually not sufficient to solve low frequency noise issues. You should add AcousticCurtain and Acoustidoor by Residential Acoustics to both openings. These are roll-up curtains that block 21 – 25 decibels of sound. They attach to the wall directly above windows and doors, and can be raised and lowered with straps incorporated into the curtain–allowing access to both windows and door.
For more detailed information, please see our articles How to Soundproof a Hollow Door and How to Soundproof a Window.
5) Technological Low Frequency Noise Blocking
- White Noise Machines. Although commercial white noise machines may cut down low frequency noise a bit, their speakers are too small to produce sounds low enough to be truly effective. Remember, white noise has to be louder than the noise it is masking. If you want your white noise machine to do the job, you will need to hook it up to a good subwoofer that can produce sounds down to 30 Hertz. If you already have the equipment, it is certainly worth giving it a try. Please go to noisyworld.org Why Most White Noise Machines Don’t Block Low Frequency Noise for more information.
- Noise Cancelling Headphones. The Sony WH-1000XM3 is an excellent low frequency noise cancelling product. They do have a downside for side-sleepers like I am. I cannot wear them to bed.
- Earplugs. Pretty low tech but surprisingly effective. Mack’s Ultra Soft earplugs have a Noise Reduction Rating of 33 decibels–one of the highest ratings for earplugs. And you can sleep with them.
- Black Noise Machines. This is a sound system that is loud enough to drown out any incoming noise. Keep in mind that you might need the low tech earplugs to prevent ear damage if this is your go-to choice. (Led Zeppelin IV in my office wins every time.)
- 3D Printed Noise Attenuating Blocks. These can apparently be customized for virtually any sound wave. Please click on the link because 3D printing is way above my pay grade and I suspect they are not readily available at the corner store, yet. But I bet you will be able to get them soon. Or maybe print them yourself, if you have the printer and know how to use it.
6) Talk to Your Neighbors
This might be a little tough if you live beside a freeway or construction site. But if you live in an apartment, condo, or even a subdivision of single family homes, here are a few suggestions.
- Pick a time when you are calm and relaxed. You will probably gain very little by putting on a ‘Jack the Bear’ act at 7 AM.
- Ask them to turn the sound to the usual volume, then come into your place to experience what you do.
- Offer to help buy and/or install low frequency soundproofing products (like bass traps or speaker isolation pads).
- As a last resort, consider speaking to the landlord or condo board.
End Notes
What is Low Frequency Noise?
Low frequency noise (generally between 20 Hertz and 250 Hertz) is sound with a physical component. Even the hard of hearing and the deaf can feel low frequency sounds. Low frequency noise can pass through most walls, floors, and ceilings, including concrete. The scientific term for low frequency sound is Infrasound. (For more information see Infrasound – Wikipedia.)
Note: 20 Hz is considered the low end of the range because the human ear cannot hear anything below that.
Low frequency noises have a longer sound wave, making them more powerful and allowing them to travel longer distances. A 31.5 Hertz (Hz) soundwave is around 35 feet long. By comparison, an 8000 Hz soundwave is about 1.65 inches long. Shorter wave=quicker dissipation.
What Causes Low Frequency Noise?
Anything that produces noise in the 20 Hz – 250 Hz range. Here are a few specific examples.
- Music and Entertainment Systems. Many people like lots of bass when listening to music or watching movies. If the room is not soundproof, or at least sound treated, the bass passes through walls, floors, and ceilings.
- Neighbors. Neighbors, specially in apartments or condos, will make low frequency noise that passes through walls, floors, and ceilings.
- Electrical Appliances. Refrigerators, washing machines, dryers all produce a low pitched sound that travels very well.
- Traffic. Most traffic noise (not including horns and sirens) is low frequency.
- Construction Noise. Everyone has seen at least one movie or commercial with a jack hammer. Very loud, but low frequency.
- Wind Turbines. If you are ever close to one of these when it is operating, you will notice the same type of low pitched hum you hear from your refrigerator.

Hi Terry, thanks so much for creating this very helpful website! Could you tell me what would be the best material for reducing low-frequency noise out of these three: MLV, Quietrock, or cork? Thanks.
Hi Keith,
When it comes to low frequency noise, mass is your best friend. Along with Green Glue. So I would use double 5/8″ drywall with Green Glue sandwiched between the layers. If one layer is QuietRock–so much the better because of the polymer inside. It diffuses bass sound just like the Green Glue.
Terry
Terry, the most comprehensive and insightful article, many thanks!
How might you handle the following:
– Live in a side by side 2 unit condo (used to be an older duplex) with shared common wall and shared common subfloor between the 2 units
– Impact noise from footsteps was never a problem as I on my side and other owners of the unit next door changed out wood flooring but always installed underlayment
– New owner refused to install underlayment when he changed wood floors, even if I paid for it, he installed wood floors WITHOUT UNDERLAYMENT anyway and now our adjacent condo is filled with booming, vibrating impact noise with their every footstep waking us up at night or early morning.
Your comments on these options:
– Solution Option 1?: acoustic caulking where their new wood floor connects to their side common wall drywall
– Solution Option 2?: cut thru my wood floor to the shared sub floor plywood and remove a 1-3 inch piece of the sub floor plywood along the length of my house from
front to back (the joists are parallel front to back) thereby disconnecting and decoupling the the shared subfloor so low frequency, vibrating noise is interrupted froom travelling across the sub floor on our side.
P.S. The common wall is 1/2 inch drywall on each side with nothing in the cavities for sound dampening.