Now that you have decided to soundproof your home theater, you need to understand mass, damping, decoupling, and absorption–and what they do. We will give you that information. And some suggestions you can use to get the best theater soundproofing value. If you want to ‘turn up the volume’ you will first have to deal with sound escaping the room; and in some cases, sound entering the room.
Basic Soundproofing Principles
Before embarking on this project, it is valuable to have some understanding of what you need to accomplish–and how to go about it. I have added a fifth ‘Soundproofing Principle’ to the accepted four main ones of mass, damping, decoupling, and absorption. Sealing gaps, because it is too often overlooked, or lumped in with the other four.
Adding Mass
Adding more, and heavier, material to the walls, floor, and ceiling will cut down on vibrations passing through. Obviously, heavier products vibrate less, so fewer sound waves can travel onward.
Damping
Reducing the amount of vibration that can pass through a wall, or floor, system will stop the transference of sound by absorbing some of the sound waves. This dissipates the sound waves before they become noise on the other side.
Decoupling
When it comes to soundproofing, dead air is your friend. Decoupling properly will create a space between two surfaces to stop vibrations from continuing the journey into the next room.
Absorption
Insulation in the walls, floor, ceiling will absorb some of the sound waves. It works best in combination with other soundproofing suggestions. (Note: Just using acoustic panels on the walls is a fairly ineffective solution.) Absorption does not work well on low frequency sound.
Sealing Gaps
Sound is like air. It will flow through any opening into the next room. Sealing any, and all, wall, floor, and ceiling penetrations will make your soundproofing efforts more successful.
Sound Volume and STC Ratings
A good sound system will put out 110 decibels. The average uninsulated interior wall will stop no more than 40 decibels. The other 70 decibels will be heard in the next room. A quick look at the following chart will give you some idea of noise levels. If your wife, or children, can sleep with a toilet flushing constantly, or a vacuum cleaner running constantly beside the bed, there is no need to read further. If not, we have some solutions for you.

The following chart will give you an idea of what Sound Transmission Class (STC) ratings mean in the real world. For more information on STC please go the this Wikipedia article.
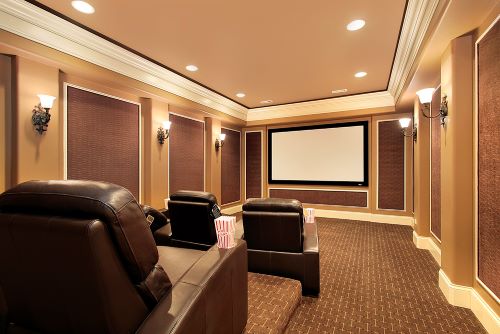
Theater Soundproofing Decisions
Deciding that you need soundproofing for your theater usually comes down to ‘Is the outgoing, or incoming, noise too much to handle?’ You may feel that a couple of soundproof blankets, carpet on the floor, and door weatherstrip are enough. Or you may want much more. The following suggestions will help you decide how much, and what type of, soundproofing product you should be considering.
Theater Soundproofing
Most of the following suggestions can be accomplished without removing the existing drywall. If you decide to remove drywall–to get some extra absorption by adding insulation–you should use a soundproofing product like RoxulProRox SL 960 Rockwool rockwool for the best results. (Note: Before insulating, make sure you use acoustic caulking to seal every hole or gap you can find. Also seal the sill plate to the subfloor.)
If you do not want to remove drywall–but still want more absorption–give some consideration to blown-in cellulose insulation. (A 2 x 4 wall with 1/2″ dry wall on each side will improve from STC 30 to STC 41 according to test results from ecopacificinsulators.com) You can do this yourself by renting a machine (usually where you buy the product), cutting a 2″ x 2″ hole in the drywall at the top of the wall between every 2 studs, blowing in the cellulose, then patching the hole.
Walls
Soundproof Blankets
If you live in a rental unit, or have a condo board that will only approve a serious renovation after you give up your first-born male child, US Cargo Control manufactures a sound absorbing blanket that is 80″ wide x 96″ high with grommets on one 80″ side.
By using self-adhesive hooks near the ceiling, you can cover an 8′ high wall without having to add extra material. Give some consideration to using Velcro or double-sided tape to hold it to the baseboard and seam them together where they overlap. (I would overlap about 4″ – 6″.) If you need to make a cut-out for windows, doors, closets, HVAC, or electrical, make sure you seal the raw edges by sewing or taping them together–then fastening the blanket to the wall around the penetration. Having little tufts of cotton floating in the room will be annoying. (Note: Color choice is black or black.)
Double Drywall and Green Glue
Sandwiching Green Glue noise proofing damping compound between two layers of drywall could reduce the noise transfer by up to 90% (according to the manufacturer).
To get even better performance from the wall, I would use 5/8″ soundproofing drywall (such as CertainTeed or QuietRock). It has a viscoelastic sound absorbing polymer sandwiched between two layers of dense drywall which also dissipates sound. It is about 5 times more expensive than standard 5/8″ drywall, but the extra mass and sound dissipation might be well worth it. (Not that I do not have complete faith in the Green Glue claim, but it states ‘up to 90%’–and in this case, I believe ‘more is better’. After all, you are probably only going to do this once.)
QuietRock claims to improve STC rating by 15 – 20 points; the equivalent of 4 sheets of standard drywall. This, by itself, can get a standard uninsulated interior wall to an STC rating close to 60. Higher STC numbers are always better. (I might not have complete faith in that claim either but, if accurate, the cost difference becomes negligible.)
Isolation Clips, Hat Channel, and Drywall. While extra drywall and Green Glue provide mass and damping, you can add decoupling to your project by adding isolation clips and hat channel, or resilient channel.
Although the Green Glue and soundproofing drywall work very well, adding decoupling to the program should get you even closer to soundproof. And again, you are probably only going to do this once. When the clips and/or channel is installed, you can add one, or two layers of soundproofing drywall. If you choose a double layer, you can sandwich Green Glue between them. Acoustical Solutions has a layout guide for isolation clips in their Installation Instructions section.
Ceiling
Soundproof Blankets
Soundproof Blankets. Attaching blankets to the ceiling tends to be huge pain in the rectum. But if you cannot, or do not want to, add drywall it is an option to consider. One of the only practical ways of getting them up there–and having them stay–is to install 1 x 2 primed pine strapping every 2′ perpendicular to the ceiling framing. For more details about blankets installed on your ceiling please see our article How Much Does it Cost to Soundproof a Room.
Double Drywall and Green Glue
Green Glue is really only effective if it is sandwiched between two smooth, solid surfaces. So, if you have a textured ceiling finish–even a knock-down finish–this is really not an option unless you plan to scrape everything off first. If your ceiling is a smooth, painted finish, you can treat it the same as the walls in the section above.
Isolation Clips, Hat Channel, and Drywall
If you have a textured ceiling, the isolation clips provide a good option. You only have to scrape down small sections (approximately 4″ x 2″) to attach the clips level and secure. Once the hat channel is in place, you can apply your double soundproofing drywall with Green Glue sandwiched between.
Tape, mud, and paint the drywall. Or you can texture it again–if you like that look. (Note: Resilient Channel is not a good option for textured ceilings. You have to scrape down 2″ wide sections every 16″ to install it properly. You cannot just install it over texture and expect a smooth, level ceiling after installing the drywall.)
Floor
If your theater is in the basement on a concrete floor, you probably worry more about cold feet than soundproofing. With nothing below except dirt, your only worry is the small amount of flanking noise passing under the walls into adjacent rooms. On the other hand, if people live below, you will have to be serious about the sound and vibrations that could pass through.
Carpet with Underlayment
A good heavy carpet (preferably wool) over soundproofing underlayment like 1/2″ RugpadUSA or QuietWalk Plus (vapor barrier built in so it is an excellent product for concrete, and can be glued down)
Both products along with a heavy rug provide good sound dampening. If you already have carpet, you can put underlayment, and another carpet over it. (Might be an idea to have some two-sided carpet tape handy to ensure things do not move around too much.
Plywood with Green Glue
If you want even more soundproofing on a wood floor (and you have removed everything down to the sub-floor), consider adding 3/4″ plywood with Green Glue sandwiched between layers. The plywood will add extra mass to the noise reduction capabilities of the Green Glue (manufacturer claims up to 90% noise reduction), and has the added advantage of providing a solid base for nail-down flooring. Then finish the floor with whatever you prefer–laminate, carpet, tile, real hardwood along with the suitable underlayment.
Window
Eliminate It
Windows are the second hardest part of the room to soundproof. So, if you do not need it, or want it, remove it and frame in the opening. Then just treat it like the rest of the wall.
Soundproof Curtain
Nicetown blackout soundproof curtains are an economic option to cut down sound. They are available in many colors and sizes. (Note: I am not a big fan of these for serious soundproofing. Sound waves travel through any type of gap, and the pleated design leaves quite a few large openings at both top and bottom.)
AcousticCurtain
Manufactured by Residential Acoustics, these are a custom-made roll-up curtain that blocks 21 – 25 decibels of sound. Hung from hooks at the top, they can be ordered with either Velcro or magnetic fasteners for the sides and bottom for tight sealing to the wall. Many colors of fabric and straps available. Colored hooks can be ordered with the curtain.
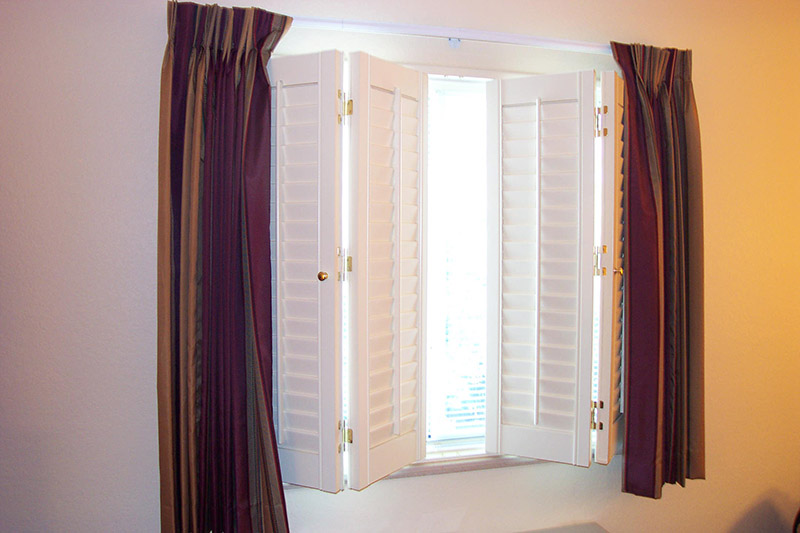
Acoustical Shutters
Manufactured by Quietly Making Noise, these are custom made interior shutters providing 25 – 50 decibel noise reduction. Custom made to fit any window or door, they provide soundproofing–both incoming and outgoing–along with keeping out the light. Many colors and designs available.
 Shut-eye Shutters
Door
This is your enemy. Standard interior doors have an STC rating of 20–on a good day. Even using most of the following suggestions, you may have a struggle to achieve much over STC 60.
Replace the Slab
Most interior door slabs are hollow-core (1/8″ panel inside and out with maybe some beehive cardboard between). Not much mass. Replace it with a solid core, or solid wood slab 1 3/4″ thick. (Note: I would get mine prehung to eliminate hinge and handle prep.) The extra mass will improve the STC rating to around 35. Make sure you insulate the gap around the frame. I would use about 1 1/2″ of spray foam; then fill the cavity with RoxulProRox SL 960 Rockwool, or fiberglass (not packed tight).
Seal the Gaps
Whether you change the slab, or not, add weatherstrip to the doorstop, and a sweep to the bottom. Sound is like air, and will flow through any gap.
AcoustiDoor
Manufactured by Residential Acoustics, these are a custom-made roll-up door covering that blocks up to 30 decibels of sound. They are hung from hooks above the door and can be ordered with either Velcro or magnetic fasteners to seal the sides to the wall. Many colors of fabric, straps, and hooks are available. Make sure it touches the floor to seal the gap.
Double Door
If you have the room to swing doors both in and out, you can order double solid core doors in a single frame. When you add weatherstrip and sweeps to both slabs you will create a sound suppressing dead air space between them. Another option is to order a second door from Acoustical Shutters to add to your new solid core door for a 25 – 50 decibel noise reduction.
HVAC
Unless you plan to change the complete system (or at least the piping), your options here are rather limited. Specially if you are adding to the existing walls, and not removing any drywall. If you are planning to quiet down the whole system please see our article How to Quiet a Noisy Furnace Blower.
Seal All the Gaps
The holes cut into walls, floors, and ceilings to allow for pipes, vents, plumbing, electrical are almost invariably bigger than whatever is penetrating them–for obvious reasons. It is much easier to slide a 4″ pipe through a 4 1/4″ or 4 1/2″ opening. Also, almost invariably, there is nothing used to seal the gap. Seal everything you can with acoustic caulking. For anything you cannot caulk–such as floor heat vents–give some consideration to Kilmat 50 mil Sound Deadening Mat. Just cut to the size you need and stick it over the gap between the boot and the floor.
Furniture Placement
Place furniture in front of, or over, vents. This will absorb, or deflect, both incoming, and outgoing sound. Do not seal off the opening!
Baffles
Especially for wall or ceiling vents. Once you have sealed around the vent, you may still need something to cut down the noise coming through the vent. (Quite difficult to have the La-Z-Boy on the ceiling.) You can use some of your acoustic treatment in these locations by hanging Sonoma Sound Absorption/Diffuser Panels in front of the vents. Just make sure you leave an inch or two between vent and panel to allow for air movement.
Note: I have seen articles suggesting that vents can just be closed off to achieve better soundproofing. Do not do this without at least talking to a professional. Closing off vents can overload the system–potentially causing a shorter lifespan, or worse.
Miscellaneous Considerations
Every ‘Do It Yourself’ home renovation project invariably runs into the ‘Now What’ situation. Here a couple that come up any time you add thickness to walls, ceiling, and floor, along with a note on speakers.
Electrical Penetrations
You will need to get electrical box extensions so the switches, plugs, and light fixtures are flush to the new drywall. Before adding drywall, caulk around the existing box with acoustical caulking, then seal around the extension in the new drywall with acoustical caulking. And install a Trade Gear Wall Plate Insulation Gasket when you put the cover back on. (Note: Keep the extra gaskets because acoustic caulking never dries; so if you ever take the cover off, you will need a new gasket.)
Window and Door Frames
You are going to have to extend the window and door jambs to the same depth as your new drywall if you want the casing to fit properly. I usually use 1 x 2 primed pine ripped to the proper size, then brad nailed onto the existing jamb. Then install the casing.
Note: When you have access to the cavity around the frame, make sure you soundproof it by spraying in about an inch of low expansion foam, then filling the rest of it with RoxulProRox SL 960 Rockwool, or fiberglass (Do not pack the insulation tight. In this application, more is not better.)
Sound Equipment
If you have speakers sitting on the floor, make sure you buy speaker isolation pads to deal with the vibrations. Not only will the vibration travel through the floor into the space below; it will also travel through wood framing and even concrete into the surrounding rooms. (This is known as flanking noise–noise that travels around the walls. You can find more information at Designing Buildings Wiki.)
The heavy foam pads also act as bass traps. Bass frequencies (under 125 Hertz) are the most difficult to eliminate. Adding decent bass traps in all 8 corners of the room will help absorb the low frequencies.
Room Within a Room
This option is as close as a person can get to a truly soundproof theater. Unfortunately, it is usually only available if you own your home–and plan to stay there for quite a while. And are willing to commit lots of time and/or lots of money to the project.
Note: A contractor-built ‘room within a room’ can cost up to $30.00 per square foot of wall and ceiling area–so a 12′ x 12′ room with 8′ walls could be around $15,000.00 not including floor or acoustic treatment.
The greatest benefit of this system is the decoupling achieved by ensuring no part of the new ‘room’ touches the existing framing. (This can be a little difficult when planning the ceiling but by using the American Wood Council Span Calculator you can determine the size of joists required.) RoxulProRox SL 960 Rockwool soundproofing insulation installed in both the existing walls and ceiling (if accessible) and the new ‘room’ gives you plenty of sound absorption.
Mass is accomplished with soundproof drywall, or two layers of 5/8″ drywall. For added damping, sandwich Green Glue between the drywall. (My preference for adding mass and damping is to sandwich Green Glue between a first layer of 3/4″ plywood, and then add a layer of 5/8″ drywall. The plywood gives you the ability to nail, or screw, things anywhere on the walls or ceiling without looking for the studs.
You will still have to extend the electrical, HVAC vents, and plumbing (if required) which makes the decoupling imperfect. But with the use of acoustic caulking, putty pads, and gaskets, the loss of soundproofing should be minimal.
End Notes
Realistically, there is another fool-proof method of soundproofing your home theater. Wear headphones.