
Many of my friends are spending big money on soundproofing when a DIY sound diffuser would be better. They are so busy absorbing sound, echo, and trapping base noise in their games or media rooms, and elsewhere that they often make it worse. While deaden some sound has merit, it makes the harmonics sterile or off. They forget about sound diffusion.
You can spend hundreds of dollars on diffusers, or you can make DIY sound diffusers for a whole lot less. I put together this list of 16 DIY sound diffuser panels together, along with free plans, to help you and some friends out.
What’s a Sound Diffuser?

A diffuser in a room does to sound what nature does naturally in the outdoors. Our ears pick up sound waves that have been reflected off numerous surfaces, like trees, rocks, and even buildings. We can hear a songbird from 100 yards or more away without ever seeing it, yet with all the bounce and reverberation, we can often identify the species, direction, and distance.
The different surface heights of a diffuser are designed so that a sound wave from any direction will hit and deflect evenly in multiple directions. It allows for a more natural softening and termination of sound reverberation, so a room doesn’t feel devoid of sound life. A diffuser also helps with standing wave build up and comb filtering and can be designed to address any frequency spectrum from a very low range to the high range.
To help give sound life in a room a diffuser absorbs some sound, but treats echo and scatters resonance around a room, bringing it to life, just like nature does. The room doesn’t sound dead or hollow. It can even make a small room seem large. They can be mounted on walls opposite speakers and even on ceilings. Diffusers are a great addition to any room to improve sound and control resonance concerns.
How a Sound Diffuser Works
A diffuser is designed based on a mathematical formula involving prime numbers. Instead of creating confusion about diffusion, understand that a diffuser scatters soundwaves over a 180-degree angle. It uses wells or towers in a pattern of differing depths, heights, widths, and spacing calculated to create an even soundwave scattering.
The depth or height of the well or tower is derived from the quarter wavelength rule, and the width is a half wavelength. By controlling the two dimensions of horizontal and vertical, wavelengths from low to high range can be diffused in a controlled, predictable manner. This will impact the timing, direction, and intensity of soundwaves making for a more enjoyable listening experience.
If the wells or towers are not correctly calculated and constructed, they won’t scatter the waves evenly, which will cause an uncomfortable listening experience. The orientation of the pattern of the wells is also important to the diffusion. If the wells are oriented horizontally, there is a vertical diffusion of sound, while a vertical orientation creates a horizontal diffusion. Combined and positioned correctly, they produce better harmonics and make a room sound bigger.
Acoustic Diffuser Types
There are two main types of acoustic diffuser, skyline and quadratic. They rely on similar mathematical principles to diffuse sound. One uses wells or troughs; the other uses different tower heights. They are basically the inverse of the other. Skyline diffusers take up more space and are heavier than QDR diffusers.
Skyline Diffuser
Skyline diffusers use solid square cut blocks of calculated length arranged in a set pattern to scatter soundwaves evenly. The pattern of the blocks makes it look like a city skyline.
Quadratic Residue Diffuser (QRD) Diffusers
A quadratic diffuser uses wells or troughs of calculated depths and widths, also in a set pattern, to predictably control the diffusion of soundwaves in an even pattern.
#1 DIY Sound Diffuser / Wall Art
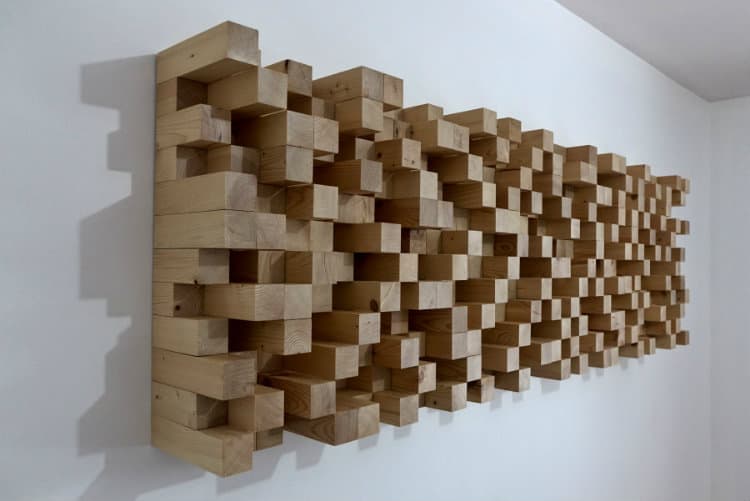
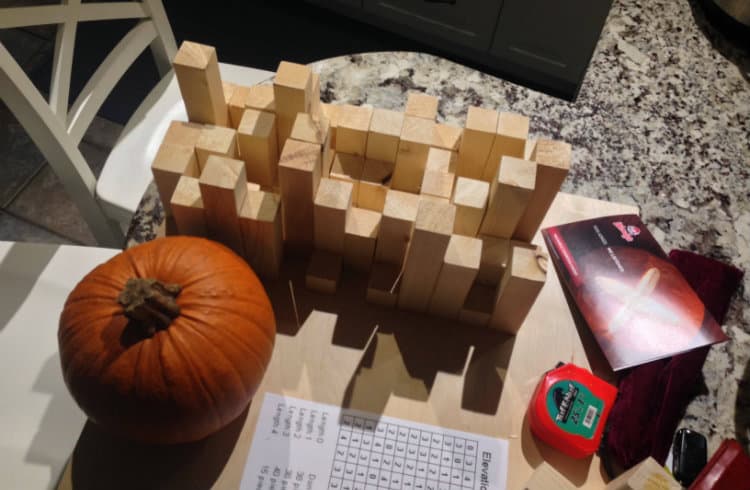
Made out seasoned scrap 2×4 pieces, this diffuser not only decreases reverberation but also looks like a piece of artwork, which it is! Trim the 2x4s, so the beveled corners are gone. Rip into 1-1/2” squared lengths. Cut the lengths into an equal number of 2”, 4” & 6” pieces. Sand each piece smooth, including the ends; remember to keep each edge square!
Assemble the pieces on a solid (and strong) flat surface. Lay out each row in a random pattern using the same number of each block height per row. Use a good construction adhesive that won’t leave a gap between blocks. One side will look like a skyline, the other like a butcher block. Didn’t use a backer board due to concerns seasonal expansion would cause sections to split. Cut a French cleat in back to provide greater support for the heavy piece of artwork.
Build this Skyline Sound Diffuser#2 Quadratic Diffuser Build
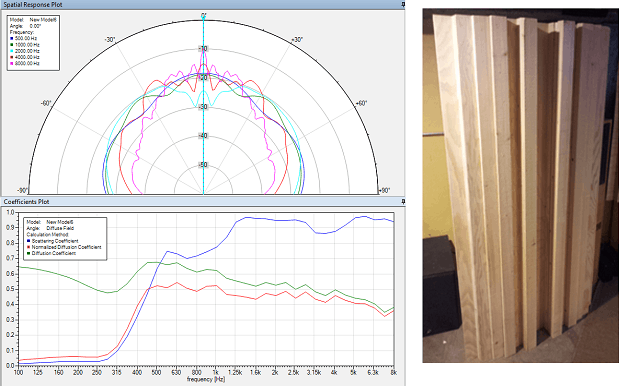
This is an N13+4 quadratic diffuser based on the prime number 13. It has 13 wells (+) 4 different depths. The +4 also diffuses lower frequencies than +1,2, or 3. The +4 improves the N13 diffusion performance by 33% and reduces the depth of the wells making it easier to build.
The build used styrofoam for spacing and to support the wood forming the wells instead of a backer board. This made the diffuser lighter, but required an alternative method for securing it to the wall, and used much more glue. 3mm ply was used to form the wells and walls. All the walls were cut to the same 6” dimension, and the pieces for the well bottoms were cut 1-1/2” wide. Measurement and accuracy add to the build complexity.
Build this diffuser#3 DIY Skyline Diffuser
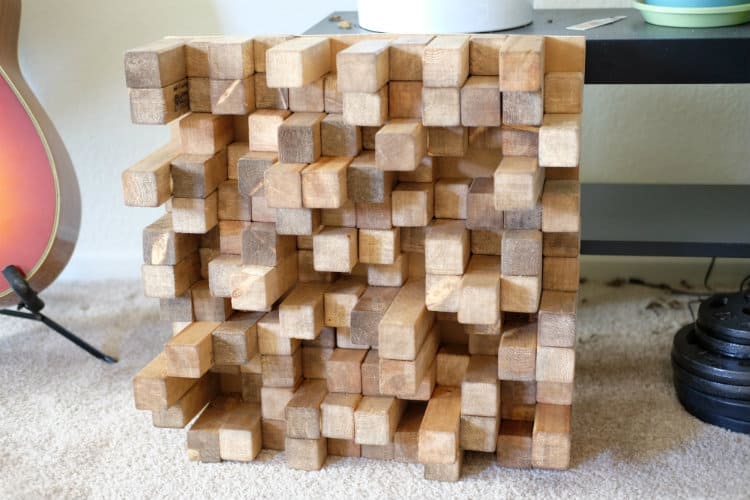
A 20”x20” skyline diffuser made with four different lengths of 2×2 on a backer board constructed using minimal tools and limited skill. The beveled edge was retained, making gaps where the corners meet. The design and pattern were created using an online tool which calculated the length of each piece, the number of each length needed, plus the pattern to assemble them in.
The deepest well was 6”, and the shallowest 0”. The narrower the width of the individual pieces, the higher the frequency it will handle. The deeper the well, the lower it will diffuse at the low-frequency end. It is an inexpensive solution to sound diffusion, but still a heavy piece to hang.
Build this diffuser#4 How to Build a DIY Acoustic Diffuser
Building several skyline diffusers to place on the wall opposite where the sound is generated in a studio to diffuse and improve the sound. It uses an online diffuser program to identify width, length, spacing and pattern. The maximum length is 20cm which will diffuse as low as 860 Hz and up to 5055 Hz, and the overall dimensions are 40cm by 40cm. The program also identifies the total length and the amount of each size needed.It is much less expensive to build a diffuser than to purchase one. The concept is straight forward, easy to assemble, but labor-intensive and time-consuming to build. The plan was to assembly three sets on one backer board and to make two full boards. That’s a lot of cuts, sanding, and gluing to do. It also is one heavy finished product!
#5 How to Build an Acoustic Diffuser
Builds three skyline diffusers for the back wall of a studio to liven sound and make it less sterile. The diffusers scatter soundwaves evenly in a fixed pattern, preventing bounce and reverberation. Discusses using free acoustic diffuser calculator program which lays out size and dimensions, plus the highs and lows the diffuser will moderate.Building a skyline diffuser is very labor intensive and even tedious cutting and sanding all of the pieces. Recommends drawing and numbering the grid on the backer board to make assembly easier. Also, suggests using a thicker more rigid piece of plywood for the backer. Only glues the base of the block onto the backer, not the sides to each other. They then set the three side by side on a support shelf instead of hanging them.
#6 How to Make a Wooden Sound Diffuser
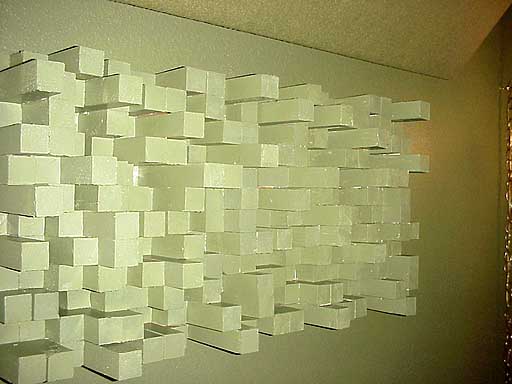
The site looks at building several 17”x17” skyline diffusers for a recording studio. They use limited tools, a couple of hours, and spent less than $30 on materials. The plan was to use ¾” pine panel for the backer board to support the weight of the pieces. The diffuser pieces were made from 2×2 dimension lumber cut in 2”, 4”, 6” & 8” lengths.The pieces were sanded but left with beveled edges. The base of each piece was glued and then assembled onto the pine panel following a pattern found online. The deeper 8” wells will modulate lower low-range frequencies than 6” wells would, but also stick out further from the wall and are heavier.
#7 How to Build a DIY Acoustic Diffuser QRD 13 Kit
A kit based on the prime number 13, with 12 wells. All you have to do is apply glue, and assemble. Everything for the 2’x4’ diffuser kit is precut, and the back and ends are dadoes cut to receive the walls of the wells.They walk you through the gluing and assembling of the kit which has 12-1/2” deep wells. Once the wells and frame are assembled and the glue has dried, they show you how to insert the quarter wavelength inserts for the correct diffusion sequence. The provided drawings also explain how to assemble support boxes to change the well depths. The diffuser is lighter than a skyline diffuser. It can be oriented vertically or horizontally depending on the harmonics you want to diffuse.
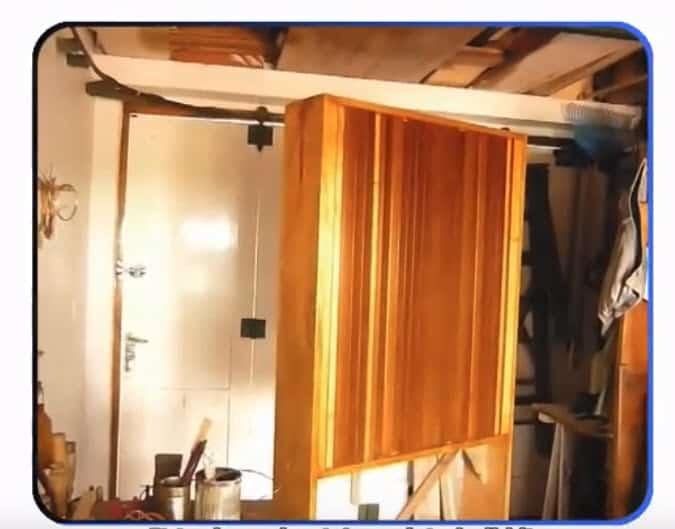
#8 N13+4.7 – Building QRD Diffuser
A video presentation for constructing a 24”x24” quadratic diffuser based on the prime number 13. It shows the assembly of the 12 wells but doesn’t provide any measurements. Constructed of MDF and glue it doesn’t have a backer board. Spacers and supports are removable from the back once the glue has dried.The +4.7 will improve the N13’s performance and temper more low-frequency noise. The quarter wavelength depths span a greater spectrum allowing for a greater frequency range of predictable control and even scattering of soundwaves. The diffuser looks easy to make, and can even be assembled on the kitchen table. All pieces were precut to make everything move more quickly and smoothly. The finished product was a framed quadratic diffuser that could hang or sit on a shelf where needed.
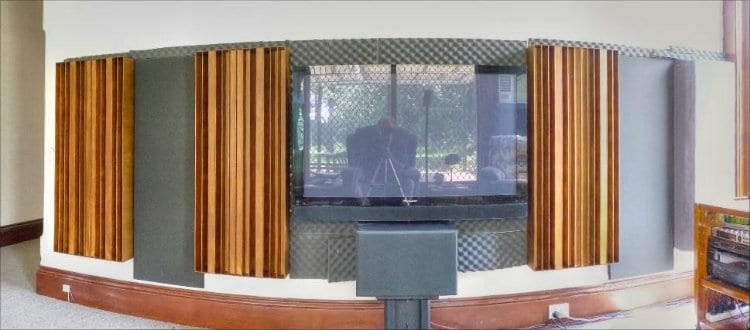
#9 How I Made My Own Curved Acoustic Diffusers / Deflectors DIY Project
Video shows how to make a curved 5” deep, 24”x 48” diffuser box. Cut three pieces of pine to make the arcs or half-moons. The back was 1/2” plywood with the edges angle cut to match the arc. The arcs were predrilled, glued and screwed to the ends and middle of the plywood. Flexible NRP waterproof panel was cut to form the curved face of the diffuser.Textile moving blanket pieces are cut and glued to the plywood between half-moons, plus the inside face of the NRP panel. The fabric layers help reduce vibrations and improve acoustics. The flexible panel is secured to the arcs and plywood frame. The exposed face of the panel is covered with rubber toolbox liner to further dampen vibration, and then everything is covered with a felt fabric to finish. Hang it horizontally or vertically to diffuse soundwaves.
#10 Why A DIY Sound Diffuser Is A Good Acoustical Tool To Have
The article discusses why a studio diffuser is useful and how it can liven up the sound in a room. It helps to evenly scatter soundwaves, so they don’t bounce directly back at you off a flat wall. The article explains how a quadratic diffuser can create a 180-degree fan of sound either horizontally or vertically, depending on the orientation of the diffuser.
An explanation and video of how to build a quadratic diffuser are included, as well as how you can set it to respond to different frequency ranges. The savings from a DIY panel vs a manufactured one can be thousands of dollars while achieving the same results! Plus, everything you need to know is available free online.
Build this diffuser#11 DIY Quadratic Skyline Diffuser
This is a step by step DIY guide to making an 18”x18” skyline diffuser, with links to images. The original plan was a 24” square diffuser, but things happen. An image of the layout with parts list and sizes is included. Draw and number the layout grid directly onto the backer board. Rent a chop-saw if you don’t have access to one. It will reduce the cutting time and increased accuracy.
Remember, dimension lumber is not the actual size; a 2”x2” is really 1-1/2”x1-1/2”, so plan accordingly. Square edge lumber is slightly more expensive but provides more even sound diffusion. A skyline grid using 1-1/2” pieces will be 18” square, not 24” square. Hand sanding is tedious, but there’s less chance of splintering or changing the dimensions of the pieces. Use good construction glue and take your time.
Build this diffuser#12 Making Easy DIY “Depot” Acoustic Diffuser Panels
A guide to making a large, 3’x8’ quadratic13 diffuser for less than $100.00. The cost of two would be about $150 due to the leftover material. It includes pictures and material lists. Construction uses larger dimension pieces laminated to create the correct well depths which diffuse a wide bandwidth from approximately 400Hz to 8000Hz.
Assemble the planks on the good side (finished) of the plywood. If you use square edge, not beveled lumber, the soundwave scatter results are more predictable and even. Draw lines on the plywood for correct spacing and alignment. There’s limited cutting as most of the pieces are standard dimension lumber, so it’s a quick nail and sand to have a finished diffuser. You don’t even have to wait for the glue to dry!
Build this diffuser#13 Inexpensive but Effective QRD Diffusors
A “How to” for an 18”x18” skyline diffuser using 2”x2” dimension lumber on a backer board. It includes the layout grid, parts list with cuts, and links to calculations and additional information. They recommend against using a chop-saw due to measuring. I’d clamp a stop-block at the desired length and cut away. They suggest using 1/8” or 1/4” hardboard for the backer; plywood is more durable and stronger.
Use square corner, not beveled lumber. Sand all cuts smooth, it will make the finished product look a whole lot better, and it stains or paints nicer. The pieces will also fit together better and not have gaps between them. The finished product weighs about 23 pounds, so it needs to be mounted securely, especially if mounting on the ceiling!
Build this diffuser#14 QRD (Skyline) Diffusor Build
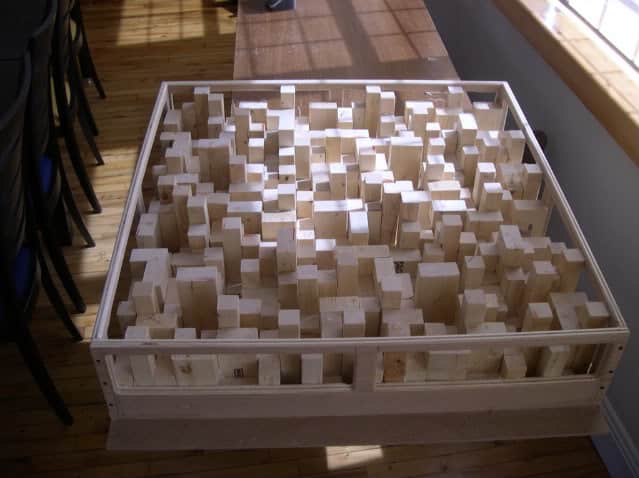
A picture supported discussion on the construction of a 3’x3’ skyline panel array that weighs in at over 100 pounds. The backer board was oversized to provide for mounting to at least 2 studs for carrying the weight. The material and cut list are included for the four 18”x18” to make the larger panel. The plan was to mount it on the back wall 5’ behind the listening area and at ear level for the best diffusion effect.
Staining or painting the wells and towers of the skyline equally and completely was too frustrating. The author decided to build a frame around the array and cover it with acoustic fabric instead. Unfortunately, it then looked like an 8” deep abffuser panel, and all the hard work and artistic aesthetics disappeared.
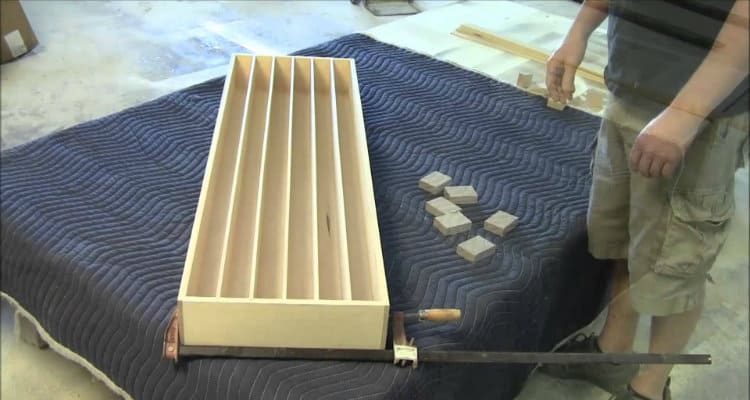
Build this diffuser#15 1D QRD Acoustic Diffusor
A video showing how to build a free-standing 1D quadratic23 diffuser. The diffusers are for a mixing control room which also is used for recording vocals. The room is approximately 9.5-feet by 14.5-feet, so for the best results, they went with a diffuser based on prime number 23. That means 24 wells with a maximum depth of 8”s. The frequency spread is 644Hz to 5152Hz, so not as low on the lower-frequencies as some.
Construction was straight forward, 4 pieces of good wood, 25 spacer strips, and 25 MDF dividers. The extra was just in case something went wrong. The dividers were nailed to the spacers, which were first placed at the correct depth. The finished diffuser was 39” high by 31” wide. The sides extend to form legs, so the diffuser is not only self-supporting but mobile.
in Spanish, but subtitled.
#16 12″x12″ Diffusor Panels
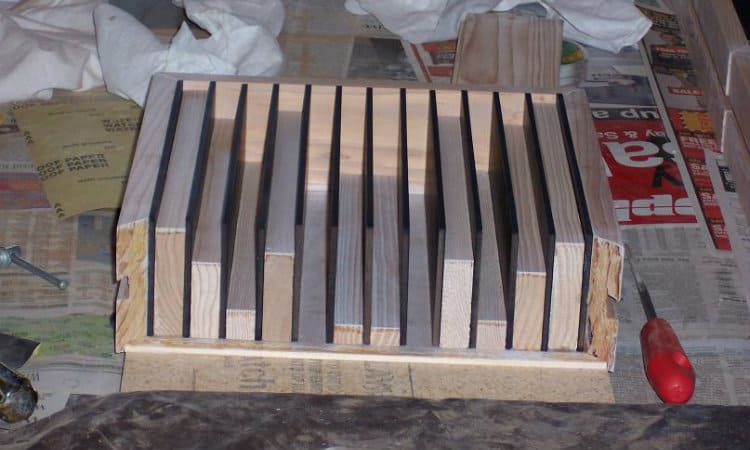
A short guide to building 30 one-foot square quadratic13 diffusers to mounted in an array. The guide includes pictures and the number of pieces needed, but not any measurements. However, it does have a realistic scope on the time and work required to complete the project. The well dividers are hardboard (MDF) painted black, and the frames and well bottoms hemlock. All sanded and exposed surfaces received 2 or more coats of clear finish.
The benefits of diffusion and the improvement of sound within the room are mentioned, but the frequency spectrum isn’t. The finished boxes are an impressive work of art, although a picture of them all together on a wall would have been nice.
Build this diffuserDon’t Have Time to Make Your Own Sound Diffuser?
If you don’t have the time, skills, space or tools to make a diffuser yourself, you can buy one. There are commercially available diffusers that range in price from less than $100 to over $1000. Anything made of foam isn’t a diffuser, it absorbs. Fiberglass or molded plastic products are usually hollow so aren’t effective below 800Hz.
Have a look at these sound diffusers on Amazon:
BXI Sound Diffuser
Weighing only 9.3 pounds, this 2-foot square, the wooden diffuser is less than 3” deep. It is neither a skyline nor QDR, but possibly a combination of the two. It claims to diffuse frequencies in the 410Hz to 24571Hz range, which is really pushing the upper range. The diffuser will redirect sound energy and remove flutter and echo. It mounts on the wall with a picture hanger.
ATS Acoustic Diffuser Panel
A true QDR quadratic7 diffuser manufactured from birch, it is slightly less than 24” square, the maximum well depth is 6”s, and it weighs a hefty 20 pounds. It is an acoustically artistic product that evenly scatters frequencies from 325Hz to 3000Hz. The diffuser is not cheap, so buying more than one is a bit of an ouch, but still cheaper than a chop-saw. The diffuser can be mounted vertically or horizontally depending on what you require, at least 6-feet away from the listener to properly diffuse the returning sound waves.
Acoustic Diffuser Placement
The placement of a diffuser often depends on the manufacturer and on the sound frequencies being scattered. However, they should be mounted off the floor and at ear level for standing or sitting. Having 5 to 6 feet of distance between the listeners’ ear and the diffuser allows for sound waves to scatter and improving listening enjoyment. It will also make the room seem larger.
If you can, mount diffusers overhead between the sound production and listening areas. It will help control the sound distribution and improve the experience. For drums, the diffuser can be placed in front, behind, or to the sides of the drum set to evenly distribute the sound, and help reduce echo flutter and comb filtering.
Related posts:

Hey Eugene ,
Thanks for this article it’s really helpful and interesting!
I wonder if you can help me locate the sweet spot in my room to transform to a mixing room !
Any ideas ? Do I send you dimensions and details ?
Thanks
Hi,
My cat meows loudly and wakes me up in the next room! Any suggestions are welcome. Thx!
Hi Elizabeth,
I will need a little more information. Is the cat in a cage? Is the door closed? Does the noise come through the wall? Can you attach soundproofing materials or drywall to the wall and/or door?
I do not want to make the same suggestions I make to my daughter when her cats annoy her. Being the non-cat person I am.
Terry
Down a rabbit hole. I have just built what will become a mix room 12′ x 18′. I am looking to do homemade diffusers and a friend had mentioned that he had been to a studio where they used pvc pipe cut to different lengths with open ends facing wall as well as a version with the pvc cut in half lengthwise and then either glued together in a wave pattern or in random patterns. Is this something that would work or did someone just come up with what they thought would be like a diffuser? I like the idea but your article mentions some specific measuring and patterns to follow.
I personally have not seen the setup they have so I’m only able to go off what I was told.
Hi Rob,
I guess I am a bit skeptical–specially of the open ended pipe. If you look at everything on Eugene’s post, or even just look at diffusers on Amazon, they are all solid wood or solid PVC. And if you read the post, all of the skyline panels use a certain number of pieces of wood in each row of specific lengths. And the Quadratic diffusers are based on a prime number and consistent depth. So, I guess what I am saying is take a long look at the pipe diffusers before putting in a lot of time and effort. Or better yet, go listen to the music produced using that type of equipment. Then make your decision.
Terry
The pipes are likely to be tuned to a frequency that that part of the room has an issue with and part filled with absorbant material to resonate and absorb that particular note. Josh Clark of get real studios has a fair few of these on his ceiling amongst the foam.
Thank you so incredibly much Eugene! This is the exactly detailed information that I have been looking for over many years now. Your detailed information lists very informative videos and links to more important information for building many different types of diffusers which I probably would have never learned of without your assistance. Thank You Again!- Chris