
A friend emailed to see if I had any plans for a DIY Bass Trap. I knew what he meant but told him a fishing rod, and fat worm on a hook work fine. He laughed, and then explained that he had a low-frequency ringing sound that was interfering with his work.
Bass sounds are low-frequency long wavelengths. They bounce off flat surfaces and ricochet around a room creating an irritating ringing. Bass traps help remove the ringing, control the bass and enhance the other frequency sounds. They improve the listening enjoyment and mixing and recording of your own music.
Bass frequencies are the most difficult to keep from passing through walls and annoying the neighbors, or the spouse, or you–if the sound is seeping into your quiet space. For more on controlling low frequency noise, please see our articles How to Keep Bass From Going Through Walls and How to Block Out Low Frequency Noise.
Best Material for Bass Traps
Low-frequency sound bounces of hard flat surfaces and creates a ringing as it goes from surface to surface. To control the low-frequency noise, you need a densely packed material to absorb or trap the frequency. The thicker and denser the fiber, the less the air particles within it can move.
To help control the reverb and ringing, fiberglass and mineral wool bass traps are both excellent sound insulation products. They are also fireproof and help contain the heat generated as the captured soundwaves convert to heat. The thicker the insulation, the greater its density, and the more it will absorb. Corning fiberglass 705 is rated at 6 pounds per cubic foot (pcf). Acoustic foam is less than 2 pcf.
and 705 will absorb twice as much low-frequency as a foam of the same thickness. The 2’x4’ rigid panels come in 1” to 4” thicknesses, so they are an effective choice for DIY bass traps. An inch thickness of 703 will control frequencies down to 500 Hz, two inches cut that in half, to 250 Hz. At 125 Hz, 705 absorbs (0.16NRC) about the same low frequency as 703 (0.17NRC).
Roxul Safe’N’Sound is 3” thick and has a density of 2.5 pcf and at 125 Hz has an NRC of 0.52. The 2” thick has a density of 8 pcf but is only rated at 0,43NRC. Inch for inch the Roxul will absorb more low range frequency. However, both products work well in DIY Traps.
How Thick Do Bass Traps Need to Be?
The optimal thickness for bass traps is 6-inches. Rigid insulation works best as it won’t slump. Make sure to configure it, so it fits across the corner. The airspace behind the insulation will help absorb or trap lower bass frequencies.
18 Ideas on How to Make DIY Bass Traps That Work
1. Dedicated Theater Design and Construction
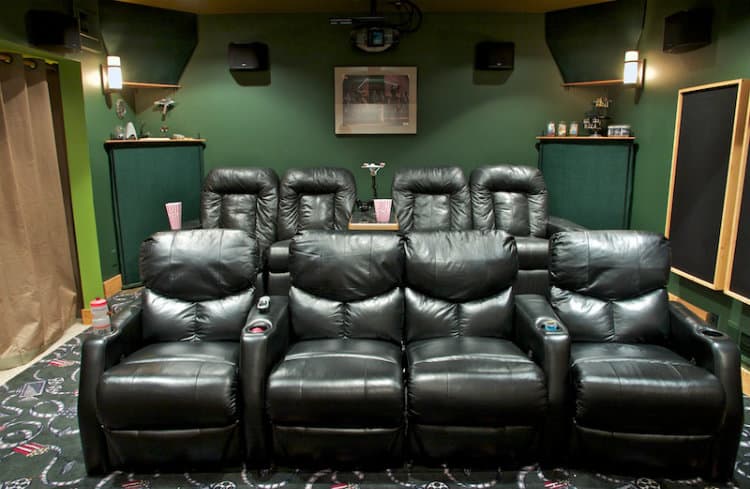
A unique way of making corner traps using threaded rod to separate the top and bottom plywood triangles of a bass trap. The fluffy pink insulation was cut into triangles to layer fit between the two wooden pieces. The fiberglass was wrapped in a length of breathable cloth and then inserted into the frame.
This is a Forum thread starter on how to control the sound in a dedicated home theater. It is a discussion about constructing multiple wall, ceiling, and corner bass traps and diffusers, their placement, and the materials used. Traps are all DIY and can be repositioned to adjust to new equipment and speaker placement. It also includes testing results.
Build these traps
2. Building the Studio Tips “Super Chunk” Corner Bass Traps
Used 2” thick 2’x4’ mineral wool panels to make their bass traps. Cut the panels into 2-foot squares, which were then cut corner diagonally to corner to get 4 triangles per panel. Cut enough to do each corner from the floor to the ceiling.
To cover the ends of the fiberglass, they made a frame with 2”x2” lumber which was then covered with burlap. The traps cost about $25 each and were finished in a color that complemented the control room.
The added depth of the insulation helped to reduce the low-frequency reverb further. It absorbed lower waves to decrease ring and flutter, and flatten the bass response. The new traps greatly improved the sound in the studio. The writer includes before and after Db meter results for comparison purposes.
Build these traps
3. DIY Corner Bass Traps
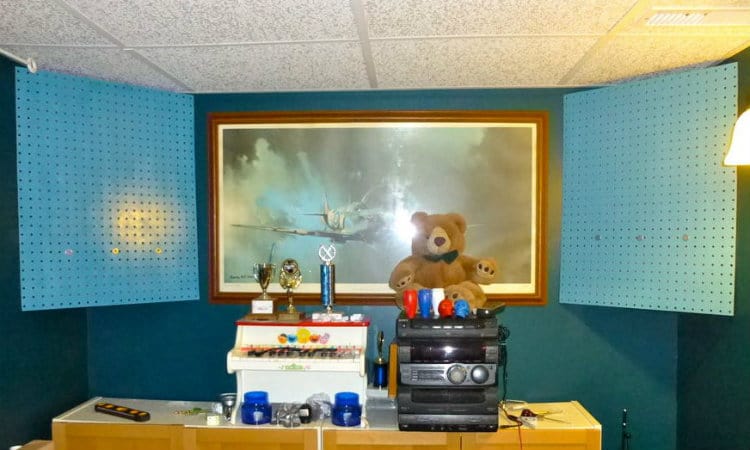
The author explains that bass traps have plywood fronts which transition low range frequency sound energy into vibrational energy on contact. The hard surface would also reflect higher sound frequencies, preventing the deadening of sound. The initial plan was to hinge the plywood face, so it could be opened to absorb more mid to high frequencies when needed.
Build a corner bass trap that is suspended on the wall, 3-feet off the floor. Cut mineral insulation into triangles that stack on a triangular piece of plywood. The insulation goes all the way to the ceiling. Two 1×3 strips across the face of the insulation were used to attach the face cover.
To maximize sound control, they use pegboard instead of solid plywood. This modification turned the corner bass trap into a combination bass trap and a broadband absorber. The pegboard can be painted or covered with fabric to suit your color scheme.
Build these traps
4. DIY Corner Bass Traps in 12 Steps
The bass traps are triangular prisms made to fit in the corners. Made with 1/2” plywood triangles for the top and bottom, held together with glue and brads. Instead of rigid insulation to absorb the sound waves, loose cellulose was used to fill the prism. A plastic mesh was used to prevent the insulation from getting loose.
To control the low-frequency ringing made 8 triangular based prism corner bass traps. By stacking two on top of each other in each corner for a floor to ceiling coverage, the low-frequency ring was modulated. Much less expensive than buying pre-made.
To finish the traps off, stretchy sweatpant fabric was pulled tight over the frames and stapled into place. The tops and bottoms were also finished in the fabric. The traps were inexpensive, the color customized to suit, and they improved the sound in their mixing/control room.
Build these traps
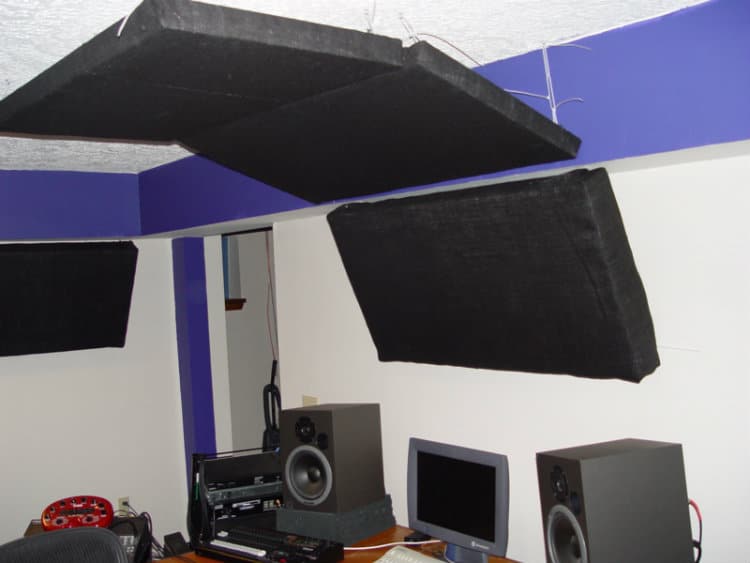
5. How to Build Cost-Effective Bass Traps
Home studios or recording – control rooms don’t have to be perfect. The idea is to control the highs and lows and to create an environment where good sound is easy to achieve. Using bass traps is key to improving sound control.
The write makes 2’x4’ panels using two layers of 2-inch thick fiberglass (OC-703). A frame is made using 1”x2” pine for the fiberglass to sit on. Breathable fabric is wrapped over the rigid panels and stapled to the pine. The cover can be any color that works in your space.
Two bass traps should be stacked in the corner to make a floor to ceiling trap for low range sound. The two corners opposite where the sound is being produced should have traps. This format can also be used where walls and ceilings meet to further control reverb in the room.
Build this bass trap
6. DIY Corner Bass Trap
Inexpensive bass trap construction using a quarter sheet of plywood to form the top and bottom of two separate traps. Cut the 2’x4’ piece of plywood in half, cut each half diagonally in half, and the hard part is done. Attach L-brackets near the corners to attach 1”x2” furring strips. The author cut the strips so they would form 4-foot tall traps which could be stacked or used in separate corners.
Triangles of “fluffy” insulation, not rigid, were cut and stacked to fill the 4-foot space. The face was wrapped with a heavy craft paper which was stapled to the vertical 1”x2”. The paper was an effort to permit some mid-range frequencies to be reflected. Cover with light fabric to allow low-frequency sound to penetrate the fiberglass and be trapped.
Build these traps
7. DIY Bass Traps Made Easy
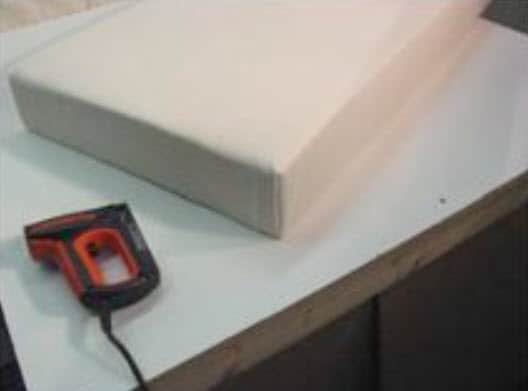
Create a 2’x4’ frame using 1”x2” strapping, and reinforce the corners. Cover it with canvas, felt, or acoustic fabric; pull tight on the frame and staple into place. The fabric side becomes the back of the trap, and the wooden frame allows for airspace behind the trap, it also makes it easier to mount to a surface.
Use 2’x4’ rigid insulation panels that do not have foil or paper bonded to them. Two thicknesses provide 4-inches of depth. Lay the insulation onto desired fabric cover, place the frame over the top, and stretch the fabric up and staple it to the frame.
The frame can be hung in a corner, on a wall, or even suspended from the ceiling. The trap absorbs low-frequency sound and reduces the ring and reverberation within a room.
Build these traps
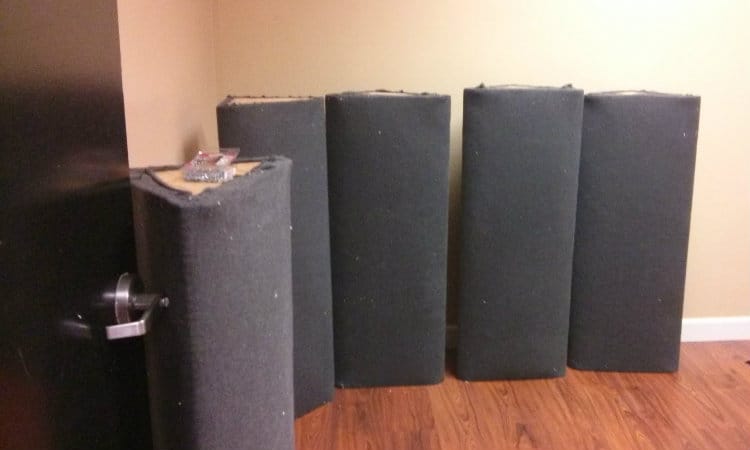
8. DIY Acoustic Panels: SuperChunk Bass Traps
Make 8-foot tall corner bass traps using three 3/8” plywood triangles and three 2”x2” vertical support structures. The third plywood triangle is a middle support. Cut triangles of 3”x2’x4’ Safe’n’Sound – one piece provides 24” of fill. 6-inch thick insulation will do 4-feet of vertical height per slab.
Fill the frames with slabs of insulation, trying not to compact it too much. Cover the whole trap with acoustic or breathable fabric; select a color to complement the room. The two bass trap towers were inexpensive and easy to make in less than a weekend. Place them in the corners opposite the speakers or drums to capture low-frequency chatter and ringing.
Build these traps
9. DIY: How to Make Bass Traps

Make a 4-foot tall curve fronted corner bass trap. Plywood made the top, middle, and bottom, while 1”x4” pine became the frame. The cavity was loosely filled with two vertical layers of pink R-13 insulation to trap low wave sound; used the R-13 as it was left over, so free.
The front face was covered with a 2’x4’ piece of hardboard which was screwed to the plywood and two vertical supports to maintain the curve. Double sided tape was used to attach the corrugated acoustic foam to the hardboard to finish it off. The foam was also leftover, so cost was kept at a minimum.
Four traps can be used in four corners, or stacked to provide floor to ceiling coverage opposite the sound generation. The traps effectively cut the standing waves and reduce reflection too.
Make these bass traps
10. DIY Tube Traps
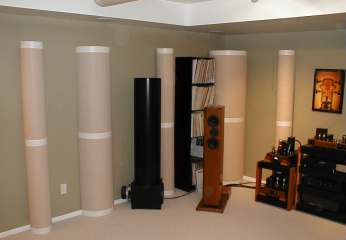
DIY traps improve sound clarity, and pressure zone tube-shaped traps are light-weight and add to the acoustic dynamics of a sound room. The tubes are preformed compact fiberglass industrial pipe wrap. They’re available in 36” lengths, and the author recommends using the 1” thick product. The pipe wrap can be ordered for different diameters.
The top and bottom of the tube traps are covered with plywood or particle board cut to match the outside diameter of the tube. Remove the factory installed wrap on the tube, and use a 2 mil poly or fabric to cover instead. Construction adhesive will hold the plywood top and bottom, and the poly or fabric can be stapled to the wood.
The tubes can be placed in a corner, stacked, or suspended. The high range frequencies are reflected, and low range trapped. Due to the hollow core, double the low-frequency is captured – once on the way in, and on the way out.
Build these traps
11. Bass Trap Project

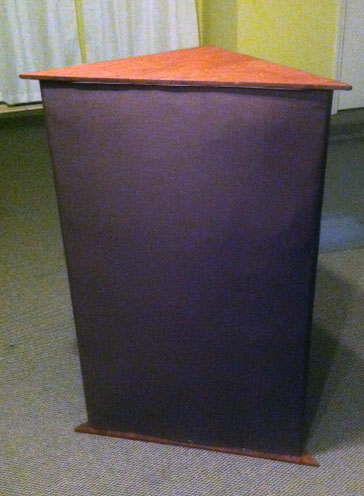
The author shows how to build an elaborate and elegant solution to low-frequency sound control. As with all floor to ceiling corner traps, this is angled to fit the corner. However, it doesn’t fill the corner but leaves a space between it and the corner.
Oak slats, angle cut at both ends for a diagonal cross-corner fit, were stained and attached perpendicular to 2 black painted 8-foot metal rails. Black automobile carpet was fitted between the metal rails, so the fabric side was visible between the slats. Rockwool insulation was laid down on top of the carpet backing between the rails and angled at the edges to fit the corners better. Sofa lining fabric covered the insulation and was stretched and tacked down, then further secured with thin rope.
The author constructed four for about $900US. The before and after results between 20Hz and 200Hz for bass reverberation in the studio look impressive.
Build this bass trap
12. How to Do It Yourself Bass Traps
A video explaining how to construct 2’x4’ bass traps that can be mounted or hung in the corners or a studio. The 4-inch thick panels leave airspace behind them between the back and corner helping to reduce low-frequency noise further.Each panel uses two 2’x4’ panels of 703 rigid insulation to trap low waves, 1’x4’ pine boards for framing, and breathable fabric to cover it all in. Build the frames, then lay it on the cloth, pull it tight and staple, so the frame is covered. Lay two fiberglass panels inside the frame, trim if necessary, and cover the back with fabric. Use eye hooks on the back or top to hang in the corners.
The same panel structure can be attached to the ceiling–wall corners too, or flat on the walls to absorb mid-range frequencies.
13. DIY Bass Trap: Home Studio Room Acoustics
A step-by-step video of how to build 2-foot tall stackable corner traps for a home studio. It provides a more modular approach to sound control. Traps use 3”x2’x4’ Safe’n’Sound stone wool, 1/4” plywood, 1/2” thick MDF, 2”x2” strips, plus fleece fabric.The plywood and MDF are cut into isosceles triangles with two 2-foot sides. Rip the 2”x2” to form triangular prisms too. Cut them into 2-foot lengths. Attach them with screws to the corners of the MDF base, and plywood top. Cut the insulation into matching sized triangles and slide them as layers between the top and bottom boards. Only covers the front only with fleece, or another breathable fabric, secured to the wood with staples.
14. Mixing Studio Build – How to Build a Membrane Bass Trap
A complex build using vibrational metal lined rubber membranes within a double layer of insulation to control low and upper-frequency noise. These are more a built-in than an add-on bass and reverb trap for a serious sound studio.Build 8-inch deep floor to ceiling pine frames on sides and back of the studio. A 1”x2” spacer frame was inserted and screwed in 3-inches from the back. Fill the frames behind the spacer with insulation. Staple a breathable fabric to the 1”x2” spacer to hold the insulation in place. An inch out from the fabric, a metal frame holding the membrane was mounted.
The membrane was made of 2 matching pieces of EPDM rubber with steel sandwiched in between. Contact type glue was used to hold a steel sheet fixed to the membrane, so it floats within the frame. Varying thicknesses of sheet metal were used in different traps to interact with different frequencies of sound.
Another 1”x2” frame was mounted an inch out from the membrane frame, fabric stretched and stapled to it, and another layer of R13 put into the trap frame. A layer of Dacron was tacked into the sides of the frame to cover the insulation. To finish off the traps a layer of breathable fabric was stretched and stapled to the face of the frame.
15. How to Make a Super Simple Diffuser with Bass Trapping

An explanation on how to make a bass trap – curve faced diffuser combination from a 4-inch thick 2’x4’ trap. Construct a bass trap using 4” of rigid 2’x4’ (could be two layers of 2”) insulation on a plywood backer board. Cut a separate piece of ¼” MDF or Masonite 2’x4’. Across the middle, so it divides the thin sheet into two equal 2’x2’ sections, staple, screw or nail a 1”x4”x2’ plank. Lay the ¼” thick panel on top of the insulation, so the 1”x4” is against the insulation.
The author uses an inexpensive breathable fabric to cover the whole trap. However, staple the material to the back of the top of the plywood sheet first. Once the wooden piece is on top of the insulation, push the end down, so it touches the insulation. Pull the material tight along the sides as you work to the opposite or lower end, stapling it tight to hold the MDF sheet curved. Stretch the cloth tight, so both ends of the MDF touch the insulation and the middle is held out by the 1”x4”. The finished product is a bass trap with a curve faced diffuser.
The base trap absorbs or traps the low frequencies, and the hard convex face reflects and scatters high frequencies, so they don’t bounce back in a straight line.
Build these traps
16. Corner Bass Trap DIY – With Lots of Pictures!
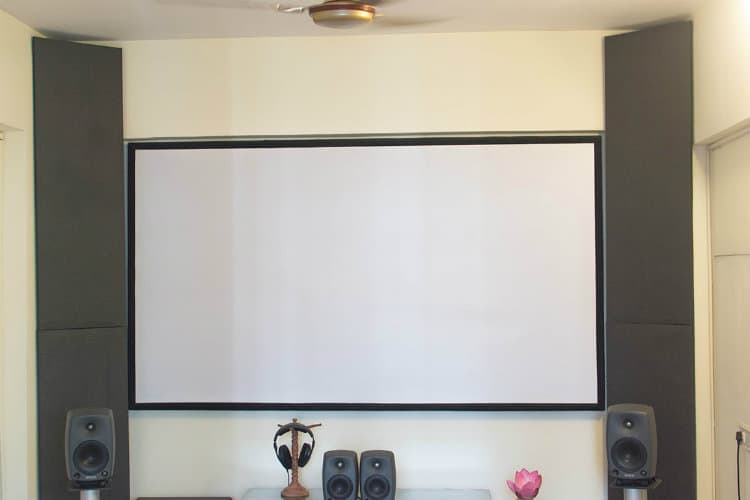
To make custom corner bass traps using 5/8” plywood for the top and bottom, and ¾” aluminum angle frame for the corner supports. For ease of handling, the two floor-to-ceiling traps were done in two 4-foot sections each. 4” Rockwool slabs were cut into triangles to fill the traps. The traps were sized to fit the space on either side of a projector screen (18.3”) in a media room.
The traps were wrapped in thin breathable cloth to hold in any loose fibers. A heavier, more professional looking fabric was then used to cover the traps. Test results are promised, but not available at this writing.
Make these traps17. DIY “Superchunk” Corner Bass Traps

A different take on creating a “floating” corner bass trap. Used 1”x2” pine to make 3-sided corner supports (skeleton frames) attached to the corner walls at 2-foot intervals for floor-to-ceiling coverage. The bottom support was just above the baseboard height. A triangle of OSB was attached to the base frame.
A breathable canvas was stretched and stapled to the skeletons to provide support for the insulation. Using wood dividers would create chambers that can affect performance. R-19 fluffy insulation was cut into triangles and placed onto each shelf to fill the cavities. A strip of Velcro was stapled to the face of the top, bottom, and middle frames to hold the cover in place. A 1”x2” frame was constructed and fabric stretched over it. Velcro was stapled to the back of the frame, and the cover pushed into place.
Build these traps
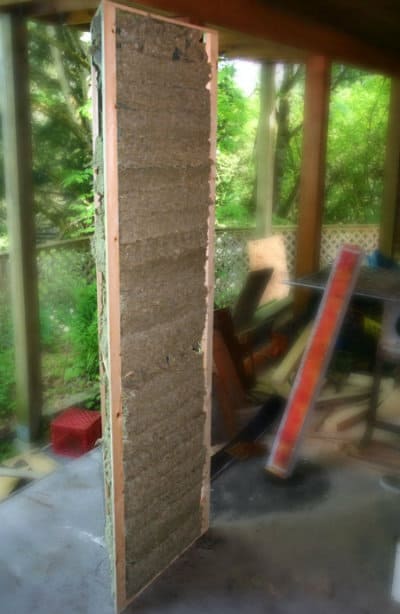
18. Do It Yourself Corner Bass Traps: Work In Progress
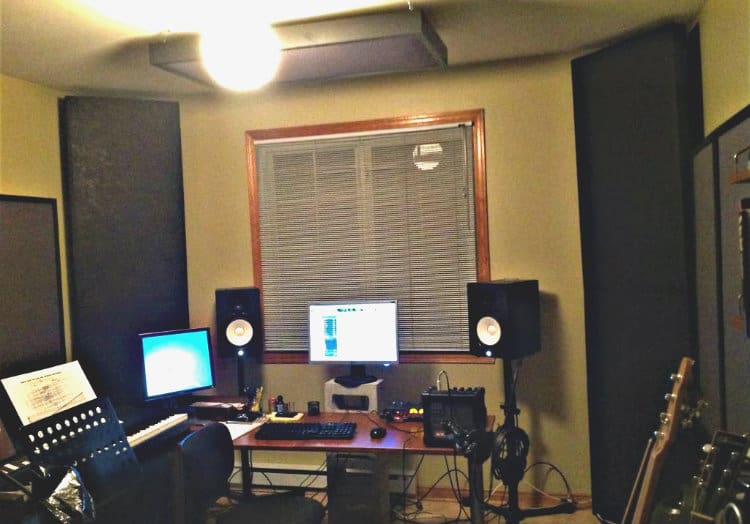
A modified approach to the corner bass trap using two sheets of 2” thick foil backed O/C 703 vertically with triangles of Roxul Safe’n’Sound to fill in the triangular gap behind. The plywood triangles for the top and bottom were trimmed so a 1”x4” plank could form the sides of the 2’x4’ front. The back was supported with a 2”x2”.
Eight traps were made for floor-to-ceiling coverage in the four corners. Each 4-foot section was covered with a breathable polypropylene fabric, pulled tight and stapled into place. Two were stacked in each corner of the studio. The traps did away with the chatter in the room and tightened up the bass sound. It also made the mid and high frequencies clearer.
There are several sections to the post, make sure you read it all.
Build these traps
Don’t Have Time to Make Your Own Bass Traps?
If you don’t have the time or the space to make bass traps, and you don’t have a relative who could help you out, don’t put up with that ringing, echo, and chatter. Here are a few ready-made products you can find online or possibly at a local acoustic store.
Best Corner Bass Traps
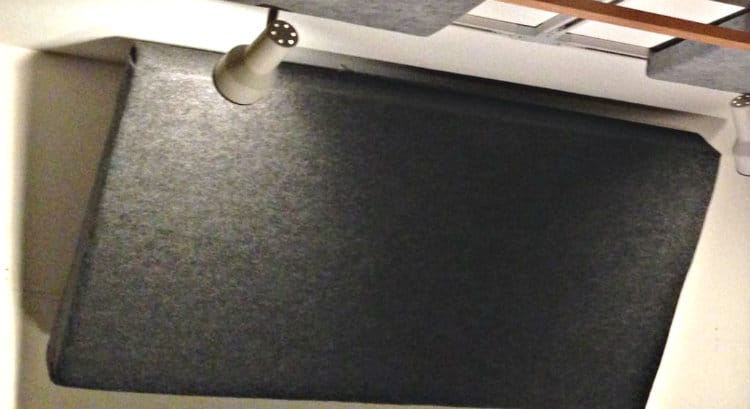
Foamily Acoustic Foam Bass Trap
A 4 pack of 12”x7”x7” (larger are available) made of soft, low-density foam professionally designed to reduce low and mid-frequency echo and reverb. They can be adhered to vertical or horizontal corners opposite speakers or mikes to absorb or deflect waves that cause unwanted noise and chatter.
The traps can be used in media rooms, mixing rooms used for webinars, videos, or podcasts, or in other rooms to decrease unwanted background sound from HVAC or other appliances. The foam traps are a good quality product that soaks up room reflection, for an affordable price. The foam trap is only available in charcoal gray.
LENRD Acoustic Absorption Bass Traps from Auralex Acoustics
A corner bass trap engineered to reduce low and mid-range frequency bump and ringing. LENRD stands for Low End Node Reduction Device. Available in four packs of 24”x12”x12” sections, and other sizes, made of soft mid-density foam they absorb mid-range and help to smooth and redirect the low-range.
The traps can be mounted in room corners or between ceiling and wall to help address low wave reverberation down to 63Hz. The traps are also available on stands so they can be moved out from the corners to interrupt the long wave chatter further. The traps are available in dark gray foam.
ATS Acoustics Corner Bass Trap
A large format corner trap, it is 4-feet tall, is 13”x13”x 24”, and weighs only 40 pounds. It has an absorbing face of 24-inches, and 6pcf mineral wool is fully wrapped in your choice of 37 colors of textured fabric, or you can provide your own choice. The wood base and frame are supported by a wooden skeleton frame providing protection and durability.
The traps can be stacked or mounted in corners to reduce reverberation and reflection to improve sound and listening enjoyment. They can be used in home theaters or studios, or larger sites to reduce low-frequency bounce.
Acepunch Triangle Corner Bass Absorber
Soft, low-density foam corner trap that can be attached to wall or ceiling corners. It is available in purple or black. The traps are designed to maximize surface area to control and absorb low and mid-frequency sound feedback. They are available in four, eight, or twelve packs of 9.8”x11.8”x11.8”, or larger sizes.
The shape is designed to dampen low-frequency reverb, echo, and flutter in home theaters or small studios. The foam used doesn’t off-gas and produce noxious smells that can make a small space uninhabitable. The light-weight traps are easy to secure wherever needed to improve the recording or listening experience.
Flat Panel Bass Traps
Auralex SonoLite Acoustic Absorption Panel
Acoustic panels are 3-inch thick 2’x2’ foam on a solid back and wrapped in black or tan velour. They can be mounted in corners to absorb low-range bounce and ringing and reduce bass build-up. The edges are angled so they will fit easier into corners, and even include easy stick tabs for securing them.
SonoLite is also available in 1-inch thick 2’x2’ panels for use on flat walls or ceilings. They are available in ten different colors, including the tan and black to match their corner models. Both products can be used in residential studios or theaters, or professional operations.
Tri-Corner Traps (Ceiling Corner Traps)
Primacoustic Cumulus Broadband Ceiling Corner Trap
Tri-corner traps are placed where the wall corners meet the ceiling and sound often gathers to produce disruptive noise. The traps are made of high-density 6 pcf fiberglass. The faces are bonded to a micro-mesh material and the edges hardened with resin for durability. The whole product is then covered a breathable fabric. The light-weight 2.5-pound trap has a spring-loaded clamp for easy and invisible mounting.
The traps absorb broadband down to 100Hz and are effective lower mid-range moderators between 200Hz and 300Hz. The tri-corner offers a potential solution for home or professional studios to curb distortion and standing waves. They are available in tan, light gray, and charcoal cloth finishes.
Conclusion
If you’re finding that low-frequency build-up is interfering with your work or listening enjoyment, hopefully, one of the DIY or prefab solutions provide you with a fix. They all work to control and reduce noise interference and can be adapted to different room sizes or configurations.
If you need to do some reflection, go on down to your favorite fishing hole and toss a hook in. Don’t forget to let us know what kind of bass trap brings you the most enjoyment. If you know someone who could benefit from this article, pass it along.
Related posts:

I hope to set up my studio in the next couple of months here in Uganda. To minimise costs, I intend to do much of the actual design and setup work myself so I’ve been doing a hell of a lot of research. One thing, though, that’s really giving me such a headache is grasping the concept of acoustic treatment, and, specifically, this whole thing about bass traps. I think this is so far the most helpful article I’ve come across, on the subject. Very simple written and absolutely easy to understand. Most I’ve read have been quite technical and kinda complicated for a novice like me. I definitely will use this when I start work on my studio. Thanks a lot. This is a nice piece of work!
I have a 11×10 sq ft room. Can you tell me how to treat this small and almost square room?
I have to combine any soundproofing with the family’s panther. Well, cat really- Big cat with a lot of energy. There is nothing in this world that he won’t instantly try to climb, scratch and chew on. The soundproofing we did have on the wall – wooden frame + blankets – was loved to death within two weeks when our beloved boy arrived. I would love to hang up cool canvas pictures covering sound proofing. But let’s be realistic. This cat can jump from floor to ceiling, and will – no matter our opinions.
So – cat-proofed soundproofing?
Is rope made from cotton, sisal, etc an alternative? Maybe by gluing rope on cork?
I’d be very grateful for any tips. Cheers!