
The mind-numbing commute during the daily grind is stressful as it is, and when you add road noise into the mix, it’s impossible not to get a splitting headache. I mean, who wants to cruise down the road fully immersed in blaring car horns and roaring engines? I certainly don’t.
You can deaden the outside noise with car soundproofing materials for your doors, the engine bay, your trunk, the floor, the roof, and other parts of the vehicle. Some of the materials may have pretty hefty price tags, but they don’t really cost an arm and a leg—some budget options are good enough for you to get by. You don’t really have to break the bank just to get some peace of mind on the road.
1. Soundproofing the floor
With the many ways to soundproof your car, it’s important to keep in mind that different methods will work for different models. Factors will also include how you use your car on a regular basis, so you should be patient enough to try out a bunch of different methods to see which ones work best for you.
Your car’s floor is the most important section of the car to soundproof. You have to make sure that you deaden the outside noise with materials that absorb sound. Most of the noise from the outside actually enters your car through the undercarriage mainly because the floor of your car isn’t as thick as can be. The floor is also closest to the ground, to put things simply. In order to minimize the noise entering from the undercarriage, you need some extra padding under the floor mat.
Before you think that you can get away with the stock floor mats since they do pretty much everything anyway (they protect your carpeting, collect dirt, and add visual aesthetics to your car), remember that floor damping mats are specialized for soundproofing. They absorb sound since they’re made from thicker and more durable materials, so it’s still best to rely on them for soundproofing rather than on your regular car mat.
In terms of the brand, one of the most popular picks for car owners is Dynamat. Made from quality butyl rubber, these products usually have an extra layer of foil constraint and feature an adhesive material on one side to secure the mat firmly in place. They’re very easy to install, but depending on your car, the mats may be pre-cut and ready for use or may need to be cut to size before installation. Basically, you install the damping mat then top it off with your regular floor mat.
If you’re concerned about your budget, the harsh truth is that the damping floor mat will likely be more costly than your soundproofing materials for other parts of the car. Remember: the floor of your car is a huge surface area (plus, they’re near your tires), so you really need to invest in soundproofing it if you want to cut down on all the chaotic earsore from the outside.

Dynamat sound deadeners can be pretty expensive for a reason—they get the job done, and they get it done right. They can cost a pretty penny, but you can slash a good chunk off the price tag by going for asphaltic-based panels rather than stryene-butyadine rubber. They do a good job of reducing vibrations as well for a more comfortable ride. There are plenty of alternatives from Fatmat and Noico brands, and your wallet will definitely thank you for it if you do decide to go with these options.
For a comparison of automotive floor soundproofing products, please see our article Kilmat vs Noico vs Dynamat vs Hushmat.
The thing about asphalt-based deadeners though is that they tend to melt in very warm temperatures. You have to check ideal weather conditions in your area or in your destination before you pick your brand. Otherwise, melted asphalt-based mats will lead to foul smells and a general mess inside your car.
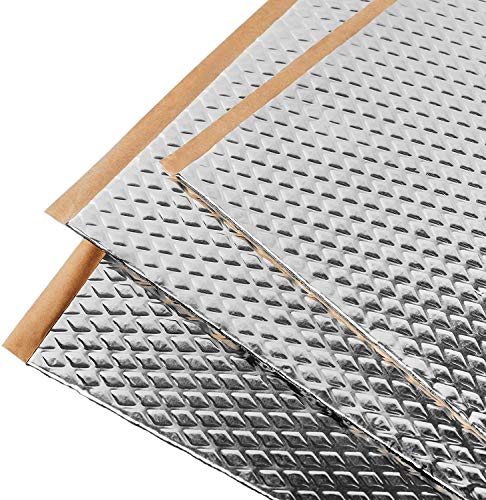
For instance, the Noico 80 mil 36 sqft Car Sound Deadening Mat is a budget-friendly alternative to soundproofing the floor of your car. With an 80-millimeter thickness and an aluminum coating, the mat is easy to install with self-adhesive features. It also has a special insulation indicator to help you figure out if the installation was done successfully or not for the ultimate fool-proof application. After you install this though, it may give off a strong rubber smell that can be a turn-off for some users, so you have to be able to stomach that smell for a while before it fully dissipates.

Another alternative is the FatMat Self-Adhesive Rattletrap Sound Deadener Bulk Pack with Install Kit. From the name itself, you can see that it’s a complete installation kit and it comes at an affordable price. It also has an 80-millimeter thickness. You can cut it to size easily since it comes in a roll form, but it can be a little bit challenging to install since you need to apply pressure to the mat to keep the adhesive from peeling off. Users have also complained that the adhesive loses its hold when temperatures start to rise.
Once you’ve picked your brand, install the mat on the area directly under the driver’s feet. Do the same for the passenger side as these are the sections where a majority of the din from the outside comes from (they’re closer to the engine, too). You can also apply them to the back seat if you can spare some extra change to reduce noise from the muffler, especially for older car models. Be sure to make accurate measurements for each side—you definitely wouldn’t want to buy the best dampening floor mat only to end up with awkward sizes when it’s time to install them in your vehicle.
Now, there’s also such a thing as soundproof mats that have reflective insulation. These mass loaded vinyl (MLV) noise barriers applied underneath the soundproof foam mat can block out noise one level higher—plus, they also add thermal insulation to your car. If you do everything right, your mats can help cut down on annoying road noise by a whopping 9 to 18 dB.
To further reduce the transmission of sound in your car, you can also use sound deadening sprays and apply them to hard surfaces. Easy to install especially when it comes to hard-to-reach areas, these rubberized coatings are basically the liquid versions of the MLV from the mats. You can apply it on the undercarriage of your car, or practically on any interior surface. They can withstand high temperatures, so you can install them in the engine compartments as well.
With a sound deadening spray, you can reduce the transfer of sound through surface vibrations. Remember that the spray will add more mass to the surface you apply it on to make it thicker and heavier to reduce the vibrations, so use it wisely. Always keep your car’s weight in mind.
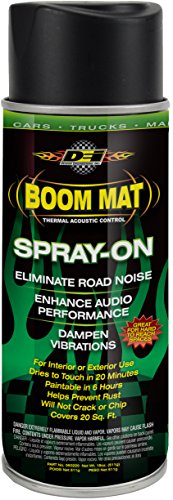
For instance, the Design Engineering Boom Mat Spray-on Sound Deadening Spray helps reduce noise and vibration as well as keeps the heat out for especially hot days under the summer sun. The thermal barrier should work up to a whopping 300 degrees Fahrenheit, so you can apply it to engine compartments, too. A whole can should last you about 20 sq. ft., and you can do double coats to increase the sound deadening features to your desired level. Again though, it can emit a pretty foul smell after installation, so you should air it out after you apply it.

2. Soundproofing the engine bay
Especially true for vehicles that run on diesel, the actual chaos from the outside will most probably come from your engine. You can apply deadening mats under the bonnet of your car using adhesive backings. Make sure that you measure under the hood before installation.
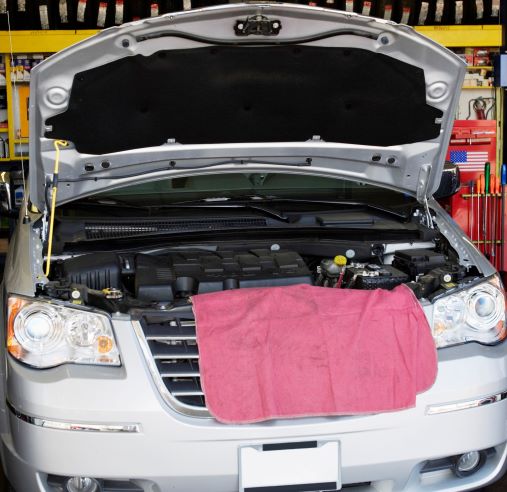
Before you apply the mat, clean the surface thoroughly first to get rid of any oil and grease. The debris will keep the adhesive from properly sticking to the area. You should also make sure that your mat is made from heat-resistant and tear-resistant material; plus points if it comes with an aluminum coating to avoid any grease and oil spills from transferring all over the place.
Car soundproofing materials for engines will feature acoustic foam mats that absorb the noise, usually with easy-to-apply peel-and-stick adhesives you can apply in your hood as needed. Again, make sure that you measure the dimensions correctly before you buy anything.
3. Soundproofing the doors and windows
Lots of noise from the outside can be reduced simply by insulating your doors. Depending on the model of your car, there will be all sorts of sizes for insulation. Different cars will also have different levels of built-in insulation, if any. Sound damping materials for your car doors will normally have peel-and-stick backing to make installation a complete no-brainer.
Before you apply the insulation, first turn to the interior of your car door and remove the screws (don’t misplace these since you’ll need to put them back in later!). Measure the space here properly, then make sure that you cut the insulation to size. Cover the interior of the door as best as you can, but make sure that you steer clear of the mechanisms inside the door itself. You definitely wouldn’t want to obstruct any of the mechanisms inside and end up with malfunctioning locks and window controls. Your car door will likely have parts that will easily pop off, so if something doesn’t give, don’t use brute force to pry everything off. Check your owner’s manual to know the right places to tinker around with.
Once everything is in its place and you’re good to go, reattach the interior panels and make sure that you secure the screws (you don’t want to end up with more rattling noises just because a screw is loose).
By the way, here’s something that I find really useful every time I try to DIY stuff with my car: before you touch anything, take photos from every angle. This will help you remember exactly where things should go when you’re putting things back in. Even if you think you’re Mr. Fix-it, there will always be an annoying screw or random small part that might get misplaced somewhere along the way. I can’t tell you how many times I wanted to rip my hair out in frustration because of a wayward screw. Your photos will save the day!
As for the windows, remember that the noise from outside can easily sneak into your car through the tiniest gaps or the smallest cracks around the edges. You can seal those pesky gaps with adhesives, but only if you’re willing to sacrifice the aesthetics of your windows for it. The adhesives can be eyesores, but they get the job done. If you’re looking for something that’s more aesthetically pleasing, you can opt for aluminum foil-backed EPE foam insulation to apply to the gaps around your windows.
For any worn-out weatherstripping that happens over time (this is regular wear and tear that you just can’t avoid), you need to install new rubber seals. As the seals of your door lose their original shape due to repeated pressure and impact, they start to lose their effectiveness as well. Here’s where sound and air can leak inside your car. If you notice rips, tears, or any kind of damage due to excess wear to the weatherstripping of your door, you can apply a second seal that’s larger than the original, or simply replace it altogether.
4. Soundproofing the roof
The roof of the car has extremely minimal insulation if any. You can reduce wind noise specifically with proper roof insulation for a smoother and quieter ride. Good roof insulation also keeps the scorching heat of the sizzling summer sun out of your car, so those two-hour drives down hot asphalt can be a breeze.
First, you need to remove the cloth headliner of the roof. Do this with extreme caution—you will need to reapply the material again after you apply the insulating material. Second, get the precise dimensions of the roof and cut your materials to size.
Afterward, make sure that you clean the surface thoroughly to get rid of any debris. Removing all the dirt will let the material stick better. Then, apply the insulation, and reapply the cloth headliner.
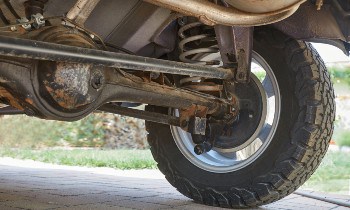
5. Soundproofing the tires
Since your tires are the part that actually touch the ground, they contribute a huge amount to the overall noise that penetrates inside your vehicle. All of the pebbles, the dirt, the debris, and the vibrations from the road can add to the noise, so the solution is simple: quiet the tires, and you quiet the car.
See our review of the quietest tire brands.
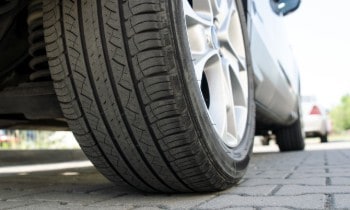
There are other factors that contribute to the noise level of your tires. Low-profile tires, while super cool to look at, do little for sound insulation. The more rubber there is, the better, and low-profile tires mean that there is less rubber between your car and the wheel metal.
Because the rubber helps to absorb sound from the outside, more cushioning is equal to lesser vibrations from the road. The same concept can be applied when it comes to the width of the tires, as more contact with the road means more vibrations as well. Narrower wheels do a better job at sound insulation than thicker ones. However, before you decide to thin out your tires, make sure that you consult your owner’s manual to check for safety precautions regarding tire width.
Reputable manufacturers will also provide you with a tire noise rating for reference. If your manufacturer has a decibel rating, remember that lower decibel ratings insulate sound better. The three-wave symbol rating, on the other hand, gives you a single line indication for minimal noise and a three wave indication for poor noise insulation.
Other factors concerning your tires include driving speeds, driving style, tire balance and rotation, and tire filling. Tires that carry heavy loads will be noisier, while underinflated tires reduce gas mileage and make more noise as well. For every 5,000-6,000 miles traveled, make sure that you have your tires rotated to ensure optimum performance with every ride.
Why should you soundproof your car in the first place?
A peaceful driving experience guarantees a stress-free commute—or a really good way to start your day, at the very least. You can bop your head to your favorite tunes without any interruptions, and you keep from disturbing other motorists with your taste in music too (because what if they’re not fans of dubstep or Beyonce? Nobody has to know).
A properly soundproofed car is also a huge plus when you’re enjoying someone else’s company inside your car. Without the road noise from outside, you can enjoy a pleasant conversation free from annoying distractions from any impatient motorists honking their horns for dear life.
You can not only concentrate on driving, but you can also get to your destination with a better, happier, and healthier outlook. After all, outside noise only ups your fatigue and exhaustion levels throughout the day, so getting rid of the noise altogether is guaranteed to make you a happy camper out on the street.
On the flipside, good car soundproofing also keeps any sound from the inside from getting out, preventing any nosy bystanders from prying into your personal life. Privacy is important, and you wouldn’t want eavesdroppers who are up to no good to be privy to any confidential information.
That said, it’s important to set realistic expectations when you’re figuring out how to soundproof your car. Let me tell you right off the bat that it’s not entirely possible to soundproof your vehicle 100%. Effective soundproofing means that you need to add a whole bunch of mass to the surface of your vehicle, and doing so will not only make your vehicle too heavy, but it will also be impractical to carry that much weight on the road.
Plus, completely soundproofing your car is also extremely dangerous. The sights and sounds on the road are there for a reason, and a lot of them serve as warning signs for any imminent danger. A car could be honking at you to give you a heads-up on some form of road hazard, or something could be barreling towards you without you being any the wiser. The best thing you can do is to reduce road noise to about 50% and call it a day.
Conclusion
Aside from those five main sections of your car, you can also try soundproofing the cup holder or any other paraphernalia inside your vehicle. These little knick-knacks may not seem like much, but there’s nothing more annoying than enjoying a smooth and quiet ride amidst coins rattling and trunks jiggling. Make sure that you don’t have random stuff cluttered in the backseat that will make any unnecessary noise each time you go through a speed bump.
Don’t drive like a maniac! Reduce your speeds at appropriate limits and be considerate of other motorists on the road. Remember that if you’re bothered by the noise that other people make outside, you’re also contributing to the outside noise for other drivers too. Going out in the blaze of glory with every ride just doesn’t make you a model citizen when it comes to road safety.
So, with all that said, I hope you picked up some useful tips and tricks on how to enjoy smoother, quieter, and more peaceful drives every single day. If you have any concerns or burning questions for me, just drop me a line in the comments section below and I’ll be happy to help out!

People might overlook ear protectors. They work.
I have been trying to reduce road noise from my 2015 Prius since 2016. Added dynamite to all doors and beneath all floor mats. I just want to be able to hear the radio while on the highway drive to work daily. These efforts have helped only a little. What is the next most logical thing to do. Undercarriage spray? Engine noise in the Prius is not seemingly a problem.
Do you even know how much 80 milimiters are?
Yes, we know what 80 millimeters is. We also know what 80 mils are. Just in case you don’t, 1 mil equals 1/1000 of an inch. This is the measurement used on auto soundproofing.
Terry