The average typing speed is around 40 words per minute. At 5 keystrokes per word, you are producing, and/or hearing 200 keystrokes per minute. On a mechanical keyboard that can add up to a lot of racket. Many people like the tactile feel of a mechanical keyboard–but not the noise.
There are quite a few ways to make your keyboard quieter. Here are some of the best solutions.
Note: Some secretaries and executive assistants are required to type at 65 and 100 words per minute (WPM) respectively. That is a lot of keystrokes to listen to every minute.
 Gamer keyboard with colorful blue lights, modern gamer computer. Blue backlight, backlit on laptop or keyborad computer of gaming
8 Ways to Make a Keyboard Quieter
These keyboard quieting suggestions range from quite inexpensive to a little pricey and time consuming. Hopefully you will find the one that works for you.
1) Lubricate the Switches
Lubricating your keyboard switches is probably the overall best way of quieting your keyboard. It is also the most time consuming and finicky–well worth it because of the end result. You will have to get inside each switch to lubricate them properly. In most cases, this involves de-soldering each switch, lubing it, then soldering it back together after lubricating it.
Once the switch is open and you have access to the inside, use a small paint brush as your lubing tool. Apply a small bit to the slider columns; make sure you get all of them. Brush both ends of the spring with lube and the sides and bottom edge of the stem. Reassemble the switch and re-install it. Start lubricating with a little bit of product. You can always add more. It is very difficult to remove grease or oil if you apply too much.
You can simplify switch lubrication by purchasing a keyboard lubrication kit from someone like Amazon–usually for under $20.00. They include lube, brush, key cap puller, switch puller, and more. (You have to supply solder and soldering iron.)
Note: If your soldering ability is as bad as mine, this will be the last option you choose. Or like I do, you will put up with the noise.
Spring Replacement
If you are hearing constant spring ping when typing, there are 2 cures. The first one–lubrication– we have already covered. If you lube up a couple of switches and try them, only to hear the same pinging noise, it may be time to replace springs. (Maybe with a medium spring to cut down resistance.) You are going to have every switch open anyway, so now is the perfect time.
New springs will probably cost you around $10.00 – $15.00. And you can save yourself a lot of paintbrush time by throwing them into a plastic bag with a little oil. shake well and they are ready to install.
2) Use a Desk Mat
In my opinion all keyboards should have rubber feet to reduce or eliminate noise transfer from board to desk. Unfortunately, many do not. They have hard plastic feet or legs attached to a semi-hollow hard plastic case. Sound is transferred to your desk top to echo around the room.
Almost all desks are made of hard material–making them very reflective. They add vibration and echoes to the noise created by the original keystrokes. Think of that administrative assistant pounding out 500 keystrokes per minute. Placing a desk mat under your keyboard is one of the easiest, most simple, and effective ways of reducing keyboard noise.
Desk mats are available in multiple sizes, making it possible to choose one that fits your needs. Make sure that your mat is at least big enough to accommodate your mouse. I think it should also be large enough for a writing pad, pen, you coffee cup, etc.
Not only are multiple sizes available, but desk mats can be had in almost infinite colors and designs, multiple types of material finishes, and a few different thicknesses. Almost all of them have a non-slip padded bottom, are water proof, and easy to clean. Not only is a desk mat a simple way to make your keypad quieter, it will enhance your office or home work space.
3) Add Foam Soundproofing Inside the Case
Install soundproofing inside the bottom of the keyboard case. Many manufacturers of keyboard pads (see #4 below) will sell combination packs of case foam and keyboard pads. This is a great option for fit. They are made for the same keyboard, making installation easy and quick.
If you can lay your hands on a piece of Mass Loaded Vinyl, use that for your bottom of the case soundproofing. It will provide much better noise attenuation than foam. If you can’t get a small piece, you probably do not want to buy a roll–unless you have a need. It is fairly pricey.
4) Use Keyboard Pads
Keyboard pads (also known as keyboard foam clothes) are a quick, easy, and inexpensive way of quieting your keyboard. The most important part of foam clothe keyboard quietening is making sure that the product you buy will be compatible with your keyboard. Dealing with companies like Stupidfish Designs will make that part easier.
Unlike O-rings (see section 5 below), which have to be installed on each key individually, keyboard clothes are a one piece fix. Once you have the proper keyboard pad, take your case apart, install the pad and re-assemble. Guaranteed, your keyboard will be much quieter. Not only do keyboard pads soak up sound, they shorten the key strokes–reducing finger fatigue. naturally, thicker pads absorb more noise than thin pads.
5) Install O-Rings
O-Rings are pretty much what they sound like. Small round rings made of silicone or rubber that fit over the key stem to reduce the impact between keycap and switch. Reduce the impact; reduce the noise. Also by acting as a shock absorber, the rings help reduce finger fatigue.
Many O-ring kits contain around 200 rings and come with a keycap removal tool. (Or you can purchase the tools separately.) The kits also contain different sized rings to fit different sized keys. To install the rings, just remove each cap, fit the ring inside the cap, and reinstall it Depressing the key fully will seat both ring and key cap.
6) Change your Switches
There are 3 man types of keyboard switches. Each reacts a little differently when pressed. They also produce more, less, or different noise.
- Clicky Switches. Clicky switches have a small bump when pressed. They also make a fairly loud clicking noise each time they are used.
- Tactile Switches. Tactile switches also have a small bump when pressed and produce a moderate noise.
- Linear Switches. Linear switches are the quietest type of switch. They have a smooth consistent keystroke.
As with switch lubrication, you will likely have to de-solder the existing switches to remove them, then re-solder the new ones in place. (De-soldering just means that you are going to apply enough heat to melt the existing solder and remove it–freeing up the switch.) This is a fairly time-consuming process, but the end result is well worth the effort.
You may be blessed with a ‘hot-swappable keyboard’ making switch changes (and lubrication) simple, No de-soldering. No soldering. Just pull out the old switches and snap in the new. When buying new switches, make sure that they will fit your keyboard. You should also get switches that are rated as ‘Quiet.’ Some of the more popular are Cherry MX Silent Switches, and Topre Switches (A little hard to source but worth the effort. Considered one of the best quiet switches available.), among others.
Note: Before installing the new switches, it might be worthwhile to pull a couple apart to ensure they have lubrication. If not, it is way easier to do the job before installing them into the keyboard.
7) Keep your Switchboard Clean
John Wesley is said to have originated the saying “Cleanliness is next to Godliness.” I can’t vouch for that. But I will say that cleanliness is next to quietness. Almost without exception, a cleaner piece of equipment is quieter than a dirty one.
Anyone who has read my articles knows that I am boringly repetitive about a couple of things–lubrication and maintenance. You are probably wondering “What is this fool talking about. It is a keyboard.” Keep in mind that you have a plastic cover full of holes with key caps poking through them. Even if you use one of those compressed air cans to blow the keyboard clean, most of us lack consistency.
Keyboards are assaulted by body fluids from your fingers, hairs, dandruff, cigarette ashes (if you are one of them–like I was for decades), drink drops, food scraps, among other things. Even diligent external cleaning will not prevent some of this from getting between the key caps and the cover.
It is a very good idea to take your keyboard apart every 6 months or so to clean out whatever might be growing inside. Depending on what you find, a combination of air spray, Q-Tips and alcohol, should clean it up. when the inside is dry, put it back together for a quieter keyboard experience.
Whether typing the great American novel or blasting aliens all day, it might be a good idea to cover it up after using it. (Maybe those old timey secretaries covering their old timey manual typewriters were on to something.)
8) Buy a New Quiet Keyboard
 Computer Keyboards
Although many of the ideas on our list are fairly inexpensive and quick, some of them are a bit pricey and time consuming. It might just be time to splurge on a new keyboard. If you are willing to spend over $50.00, you should be able to find the exact combination of features important to you– whether that be types of switches, hot-swappable board, types of key pads, colors, lighting, wired or not, along with other options.
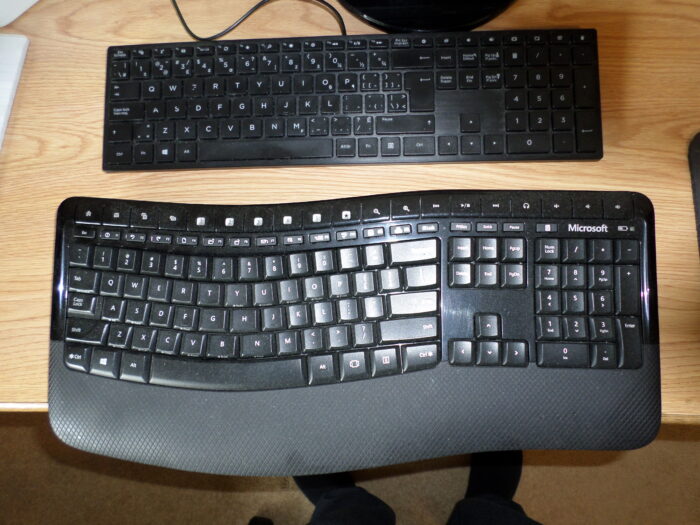
It is worth your time to check out keyboards before you purchase. (Note key size and spacing differences in the picture above.) Regardless of what you find, it is still a plastic box on a hard surface. For instance, you may find everything you want except soundproofing in the base. Be prepared to use one or two of our ideas to help make your new keyboard perfect.
Personal Caution: Make sure before you buy. I bought the zippy ergonomic wireless keyboard in the picture. When I could not type on it, I bought the cheap wired keyboard in the picture. Now I am thinking of re-building my 10 year old Dell.
A Few Other Quiet-Making Ideas
Here are a few more keyboard-quieting things to keep in mind.
- Tap the Keys Lighter. The hands of good quiet typists appear to hover over the keyboard and stroke the keys. The technique is taught in typing classes. You can learn to do this–even if you take a typing class.
- Rubber Key Caps. Yes, rubber key caps are quieter. You do not have to press the key as far to bottom out. So you need less force, which makes less noise.
- Switch Film. These are small pieces of foam install as a picture frame around switch openings in the keyboard positioning plate. Installed properly they can reduce switch/keyboard noise by up to 10 decibels. These inexpensive little addition will also help keep your switches clean.