
I was looking at purchasing acoustic panels for a project I’m working on, but after seeing the cost, decided to check out DIY acoustic panels. I’m converting a seldom-used room into a media room and want to reduce the echo and noise for better sound enjoyment.
I went looking for DIY plans and found too many to count. Some give before and after acoustic readings which is helpful. However, the placement, availability of materials, and level of skill are important for most DIY projects too. I collected 21 that looked good and some other useful information and figured I’d share.

What are Acoustic Panels?
Acoustic panels control the extra sound reverberating in a room. The more multi-directional the sound producing system, the more bounce back noise being produced. Panels absorb mid to high frequencies and soften the return noise for cleaner sound enjoyment.
Sound panels are often made of acoustic foam or sound insulation. The foam absorbs down to frequencies of 500 Hz, while the fiberglass or stone wool absorbs down to 100 Hz.
The panels can be free standing, wall or ceiling mounted. Most are fabric covered and can blend or complement a room, or be covered with a cloth artwork or a photo print to decorate the room. Other panels may have a perforated wood face to control sound feedback.
How Do Sound Insulating Panels Work?
Sound waves that encounter an acoustic panel create a vibration within the material which turns the sound energy into kinetic energy or heat. The kinetic energy dissipates into the room without creating sound reverberation.
Sound that doesn’t hit a panel reflects off the surface. If you sit 8-feet in front of the sound source, and there is a wall 2-feet behind you, the speed of sound does the rest. The sound you want to hear is being distorted by the noise around you.
What Are Sound Absorption Panels Used For?
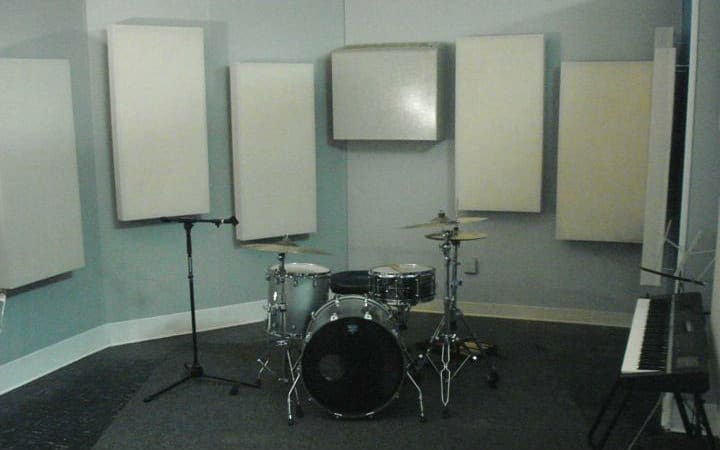
Acoustic panels absorb sound. They reduce reverberation and echo to give better sound listening quality. They are ideal for Home Theaters, Home Recording or Mixing Studios. Sound absorption panels will improve the sound clarity of surround sound for movie and sports viewing, and video gaming.
Decrease the noise and chatter in living rooms, bars, libraries, museums, and restaurants. Plus, they will improve the listening accuracy in all those spaces.
Acoustic panels are great for improving sound within a room, but they don’t significantly decrease the movement of sound into other spaces. They are not soundproofing.
Additionally, sound absorption panels are not recommended for music rooms where the reverberation enhances sound creation and enjoyment. If you don’t want to hear your child practice the violin, soundproof the walls; absorption will make it more difficult for the musician to hear the true sound.
Note that sound absorption is only one acoustic treatment. Another is sound diffusion which redirects and breaks up sound patterns but doesn’t remove the sound entirely.
For more information on acoustics and soundproofing for a home theater, please see our articles, How to Sound Treat a Room and How to Soundproof a Home Theater.
Best Acoustic Panel Core Material
There are different products used to absorb sound in acoustic panels, but the best for the DIYer is fiberglass and mineral wool insulation. The greater the density, the better the absorption the material has. Additionally, the thickness affects the low-frequency absorption based on the quarter wavelength effect.
The noise reduction coefficient (NRC) is a useful way to determine how well a material will absorb sound waves of different frequencies. Remember, they are based on lab tests and may not be the same elsewhere.
Owens Corning Rigid Fiberglass panels 703 3lb pcf, 2″ thick
The panels are 2”x24”x48” (1” and 4” thicknesses too). It has a density of 3 lb/ft³ and an NRC of 0.86 at 250Hz, 1.14 at 500Hz, 1.07 at 1000Hz, and 0.98 at 4000Hz. Available at Home Depot and other hardware stores.
Rockwool Acoustic Mineral Wool Insulation 80 – 8lb
Rigid 2” thick 2’x4’ panels have a density of 8 lb/ft³. It has an NRC of 0.78 at 250Hz, 0.9 at 500Hz, 0.97 at 1000Hz, and 1.00 at 4000Hz.
Best Fabric for Acoustic Panels
Insulation panels need to be covered to prevent fibers from escaping; they also don’t look great as décor elements. Fabric covers need to be noise permeable. A good test is to hold it up to your face and see if you can easily breathe through it. Even if there’s a little resistance, don’t use it.
Select a fabric color or pattern that will go with the room, or have a photo or artwork transferred onto acoustic cloth. There are different manufacturers available. Here’s one I like:
Guilford of Maine
Guilford offers a made in the USA recycled polyester material in 12 colors. It has a fire retardant finish, and tear strength of 30-pounds so that you can stretch it tight on a wood frame. The 60” wide fabric is sold by the linear yard, which means 1 yard will easily cover a 24”x48” panel.
How Thick Should Acoustic Panels Be?
Acoustic panels are commonly 2” or 4” thick. The thicker panel should absorb lower frequencies better. The 2” panel will be less bulky on a wall, so may blend more aesthetically depending on the use of the space.
Panels range in dimensions from 1’x1 or 1ft², 16”x16” or 1.78 ft², 1’x2’ or 2 ft², 2’x4’ or 8 ft², and even 4’x8’ or 32 ft², and bigger. There are other sizes, but these are the more common. Start with 48 ft² of panels for your media room or studio, and then add as needed
How to Make Acoustic Panels
If you’ve decided to improve the sound of a room using DIY acoustic panels, you need to calculate the surface area of the walls – add the lengths of the four walls and multiply by their height.
Use these percentages to calculate the amount of wall to cover: for light coverage 10% of a room’s wall surface, medium 15 to 20% (recommended), and high treatment 25 to 35%. Extreme control would be up to 80% of the wall and ceiling surfaces.
Step 1: Plan Your Build
Having determined the surface area to cover, decide on the dimensions and number of panels you need.
For a 10’x10’ room with an 8’ height, the wall surface is 320 ft² – 10% is 32 ft², 20% is 64 ft², and 35% is 112 ft².
If using 2’x4’ (8 ft²) panels, you’ll need 4, 8 or 14 panels respectively.
I like to make a list of what I need for one, multiply it by the number to I’m building, and get everything before I start.
Step 2: Select Sound Absorbing Material
Choose the absorption material; 2”, 3” or 4” thick rigid insulation panels, foam, or another material. The higher the density is usually better; between 2.5 lb/ft³ to 8 lb/ft³. If making panels smaller than 2’x4’, try to minimize the waste.
Step 3: Choose and Prepare an Acoustically Transparent Fabric
Select a fabric that is breathable, strong enough to be stretched taut, and has a color or pattern that blends or complements the room. You may want to wash and dry it to reduce possible sag over time. However, if it has been treated with a fire retardant, don’t wash it.
Step 4: Build Acoustic Panel Frame
Build a simple rectangular frame using 1″x4″ boards. They can be screwed together and wood glue will strengthen the joints.
Building a frame around the absorption material makes it easier to cover with fabric and hang. It also protects the material and prevents slump or sag.
For 2” thick panels, 1”x2” furring will give a beveled front edge as the wood is narrower than the panel. Using 1”x3” strapping will give a square-faced finish.
I cut the top and bottom the width of the acoustic material. The two sides are the length of the absorbing material, plus the top and bottom furring pieces; makes a stronger joint for hanging and less visible seams.
For a stronger connection between the absorber and wood, spay the edges with adhesive before enclosing in the frame.
Step 5: Wrap the Panel in Fabric
Cut the material, so it is at least 6” longer and wider than the panel.
Lay the fabric face down on a flat surface.
Place the panel face down, and centered on top.
Wrap one side and staple the material to the back of the frame at 3” intervals.
Pull the fabric taut from the other side and staple from the middle to the corners.
Repeat for the top and bottom. Fold the corners neatly and staple.
Trim off excess fabric, or use spray adhesive to stick it to the back of the panel.
Step 6: Mount the Panel to Wall or Ceiling
Attach 30-pound picture hanging wire to the two side rails, D-rings work well. I recommend using two picture hanging hooks for each 2’x4’ panel to help keep it level. If mounting on ceiling use 4 D-rings (1 per corner), and hooks in the ceiling.
An air gap between the wall or ceiling surface and the back of the acoustic panel will enhance sound absorption. You can use stick-on felt spacers to create a slim 1/8th inch gap.
Ideas on How to Make DIY Acoustic Panels
1. How to Build Your Own Acoustic Panels

A comprehensive How-To Guide for making 2’x4’ acoustic panels, with pictures, using rigid rockwool panels, furring strips for frames, and a breathable material from a local fabric store. The author outlines the reasons for material choices and has good comparative information. There are a lot of helpful hints too.
Pictures that document each step, improving the guide by visually enhancing the step by step instructions. Also has a picture of the finished installation of panels. It includes a materials list and prices.
Build this panel2. How to Build a Sound Absorbing Panel in 5 Easy Steps

Instructions to build 2’x4’ sound absorbing panels in 5 steps using 2” thick rigid rockwool sheets, 1”x4” furring strips, and fabric. The frames are 1-½” thicker than the insulation, providing for a hollow space between the wall and back of the absorbing material. Wood was added to reinforce the corners and middle, and hold the insulation in position.
Breathable black, duck canvas was stapled to the back of the wood frame and stretched tight over the front. Use Z-clip picture hangers or other picture hardware to hang the panels, or tilt them against the wall from the floor as base traps.
Build this panel
3. How to Make High Performance Sound Absorption Panels for $5
YouTube video about making inexpensive sound absorbing panels for a home studio. Demonstrates how to test easily accessible products – a pillow, towels, and packaging sponge – for sound absorption at different frequency levels.
The results of the tests are presented, and the layered towel material absorbed sound significantly better than all the others. Purchased towels for the panels at a local thrift store, built 2’x4’ frames using 1”x2” screwed at the corners. Shows how to make sound absorbing panels using towels, and how to hang them like picture frames. The finished product was tested against real acoustic foam and still did much better.
4. Make Acoustic Panels for Your Recording Studio
Combines several different DIY designs to make 12 absorption panels for a sound studio. The panels were 2’x4’ outside dimensions, as it’s cheaper to trim 2” rigid insulation panels than waste wood. The frames were made of 3/4″X4” MDF ripped from two 4’x8’ sheets. The wood would be covered, so it didn’t have to be pretty. Some of the MDF was ripped into 3/4”x1” strips to hold the panel to the front of the frame.
The frames were tacked at the corners and the 3 lb/ft³ rigid insulation trimmed to fit. The panels were covered with breathable fabric, stretched and stapled into place. Picture wire was used to hang the panels near corners.
Build this panel
5. DIY Sound Proof Panels
How to building 2’x4’ acoustic panels using quality 1”x2” wood for a stronger frame. Remember to countersink screws, so they’re flush. Uses inexpensive mattress foam in the frame and adds a wooden cross piece to hold it rigid. Staple the foam to the cross brace to help keep it in place – make sure the smooth face of the foam is up.
Cut a piece of breathable fabric larger than the panel, lay it out flat and upside down. Place the panel face down on it, staple and stretch the fabric in place. Use Z-strips to hang on picture hooks on the wall. Lighter and less dense than rigid insulation, they offer a thin alternative.
Build this panel
6. DIY Broadband Acoustic Panels
Broadband acoustic panels use thicker absorption material to achieve a broader spectrum of frequency control. Using 1”x4” furring strips to make 2’x4’ frames for 3” rigid insulation. To reduce the weight of the frame, and possibly absorb reflected sound, 2” diameter holes were cut into the side and bottom boards.
The insulation was trimmed to fit in the frames. Burlap or another breathable fabric was stretched and stapled to the frames. The frames can be hung with heavier picture wire – the panels are heavier than a 2” thick one. A French cleat is another way to hang the heavier frames.
Build this panel
7. Acoustic Panels
A home music studio DIY 2’x4’ panel system. 1”x2” wood was used to make 2’x4’ frames. The breathable fabric was stapled to one face of the frame. A larger piece of fabric was placed on a flat surface. One 4”x2’x4’ or two 2”x2’x4’ rigid sheets of insulation were placed in the middle of the fabric. The fabric side of the frame was placed on top of the insulation.
The fabric everything was resting on was pulled taut and stapled to the back of the wood frame. The thicker sound absorbing material covered a wider frequency range, and the airspace at the back would act as a bass trap. Hang with heavy duty picture wire or French cleats.
Build this panel
8. Decorative Acoustic Wall Panels

Four 6” and two 3” acoustic panels. The thicker absorb broader range of frequencies. The frames were made of 3/4” oak faced plywood ripped to 3” or 6” widths. The frames were 24”x30”, and stained espresso.
Coffee bean sacks were used as the face fabric. It was laid flat, the frame placed on top for placement, and then the edges pulled inside; ¾” furring strips were used to tack and stretch the cloth and secure it in place. Rigid 3”x15”x47” insulation was cut (15”x23-1/2”) in half to fill the frames. The 3” thick had one layer; the 6” had two layers.
Build this panel
9. Decorative Acoustic Panels From Canva
How to make an acoustic panel with a printed picture canvas cover. An attractive way to cover the reflective flat surfaces in a room. Panels can be large or small, be individual, images, or together form a larger panorama. Order or purchase pictures which are pre-stretched on a 1”x1” frame.
Use rigid insulation slice to fit inside the frame behind the picture. Cut cardboard to cover the insulation on the back of the frame, and prevent fibers from escaping. Hot glue to hold it in place. Use picture hooks to hang it on the wall.
10. Building a Frameless Broadband Absorber Panels
Uses two 2”x2’x4’ rigid fiberglass panels to make an acoustic panel 4” thick. One panel has a foil coating which is said to improve bass trapping. The foil face is placed on top of burlap fabric which is flat on a table top.
Aerosol glue is sprayed on to the back of the foil panel, and the other sheet of insulation placed on the glue. The exposed faces of the two sheets are spared liberally with glue, and the cloth pulled smooth and pressed into the glue. Hot glue is used to secure the seams and corners.
11. Making Acoustic Panels for Recording Studio or Home Theatre
How to make 4”x2’x4’ acoustic panels using Corning 703. Two sheets of 2” thick 703 were glued together with an adhesive caulk. A sheet of 1/2” OSB was ripped into 4” widths and cut into 2’ lengths. The wood was glued to the top and bottom of the 4” thick insulation panel.
A breathable canvas was cut into 60”x60” squares and laid flat on a hard surface. The panels were placed in the center of the fabric, glue applied, and the fabric pulled tight and smoothed flat. A nail gun was used to secure the fabric to the OSB at the top and bottom. Stand them on the floor, stack them, or elevate than on ‘L’ brackets.
12. DIY Pro Acoustic Panels with Frame from MDF
Frames are made from ¾” MDF 4’x8’ sheets, ripped into 3”x 8’ pieces. The outside dimensions of each panel are 16-1/2”x48-1/2”, which fit a sheet of Roxul Safe’n’Sound. Pre-drill all holes and countersink the screw heads.
Staple the fiberglass screen to the back of the frame to prevent particles escaping. Fit the insulation into the frame. Cover the front with the screen too. Cut covering fabric 12” wider and longer than the frame, lay it flat, and place the frame in the middle. Use spray adhesive on the wood frame and fabric, pull the fabric tight, and smooth out. Trim off excess. Uses French cleat to hang.
13. Building Affordable Acoustic Panels
The video includes list of tools and materials for the panels. Make an acoustic panel using 1”x4” strapping to make 2’x4’ frames for 2’x4’ Roxul batts. A middle 1”x3” strap and corner blocks were added to stiffen the frame, and to support the batt.
Insert the Batt into the frame, and cover with weed barrier fabric. Stretch and staple the barrier into place, and trim off any excess. Lay out a cloth of fabric or burlap on a flat, supported surface. Place the frame face down in the middle of the fabric. Stretch and staple the fabric in place. Hang on the wall using a method you choose.
14. DIY Sound Absorption Panels
A step-by-step video process to make an acoustic panel, plus an explanation of where to place the panels for the primary reflection. Use 2”x2’x2’ rigid stone wool. Hollows out a space in the back of the panel for a 1”x3”, which will act as a hard-point for hanging. Covers the surface with epoxy to prevent fibers from escaping.
The epoxy holds the hard-point board and stiffens to back. Use spray adhesive to keep acoustic egg carton foam on the front face. Also, spray the sides to attach foam strips, so the panel absorbs from the front and the sides. Hang from the hard point to improve the sound.
15. Frameless Acoustic Panels With A Low Budget
Make frameless acoustic panels for a home studio. The video includes a free PDF guide, description, and a material list. Using 2”x2’x4’ fiberglass panel, coat the 2” edge perimeter with epoxy to stiffen edge and secure the fibers.
Lay out the breathable cloth that is 12” larger than the panel. Place the insulation in the center of the fabric. Start on one side, spray glue and wrap the material around and onto the back. Repeat on the opposite side and smooth and stretch to remove wrinkles. Do the same with the ends. Uses impaler clips to mount to the wall.
16. How To Build Cheap Acoustic Sound Absorbers – 30$ DIY IKEA Hack
How to turn an IKEA bookshelf into a sound absorber. Use 3” thick Roxul sheets to fill in the shelf frame cavities. Cover the back with foil, and then put the cardboard back on the shelves.
Cover the whole shelf with breathable fabric. The Shelf can be moved where needed. It can also be turned around to become a base trap. Total cost is about $30. The hardest part is assembling the shelf unit.
17. How to Build an Easy DIY Acoustic Panel
Making a 2’x4’ acoustic panels using 2” thick cotton insulation batts in a 1”x4” wood frame. 1”x8” was used to make corner triangles to reinforce the corners and keep the batten flush with the front of the frame. A 2”x2” brace midway down the back of the frame helps prevent the insulation from slumping. The air space also creates a bass trap for low-frequency sound.
Uses burlap to cover the front and frame of the panel. Remember to iron out any wrinkles. Lay the frame face down in the middle of the fabric. Wrap one side, pull tight, and staple about every inch. Do the opposite side, pulling taut, and staple. Repeat for the ends. Make sure the staples are set flush. Use felt pads on all four corners to protect the wall, and hang like a picture frame.
18. Acoustic Wall and Ceiling Panels
Building a set of 2’x4’ acoustic panels for a recording media studio. Using 4’x10’ sheet of Duct Board – 1-1/2” thick rigid fiberglass with foil back. The frame was 1”x2” pine and wrapped the panels in thin polyester Elevation Carpet – breathable and water permeable.
The insulation was inserted into the frames with the foil to the back. The carpet was cut 6” larger than the frames for wrapping. The carpet was stapled to the frame, trim at the corners, so they’re not bulky. Cover the back with carpet slightly smaller than the outside of the frame. Hang the panels from Velcro strips
19. DIY Ceiling Acoustic Panels Built with Kreg
Build six 16”x48” ceiling panels using Roxul insulation in a 1”x4” frame. The frame was assembled using Kreg corner screws for a 90-degree angle. The panels are wrapped front and back in burlap to keep the fibers in place.
Eye hooks were put in each corner, and the panels hung from the ceiling. The panels hung about 2-inches down from the ceiling, it’s easier to get your fingers in to catch the hooks. Additionally, the space allows the acoustic panels to absorb more reflected frequency off the ceiling.
20. Acoustic Panels Built From Steel Studs
Uses 2”x2’x4’ Menson FSK insulation sheets, they have a foil backing on one side. Stacks two to make 4” thick 2’x4’ acoustic bass traps. Each frame is made from one steel 2”x4”x12’ stud. Triangles are cut out of the edges at 4’, 2’, and 4. The steel is bent and the end cut off to be riveted into place after the insulation is inserted into the steel channel.
Slid the insulation into the steel channel, so the foil backs are sandwiched together. Wrap the whole frame in a breathable fabric, using hot glue to keep it in place. The panels go into the corners of the studio to capture the bass build-up and improve studio sound. They are hung on the wall with monkey hooks.
21. How to Build Acoustic Panels for Your Home Studio
Building 2’x4’ panels with Roxul battens and 1”x3” pine frames. The corners are squared and screwed together with metal corner brackets. Breathable linen was used for the front and to wrap the frame and then less expensive muslin for the back.
Iron the fabric to get the creases out. Covered and stapled the muslin to the back of the frame first, inserted the insulation, and then wrapped and stapled the linen around and over.
Felt pads are stacked and attached to the back to protect the wall, but also to provide 1” to 2” of airspace, so air isn’t trapped; improving the sound even more. They are hung with 18 gauge picture wire.
How Much Do DIY Sound Panels Cost?
The cost depends on several factors – the type of insulation, fabric, and frame material. Staples, glue, screws, hanging wire and hooks are fairly common costs. If you find fabric on sale, get some free lumber or insulation, you could make an acoustic panel for less than $10.
The average cost in the 21 plans here is between $20 and $30 for a 2’x4’ acoustic panel. Purchasing a similar panel on-line will range from $60 to $150 or more. Remember, your time and skills are not factored into your costs.
Conclusion
DIY acoustic panels will improve the sound quality of a home studio, TV or media room, living room or office. They are an inexpensive way to decorate and to enjoy your work and listening space.
For most of the DIY panels, the only tools you need are a saw, screwdriver, scissors, and a construction stapler. Hopefully, you found this article of value.
If you know someone who would benefit from it, pass it. Your questions and comments are appreciated.
Related posts:

I’m looking to build something similar to the Clearsonic Ampac11 with the acrylic barrier in front and soundproofed panels along the sides and top. Will these panels work for that if I adjust the sizing to fit my needs?
I have 10 ft ceilings with an mostly open floor plan and LVT flooring. Lots of echoing! My TV is on the short side of the living room and faces the open space. Will acoustic tiles work to reduce the echoing if they’re placed on the wall adjacent to where the TV is located? None of the examples shown here indicate the ideal placement of the tiles. Thanks.
Very insightful Eugene! Thanks for the tips and recommendations.
Hi Ash,
Thanks for the comments.
Terry
Hi from Canada. We rehearse in my garage and it has a very high ceiling plus a reflective concrete floor. I put cheap area carpet down on the floor but I need free-standing and movable acoustic panels approx. 4 feet wide by 6 feet high. What build plan would you recommend for my garage of 14 feet wide by 25 feet deep by 16 feet high?
Thank you!
Nelson
Hi Nelson,
All you really need to do is choose the type of panel you want and just add something as simple as a 3′ long 2 x 4 to each end to keep it from falling over when the band is in high gear. You might give some consideration to hanging acoustic panels or diffusers from the ceiling down to the 8′ or 10′ height. 16′ high must create a bit of an echo chamber.
Canada is a big place. I live in Alberta.
Terry
I have to combine any soundproofing with the family’s panther. Well, cat really. Big cat with a lot of energy. There is nothing in this world that he won’t instantly try to climb, scratch and chew on. The soundproofing we did have on the wall – wooden frame + blankets – was loved to death within two weeks when our beloved boy arrived. I would love to hang up cool canvas pictures covering sound proofing. But let’s be realistic. This cat can jump from floor to ceiling, and will – no matter our opinions.
So – cat-proofed soundproofing?
Is rope made from cotton, sisal, etc an alternative? Maybe by gluing rope on cork?
I’d be very grateful for any tips. Cheers!