If you’ve ever tried to create a professional recording, you may have found yourself plagued with terrible sound. The solution is to build a vocal booth. In this article, I will summarize 22 DIY ideas on how to build soundproof vocal booth at home, so that you can decide which way is right for you.
In a poor environment, there are too many reverberations and reflections in your recordings. The air conditioning is humming in the background. Traffic noises seep into your recording and stop you from achieving a high-quality sound. If you have experienced these problems, then this article will help you learn to solve them.
For other information that may be helpful with your vocal booth please see our articles How to Sound Treat a Room and How to Soundproof a Room for Drums and How to Keep Bass From Going Through Walls.
What is a vocal booth?
A good sound booth will do two things. First, it will stop, or significantly reduce, external noises from being picked up by the microphone. Second, it will stop the reverberation of the performer’s voice inside the vocal booth.
When combined, the result is a clean and professional recording that is free of excess sounds. This is the goal every time we turn the microphone on!
Reverb is the echo-like sound that you hear when you clap in any open room. This reverb can destroy the quality of your vocal recording.
This can render it nearly, or even completely unusable. By recording in a vocal booth, we can dampen these reverberations and stop them from being picked up excessively by the microphone.
Do You Really Need a Vocal Booth?
Different applications will require varying degrees of quality. If you do not feel that a professional quality recording is necessary for your situation, then you will not need a vocal booth. If you are looking to create vocal recordings of professional quality; however, a vocal booth of some type will be necessary.
No matter how much editing you do or how many plugins you use in your DAW, a poor recording will never be made to sound great. The single most important factor in producing excellent sounding recordings is to take the environment out of the equation. A vocal booth is the most effective way of removing the environment from your recordings.
Types of Vocal Booths
When it comes to deciding what type of vocal booth is right for you, the options are many! This is where your own needs and budget will come into play.
You’ll have to decide if you want something more permanent, or something that can be transported to a new location. You may need something that is small and doesn’t take a lot of space, or space may not be an issue for you.
Sound quality may be the most important factor in your decision, or it may be price. Here are some of the different types of vocal booth options that are available to you.
Permanent Vocal Booth
Most of the DIY options we will be looking at today will fall into this category. A permanent vocal booth will be built once and stay there. This type of booth will usually provide the highest quality recordings.
A permanent booth will usually consist of two separate layers of sound control. The walls will provide the soundproofing.
This is what stops the unwanted external sounds from getting inside where the microphone can pick them up. They can also prevent the sound of your voice from getting out and possible disturbing neighbors.
The second layer is on the interior of the booth. This is the layer that is comprised of studio foam, sound panels, fiberglass, or acoustic blankets. This layer is for sound dampening and is what stops the reverberations and echos from ruining your recordings.
Modular Vocal Booth
A modular vocal booth is one that is usually purchased. You will probably assemble it yourself, but it should contain all the necessary components. These are often semi-portable.
They can be disassembled, and then reassembled at a new location. If you are worried about the possibility of needing to relocate your booth, this may be an option for you to consider.
Modular vocal booths are often built with a frame, on which attaches acoustic blankets. These acoustic blankets are effective at reducing reverb. Some of the higher quality ones are also effective at reducing a decent amount of external noise.
However, they will not provide the same degree of noise reduction as a hard-walled, permanent vocal booth. They also will not provide the same dampening inside as a booth that is covered with 2” acoustic panels.
This type of vocal booth also tends to be quite expensive.
Portable Vocal Booth
If you travel often, or if you don’t want to be tied down to one specific living space, then a portable vocal booth may be what you’re looking for. A portable booth will be much smaller than a permanent booth or a modular one.
A permanent vocal booth usually surrounds the performer. A portable booth, however, may only surround the performer’s head. Alternatively, a portable box may surround the microphone instead.
Portable vocal booths are small and lightweight. They will fit in the back seat of your car for easy transportation. However, they will usually not offer quite the same recording quality as a permanent vocal booth, or even a larger modular booth. They can help to drastically reduce reflections and echos and still be very useful for a traveling narrator or other similar voice-over artists.
Portable vocal booths are available for purchase through sites such as Amazon.com. They can also be made in the DIY fashion, and we will cover this type of portable vocal booth in this article.
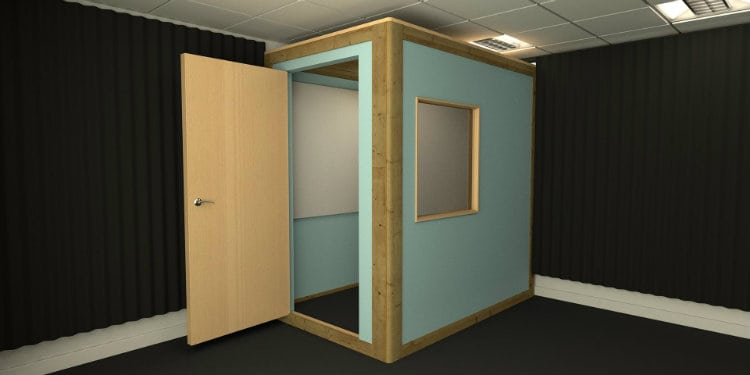
How to Build Soundproof Booth
If you need the highest quality professional sounding recordings possible, then you will want to build a permanent vocal booth. This will give you the cleanest recording environment free of extraneous sounds or reverberations. Let’s discuss how you would go about building your permanent vocal booth.
Step 1: Design and Plan Your Booth
Before you start building your vocal booth, you’re going to need to have a plan. There are many factors you will need to consider to ensure that your booth will meet all of your requirements.
Begin by determining how large of a booth you need. Will the performer be sitting or standing in the booth while recording? If you’re sitting, you will need enough space to fit a chair. Where will the performer be situated and which direction will they be facing?
Also, consider the size and placement of your entryway. Will you need lighting inside of the booth? How about ventilation? Will you need a window to see the performer inside?
If you’re located in an area that doesn’t have a lot of external noise sources, then you may be fine with a single layer of sheetrock on the exterior of your booth. If you live in a high traffic area however, you may need to double layer the sheetrock to get more noise reduction.
If the outside noises are very overpowering, you may need to add an acoustic blocker such as a limp-mass vinyl roll. These are very effective at blocking external sounds, but will drastically increase the cost of your booth build.
Once you have your booth designed, it’s time to start the build.
Step 2: Build The Floor
If you are going to be floating the floor, you will want to start your booth by building the floor first and setting it on the rubber risers. Start by building the frame from 2X4s or 2X6s.
Attach plywood to the top of the frame to form your floor surface. If your booth is being built on the carpet and you aren’t in a very noisy area, you may instead build an open floor booth.
Step 3: Build the Walls
Begin to frame up the walls using 2X4s. Attach walls in the corners. Once framed, you can install sheetrock on the exterior walls. Once the drywall is installed on the outside, add fiberglass insulation to the inside of the walls.
Install sheetrock on the interior, covering up the insulation in the walls. Finish the drywall and paint.
Step 4: Install Carpet
Install carpet foam and carpet on the floor inside the booth. This will make sure reflections caused by the floor are kept to a minimum. If you are using an open floor design and you built on the carpet, then you get to step this step.
Step 5: Install Sound Absorption Panels
This is where we take what is essentially just a small room, and turn it into an acoustically viable recording space. For a vocal booth, the goal is to get a “dead” space, which has no reverb or echo. This generally means the entire interior of the booth will be treated with some acoustic panel.
You could purchase acoustic foam such as Auralex for your sound control. You could also purchase acoustic panels made from fiberglass or Rockwool. However, these options could end up increasing the cost of your vocal booth.
An alternative for the DIY type of person would be to make your own acoustic panels to install inside your vocal booth. For more information on acoustic panels and how to build them check out this article.
Ideas on how to Build Soundproof Recording Vocal Booth at Home
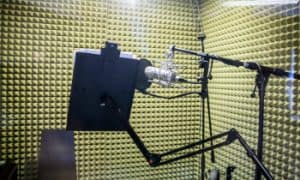
1. Building Recording Booth for Vocal Isolation and Acoustic Guitar
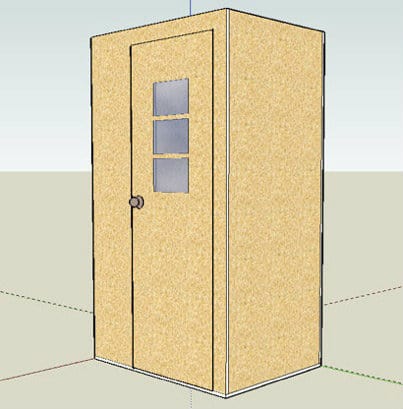
A permanent, rectangular vocal booth with basic electricity. This booth is built into the corner of a room and uses the two existing walls of the corner as the first two walls of the booth. This booth is 6’ long and 4’ wide and used an open floor design.
This build utilizes a solid core door with a clear glass panel.
The walls were constructed first from 2X4s. One foot of air space was left between the ceiling of the booth and the ceiling of the room in which it was housed.
12” X 12” studio foam panels that were 1” thick were used for sound absorption inside.
Build this booth
2. How to Build a SoundBooth on the Cheap
This booth is built from plywood and L-brackets with no framing and can be built for $2-$5 per square foot. The interesting part of this build is that this booth can be collapsed to save space when not in use. When ready to assemble the booth, the L-brackets will be attached by screw gun and hold the corners together.
A ceiling piece is set on top to enclose the entire booth. A hole was cut in this piece, on top of which a cheap light is set to illuminate the interior of the enclosure.
2” thick Auralex studio foam was used for sound dampening on the walls and ceiling inside of the booth.
Build this booth
3. Building A DIY Vocal Soundproof Booth

This build converts a small room into a vocal booth. The room was already fully enclosed and mostly just required acoustic treatment. It was built on a budget of $275-$325.
A very large bass trap was built to take up most of the back wall. It was framed with 1X6 boards. Rockwool, carpet, and limp-mass vinyl were used to fill the bass trap. This serves as the main sound dampening in the booth and is designed to absorb the low frequencies adequately.
4” thick pyramid style studio foam was used to treat the ceiling. 3” thick Auralex panels were mounted on the walls, with space behind them for better absorption of the low frequencies.
Build this booth
4. How to Build a Sound Booth
This booth is 4’X3’ and stands 7’ tall. It is constructed primarily out of ¾” thick MDF board. The booth has no framing, opting instead to attach along the edges using metal L-brackets.
This sound booth is meant to cut the noise from escaping or external noise from leaking in. 1” thick sound dampening panels are installed using lubricated screws. A rug or carpet can be added to the floor for further sound dampening.
Lamps are mounted inside to provide light. This sound booth can be assembled with a screw gun for a very modest budget.
Build this booth
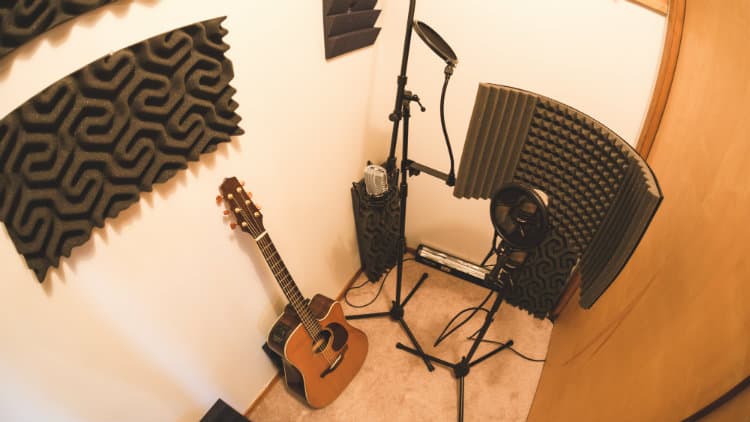
5. Turn A Closet into A Vocal Recording Booth
This booth is built into an existing walk-in closet. Since it is already separated from external sound sources, the primary concern in this build is sound dampening.
Moving blankets or egg crate foam can be used for the walls to keep costs down. Alternatively, 2” thick 12” X12” studio foam can be used for a more professional look and sound.
Studio foam is attached by using spray adhesive directly on the wall. Ceiling and door are also covered with studio foam to ensure a dry recording environment.
Carpet can be placed on top of a hard floor for additional sound dampening.
6. Build Pro Sound Studio & Vocal Booth
This vocal booth was made in a somewhat large room. This is a bit higher budget build having spent around $1000 on just the studio foam.
The walls are solid concrete. This certainly helps to cut out the external noise.
The floor is bare hardwood and left uncovered, which adds some reflection. This will help avoid too dead of a sound once every surface is acoustically treated.
Eggshell paint is applied before mounting the foam. All surfaces in the room are covered in an alternating pattern using 2” wedge studio foam. The foam is attached to the walls using a spray adhesive.
7. How to Build a Vocal Recording Booth EASY
This is a simple rectangular vocal booth. It is constructed out of 2X4s and OSB. A window is built into one wall so the performer can be seen and to allow light in..
Mattress topper foam is used to cover the interior walls and ceiling to provide sound dampening. It is installed using spray craft glue.
Carpet is used to cover the floor and provide additional reverberation dampening.
This is a low budget project that would be great for someone looking to cut external noises from their recordings without breaking the bank on their build.
8. How I Built My Vocal / Sound Booth
Another example of very high quality and effective soundproof booth built in a garage. This permanent booth is framed out of 2X3s. It has a subfloor with two layers of OSB sandwiching a layer of R-13 insulation.
The walls are filled with R-13 insulation. The exterior is covered with sheetrock. The interior is double layered with both sheetrock and Soundboard.
A solid core door is used. Carpet is applied to the floor. Two panels of glass were used for a window.
Auralex foam was used to cover the walls inside for sound dampening. 6” bass traps were used in the corners for the lower frequencies.
9. DIY Voice-Over Booth
The size of this booth is 4’X6’ and it was built for around $800 with 2X4 lumber and MDF boards.
On the exterior walls and ceiling, 1” thick R-5 insulation covers the framing. Sheetrock is mounted on top of the insulation. Wood floor paneling is installed on top to finish it.
Inside, the walls are filled with fire/sound guard insulation, and then covered with MDF board. Thick carpet is stapled on top of the MDF. Then moving blankets are stapled on top of the MDF. Finally, studio foam is used to cover all the interior walls.
Two fans are installed into the ceiling for air circulation. One pumps air in and one pulls air out.
10. Build a $500 Vocal Recording Booth
Pentagon-shaped vocal booth with a door and a window and built into the corner of an existing room.
The walls were built out of 2X4s, OSB, and 1” thick styrofoam. The acoustic adhesive was used for extra soundproofing. The walls are mounted on top of a 2X4 subfloor that is covered with ½” thick OSB.
A window was framed to reflect the sound waves and assist with soundproofing and phase cancellation.
Four fans were installed for maximum ventilation.
The door was made from OSB, styrofoam, and sheetrock.
2” thick studio foam was used to cover the interior walls and ceiling and provide sound dampening. A carpet was used for the floor.
11. Building a DIY “Soundproof” Home Vocal Recording Studio
This is a simple rectangular soundproof permanent vocal booth. It was framed out of 2X4s. Rockwool is used for soundproofing inside of the walls. Plywood covers the interior and exterior of the booth’s walls.
Carpet is stapled to the exterior of the booth. A synthetic glass window is installed in one wall.
Walls are mounted on top of a subfloor constructed of 2X4s and plywood. Walls are attached using L brackets and screws.
Interior seams are caulked and sealed to aid soundproofing.
Interior walls and ceiling are covered in 3” thick studio foam. Noise blocking acoustic mats are used to cover the floor.
Portable Mini Vocal Booth
12. Portable Vocal Isolation Booth Design Plans DIY
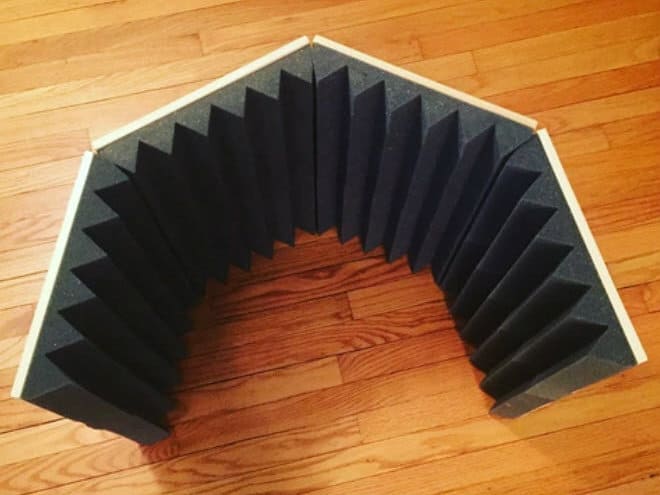
This booth is designed to sit on a desk or table. It can be folded for easy storage and is easily transported.
Four pieces of ¼” plywood are cut down to 12” wide by 24” long. These are then attached using two hinges at each seam.
2” thick acoustic foam is used to cover the inside of each of the boards. This foam is attached with either spray adhesive, double-sided tape, or liquid nails.
Handles are mounted on the outside of the end boards for easy carrying. Self-stick rubber non-slip grippers are attached to the bottom of the unit.
Build this booth
13. Voice Over Vocal Booth Construction
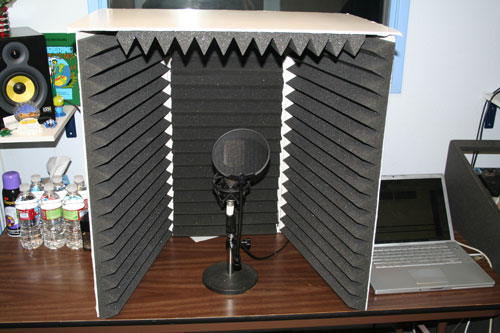
This small booth consists of three walls and a ceiling piece. It is intended to be set on a desk or a table. It folds very small for easy storage.
This booth is constructed of foam core panels. These panels are made of two outer paper layers with a styrofoam core in the middle. Four are used for this build.
Self-adhesive velcro is used to attach the edges. This makes it easy to take apart for storage.
2” thick Auralex acoustic foam is used to cover the inside of all four panels. It is attached using spray adhesive.
Build this booth
14. Portable Mini Vocal Booth
This is a very lightweight and inexpensive vocal booth concept. It folds closed and features a handle for easy portability. This project can be completed for around $15. It is intended to sit on a desk or table and create a V around the sound source.
The exterior is made from a long and thin cardboard box. The carrying handle is salvaged from a different box. The handle is placed in the juncture of the V so the whole unit can fold closed like a binder and the handle is sticking out of the thick end.
Sound isolation foam is attached to the inside of the cardboard using either staples or bolts with washers and nuts.
Build this booth
15. How to Build a Voice over Booth at Home for Under $30
This is a very simple and cheap project that is made from a cardboard box. Your microphone will sit inside of the box.
The box you use must be pretty sizeable to make room for the mic and the foam used to help dampen the reflections. For the sound dampening, a cheap convoluted mattress underlay is used for foam.
The entire inside of the box is covered with the mattress underlay. It is held in place using spray adhesive.
If reverberations are still evident, it is suggested to fill a closet with pillows and set this both inside of the closet.
Build this booth
16. DIY $23.00 Mini Sound Booth
This mini sound booth sits on top of a desk or a table and surrounds the microphone. This is one of the simplest designs to build and costs next to nothing. This sound booth works best when using a microphone with a base.
This sound booth is made from a rectangular, 20-gallon plastic storage container standing on its end. For sound dampening, a foam mattress topper pad was used. Spray adhesive was used to get the mattress pad to stick to the storage container. The mattress topper covers the entire inside of the storage container.
17. DIY Portable Sound Booth – Test & Review
This is a simple and small sound booth that is easily transportable. It is very cheap to build and will assemble in minutes.
The main structure is made from a storage cube from IKEA. It costs under $5. This will surround the microphone, which will be set inside.
Studio foam pieces are cut to fit each panel of the inside of the cube. The two side panels hold the top panel in place. All of the studio foam panels are pressure fit, and no adhesive or staples were used. A panel also covers the back of the inside of the cube.
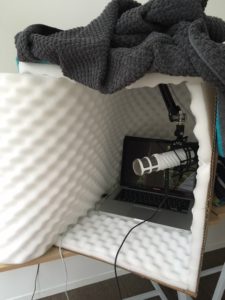
18. How to Build a Vocal Booth For Beginners
This design is cheap, light and very portable. It is also much larger than many of the other mobile designs, meaning a better reduction in the reverb and room sound. All of the materials are available at your local hardware or building supply store.
Two different types of packing blankets from u-haul were used for sound dampening. Metal curtain rings attach to the blankets by small metal clips. This allows them to hang from hooks on the ceiling. The hooks are self-stick adhesive hooks.
The blankets hang in a U shape behind the performer. They reach from ceiling to floor for maximum reduction in reverb.
19. How to Build a Vocal Booth in a Corner
This semi-portable corner booth will consist of two separate frames that are built from 1X4 and cut to whatever height you desire.
Each frame is filled with R-13 faced insulation that is stapled into place. Black sheets were then stretched across the frames and stapled into place to give a finished look.
Hinges were installed, connecting the two frames along one side. This allows the entire unit to be closed shut and stored flat.
An additional top piece is also framed from 1X4 and filled with R-1. A sheet is stretched across it and stapled in place. Then it can be set on top of the main booth structure to help stop overhead reflections.
20. How To Build 2 Types Of Vocal Booths – A Free and a $30 Option
The free method of building a vocal booth starts with a boom microphone stand set up in a “T” position. A blanket is then draped over the top of the boom. The microphone stand can be raised above the performers head to help stop reflections.
The performer will stand facing the blanket. The microphone is placed right up against the blanket.
For the cheap method, inexpensive wood furring strips from a building supply store are used to frame out a full-sized vocal booth. Blankets are then stapled across the top furring strip on three sides.
The backside is used as the doorway. A thick comforter is used for this section and is clipped to the top rail.
21. How To Build Vocal Booth Cheap From PVC
This build creates a 3’X3’X6’ square vocal booth. It will be framed out of 1” PVC pipe. Acoustic blankets with grommets will be used for the walls. This simple design can easily be disassembled for transport.
The PVC frame will stand over the performer’s head and will have one supporting pipe on each side of each corner. The blankets will be attached to the top tube of the PVC frame all the way around.
An additional acoustic blanket will be attached around the top of the structure and act as a ceiling, blocking overhead reflections.
22. Step-By-Step DIY Sound Booth on a Budget
This is simple to build, a full-sized vocal booth that is very effective at blocking noise and reducing reflections. This booth is made with producer quality sound absorption blankets for the walls. An additional sound absorption blanket covers the top to act as a ceiling.
This booth can be built for under $300 total. The price could be dropped even lower by using packing blankets instead of acoustic blankets. It can be disassembled for transportation.
The blankets used for this booth can be found at vocalboothtogo.com. Shower curtain rings are used to attach the sound absorption blankets to the top of the PVC frame.
Conclusion
There are many different options available for building your booth. These vary greatly in sound quality, price, and ease of construction.
Whether you need a portable booth for recording on the go, or a permanent booth with professional sound quality, one of these builds is sure to help get you started on the right foot.
If you found this article helpful, please give it a share to help it reach other people who may also find it useful. As always, Questions and comments are welcome and appreciated!

I love the quiet also. Thank you Eugene
Hi Eugene
Thanks for sharing your ideas and expertise. This is really very useful information. Thanks again!
Hi Gary,
Glad you liked it.
Terry