Everyone has a story about sounds coming through the walls. Whether an apartment, home or business, noisy walls are a problem! If you’re turning your basement or attic into living space, building, renovating or just trying to make your apartment quietly livable, you’re not alone. I decided I’d share what I’ve learned from how to soundproof a wall in my kids’ apartment residences and my home.
There are a lot of products available for reducing noise, but most work best when combined with other materials or practices. To soundproof a wall, here’s what you need to do:
- Determine what sound frequencies you want to control – High, Medium, Low
- Identify what kind of noise – Airborne Noise. Flanking Noise, Impact Noise
- Decouple the walls from each outer
- Increase the mass at or between the walls
- Use materials that absorb sound
- Select products that dampen sound
- Reduce other ways sound can get into your space
I’ll explain all 7 factors for new construction, existing walls, and apartment fixes. I’ll also look at some cheap, easy ways to reduce noise transfer, and even look at some myth-information.
Why Do You Need to Soundproof the Walls?
Noise entering or leaving your space is the main reason most people soundproof walls. Subdivisions are noisy compared to rural living but apartments and multiplex homes are even louder.
Most of us need a quiet place to sleep, rest, and recoup our mental balance, so we don’t get over tired, cranky, headaches, or stressed out. If your abode has paper thin walls or isn’t well insulated, being bombarded with noise isn’t very restful.
Peace and quiet are what it’s all about. Few of us want to sleep with earplugs or have to yell to make ourselves heard, especially in our homes! To put things in perspective – a quiet room has an ambient noise level of around 20dB, that’s 1/16th as loud as an ordinary conversation level of 60dB; or the average office.
A vacuum or a busy street is about 70dB, or twice as loud as an ordinary conversation. For every 10dB noise increases, our perception of noise doubles.
When your daughter’s band practices in the basement, that 110dB peak is a whopping 32 times as loud as an ordinary conversation. Hitting your horn at the neighbor’s cat at 3 AM pops an eye-opening 100dB!
We all need a place to rest, and I’m not referring to the side yard of the local church! With some thought, design, proper materials and intelligent practices, we can take the noise chaos out of our living space and make it a more tranquil and healthy place.
Types of Building Noise to Consider
There are 3 ways noises are transmitted into or out of a room. Knowing how a sound moves makes it easier to find a way to block or reduce it.
Airborne Noise
Sound waves travel in straight lines through the air. They travel in or out through doorways, open windows, ductwork, or anywhere air moves in or out of a structure.
Flanking Noise
If there are no direct lines for sound to travel and nothing to absorb it, it finds an indirect path. It will ricochet around corners, reverberate through concrete and wooden floors, sneak through ductwork, or escape under a door and in under another.
Impact Noise
Impact or mechanical noise is a class all its own – Impact Isolation Class (IIC) that is. When a sound wave strikes a solid structure, it becomes a vibration and travels through to the open space beyond. A shoe dropping on the floor, a ball bouncing on the driveway, a dog barking outside, even the furnace and plumbing all add to the noise influx!
Recommended Sound Transmission Class (STC) Rating for Walls
Modern building practices are quicker and more convenient than the lathe and plaster of the past, but they’re not as soundproof. The Sound Transmission Class (STC) is a rating system that identifies how well different products and building practices work to block sound.
The ratings represent ideal laboratory conditions. So real-life applications will be lower. Every wall is different, as plumbing, electrical, and HVAC provide noise highways for sounds within walls.
The STC is still a useful way to compare products and practices. A typical 2×4 wood stud wall with 1/2” drywall on both sides has an STC rating of 33 or 34 – it may be different depending on high, medium and low range sound frequencies, though.
When testing, a noise or frequency is generated on one side of the wall and a sound meter on the other side of the wall records the sound level that penetrates the wall into the adjacent space. The difference is calculated to identify the Transmission Loss (TL) which is reflected in the STC rating.
An STC rating of 40 is supposed to represent a quiet home. However, the International Building Code (IBC) recommends a minimum STC of 50 for walls, floors and ceilings. They further increase the minimum recommendations for bedrooms to 52 and bathrooms, kitchens and living rooms to a rating of 56.
Adding sound rated products to the existing wall or between walls, or using improved building practices, will improve the STC rating.
Main Principles of Soundproofing Walls
Identifying the type of noise that is disturbing you is the first step. The next step is determining how to reduce or prevent that sound or vibration from getting in or out of wherever.
Adding Mass
Increasing the mass reduces the amount of sound that can penetrate a wall or barrier. Adding a 5/8” layer of gypsum to the existing 1/2” drywall wall will only improve the transmission loss by about 3dB.
Absorption
The denser the material, the better it absorbs sound. MDF (medium density fiberboard), Mass Loaded Vinyl (MLV), and drywall have better STC ratings than regular insulation and are denser. Adding fiberglass or mineral wool insulation inside wall cavities will improve absorption ratings.
Conduction
Conduction is the movement of sound through wall and floor materials. Sound hitting sheetrock nailed or screwed to wooden 2×4 studs will be conducted through the connected structures into the adjacent space or room. Decoupling or increased mass or absorption will reduce conduction.
Mechanical Decoupling/Isolation
Decoupling is presently the best building practice for preventing or reducing sound transmission through walls, ceilings and floors. Use of sound isolation clips and channels, and double wall construction are two effective ways to stop flanking and impact noise movement.
Resonance
Noise or impact frequencies (usually low frequencies) that vibrate a wall will resonate through even an insulated decoupled wall. Use of viscoelastic damping products like Green Glue will help reduce vibration resonance through barriers.
Note: Soundproofing a wall is a multi-step process. The more sound paths you block or reduce, the better the soundproofing effect you’ll achieve.
How To Soundproof a Wall: Step by Step Guide
There are different ways to soundproof a wall, and it depends on if the walls are already finished or new construction, and if you own or rent. Check your rental agreement to see what you’re permitted to do. I’ll take a look at several ways to improve sound control below.
Identify Where The Noise Comes From
For existing walls, it’s best to identify where the bothersome noises are coming from. Does it seem to come through a specific window, door or maybe a vent?
If it seems to come through a wall shared with another room or residence, then put your effort there. Don’t spread your noise reducing dollars thin spend it where it will make the greatest improvement.
For windows and doors, check for drafts. If air can breeze through, then so can sound. Replace weather stripping and seals with quality acoustic seals and strips.
Pry the wooden window and door molding off the inside and see if it’s insulated. Often there is a gap left, or fiberglass has been stuffed in to fill the gap. Fiberglass loses its thermal and soundproofing abilities when it’s compressed. Replace it with acoustic spray foam or another noise-reducing material.
Doors can be replaced with heavier solid core doors, and acoustical curtains can be used on windows. Keeping sound out often has the added benefit of improving heating and cooling costs, so if you are speaking with a landlord, that might be a good angle to try.
If the sound is coming through the walls or ductwork, the solution may be more difficult. Ownership vs. rental also impacts what you can and cannot do. Adding mass and sound absorbing materials to the walls, damping the sound with a viscoelastic material, and decoupling with sound isolation clips and rails are great if you own your home.
If you rent, consider hanging noise absorbing wall panels, mass loaded vinyl or even a heavy moving blanket to add mass and absorb offending sounds. You could speak with your landlord and neighbors in adjacent apartments about adding an area carpet or hall runner, so impact noises from above are reduced.
Some landlords even have an improvement clause that may cover costs or reduce rent for work done. You’re more likely to renew your lease if you’re happy where you are, and sleep isn’t disturbed.
Existing Walls – Retrofit Soundproofing
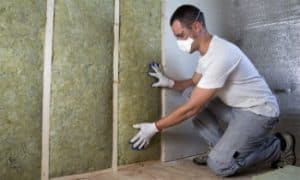
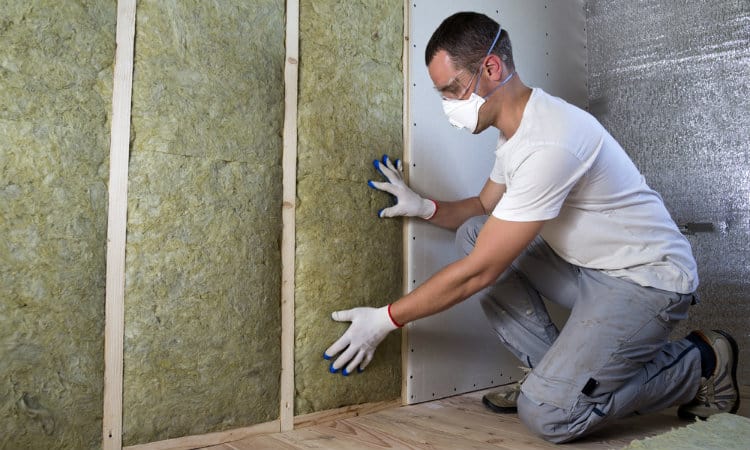
Add Insulation to a Wall Without Demolishing It
One way to improve the soundproofing of a wall is to improve its density. Blown in cellulose insulation helps to absorb and dampen noise, and reduce vibration resonance.
It has an STC rating of 44, is made of recycled material, and is fire retardant. Small holes (2” dia.) are cut near the top of each cavity between the studs, and the material is blown in.
How Do I Soundproof An Existing Wall?
Here are three ways you can improve the soundproofing of a finished wall. Each will work better if you have insulation blown into the stud cavities. The Best Way will improve the STC the most without having to mortgage the house.
The Budget Plan is less expensive, but will still reduce the noise transmission. The Premium Plan is an expensive option that isn’t necessary unless you’re trying to block out a sound studio.
Best Way
Step 1: Locate studs in the wall and mark them on the floor and ceiling with a pencil or chalk. You don’t want to mark them on the wall and then covered them up. I know someone who marked them on scrap, so there was no mark on the floor; unfortunately, they used the piece for something else.
Step 2: Install to unwanted noises coming or going through the wall. It comes in 4-foot wide rolls and can be cut with a utility knife or heavy scissors. Roll out on the floor, measure (twice) and cut; use a straight edge when cutting.
Overlap the pieces of MLV by 2-inches; add extra if needed for securing to door or window frames. Put a plank or scrap drywall under the cut line, so you don’t scar the floor.
Hold the top edge flush to the ceiling – a helper is a good idea. Use wide flat-head (shingle) nails, screws, or power stapler to secure the MLV to the wall. Start at the top and work down to the floor.
It should be flush at the top, bottom, edges, and all corners, and have no wrinkles. Trim around electrical boxes or other openings. Use PVC tape to seal gaps.
Step 3: Install a new layer of drywall over MLV. 5/8” drywall or soundproofing drywall will increase the wall density and absorbs sound. Lean it against the wall or lay it on the floor and mark out any straight cuts or openings.
Score through the paper into the gypsum with the point of a sharp utility knife, and then snap (bend) it off at the line. Run the knife tip through the back paper to separate the pieces. Use a drywall saw or spiral saw to cut out outlets or other openings.
Screw the sheetrock through the MLV into the original drywall. Don’t screw into the studs as it will allow vibrational sound a direct path.
Step 4: Seal the top, bottom and outside edges of the new wall with acoustic caulking. It will help reduce sound finding a way through. Remember to caulk around outlets and openings too.
Use an acoustic drywall compound to cover screws and seams in preparation to paint.
Budget Plan
Step 1: Locate the studs and mark on the floor and ceiling, so you know where they are. You want to miss them when securing the second layer of gypsum.
Step 2: Measure, mark and cut sheetrock to fit, remember to cut out outlets and openings. Make sure there is a 1/4” gap between the ceiling, floor, and adjacent walls to help decouple the new layer and reduce flanking noise.
Step 3: Apply to the back of the new layer of drywall to reduce vibration transfer. Use a zig-zag or a pattern that covers the full back. You can use a drywall mud paddle to spread it evenly if you want.
The acoustic caulk is a noise damping layer and reduces mechanical and airborne sounds and vibrations by decoupling the two rigid dense layers.
Step 4: Install a new layer of drywall over existing sheetrock and ensure the gap at the top, bottom, and neighboring walls is maintained. Secure the new sheet with drywall screws into the old layer. Do not screw into the studs as that will couple the two layers together instead of decoupling them.
Step 5: Seal the 1/4” edge gaps, around outlets, and any holes with acoustical sealant to prevent noise leaking through. The caulk is paintable and stays flexible so that it won’t crack.
Premium Plan
The more layers of drywall the greater the density, and the more sound absorbing potential. A layer of MLV will also block sound, and using resilient channels will decouple the wall layers reducing airborne and mechanical noise. All work together to prevent sound from moving through the wall.
Step 1: Mark stud locations on floor and ceiling, so you know where they are. You want to miss them when screwing other layers on and prevent noise vibration moving through the wall.
Step 2: Install MLV to the existing drywall. Nail, screw or staple into place. Overlap seams by 2-inches and keep flush to the ceiling, floor, and adjacent walls. Remember to cut out electrical boxes and other openings; use PVC tap to seal seams and edges.
Step 3: Measure, cut, and attach the drywall layer to the wall through the MLV. There should be a 1/4” gap at the floor, ceiling and adjacent walls. Make sure the screws don’t go into studs too; the idea is to create the greatest separation between the layers.
Step 4: Install to the new layer of gypsum to decouple the next layer from any existing connection. Draw horizontal (level) lines on the wall every 2-feet from the floor up. Try not to secure the resilient channel where there are studs.
Step 5: Install another new layer of drywall to the resilient channels. The new layer should be the same size as the first added layer, but try not to have seams in the same location. Remember the 1/4″ gap too. Attach the new layer with screws, so they too miss the studs.
Step 5: Seal the edges with Green Glue to prevent any airborne or vibration sound waves from sneaking through.
New Walls DIY Soundproofing
Sound travels like the wind. Wherever there is a small air leak or gap, the sound will invade. The goal is to make rooms as airtight as possible to keep noise from getting out or breaking into your quiet place.
Different construction techniques and building materials work to improve soundproofing, but they are labor intensive and increase costs. Three new wall soundproofing practices are explained below.
The Best Method is the most cost-effective and reduces more noise than the Budget Method. The Premium Method is the most expensive option, and will also prevent the most noise movement.
When considering building materials, wood or steel stud construction and the type of soundproofing insulation are deciding factors as they affect costs. An interior wall of 2×4 wood studs at 16″ centers and two layers 5/8″ of sheetrock each side with R13 batt insulation between has an STC of 46.
The same wall built with 3-5/8” steel studs and batten insulation for metal frame walls has an STC rating of 58; a noticeable difference when soundproofing.
Best Method
Step 1: Plug anywhere sound can leak through the wall. If you can feel a breeze, then the noise is coming through. Terminating any path sound can travel, or making it more difficult, is the plan.
Electrical boxes are often installed back to back in the same cavity of a wall. It’s easier but creates a hole in both wall faces for sound to move.
Move or install outlets, so they are in different wall cavities, and not attached to the same stud. Openings on one wall face shouldn’t match up with those on the other wall face.
Seal electrical outlets and switch boxes with acoustical putty pads that are fire and sound rated. The putty is easy to cut and form by hand around single or multiple electrical outlet boxes to seal any openings.
I would suggest putty pads from . Their putty pads have an STC rating of 49. Alternatively, use squares of MLV and PVC tape to seal the boxes.
Seal around receptacle and switch boxes with acoustic caulk to prevent sound waves and vibrations from squeezing past. The caulk stays flexible, doesn’t crack, and is paintable.
Install or self-adhesive backed draft sealers under receptacle and switch wall plates. The gaskets and sealers provide a barrier across the open face of the electrical box preventing soundwaves and drafts from seeping through.
Remove door and window trim, ensure they are properly insulated and sealed with acoustical caulk. Seal door casings with proper gaskets and rubber foam weather-seal tape and add a door sweep to keep drafts and noise out.
Ducts make excellent sound highways. Make sure ducts don’t have back-to-back openings, a common practice with cold air returns.
Don’t have the same branch duct feed more than one room. Wrap metal ducts with acoustic material, or use self-adhesive acoustic foam on the inside of the duct as far as you can reach. Use insulated flex pipe and try to have some bends to prevent straight line sound from traveling.
Step 2: Insulate the Walls
There are several options for insulating the empty cavities between the wall studs. Acoustic insulation is usually more expensive, use regular insulation.
Damp-blown cellulose is blown against the exposed back of a wall and then flattened while still damp. High-density cotton insulation comes in batts that fit between the studs. R-13 fiberglass batts are another option as are mineral wool batts.
The battens can be slit for wires and pipes and trimmed around electrical junction boxes. The more you compress the batts, the less effective at absorbing noise.
Note: wear gloves, goggles, and a dust mask or respirator when handling any insulation.
Step 3: Add mass loaded vinyl (MLV) to the walls to block noise. It should be flush to the ceiling, floor and overlap other pieces by 2-inches. MLV comes in 4-foot wide rolls and can be cut with heavy scissors or a knife.
Nail, screw or staple it at the top, and then to the studs. Remember to cut out electrical outlets and other openings in the walls. Use PVC tap to seal all seams and gaps.
Step 4: Install metal resilient channels parallel to the floor and every 2-feet up the wall. The channels are screwed to the studs over the MLV and keep the drywall away from the studs, effectively decoupling the wall.
An alternative is to use whisper clips and headrails instead of resilient channels. Follow the manufacturer’s instructions for the best results.
Step 5: Install the first layer of gypsum to the resilient channels to add mass and density. Mark the stud locations on the floor or ceiling, so you don’t screw the second layer of drywall to them.
There should be a 1/4” gap at the ceiling, floor and where it abuts the adjacent walls. The gap helps prevent flanking and mechanical noise from finding a way through.
You can use 1/2” sheetrock, or the denser (and better) 5/8” sheet, or break the bank and use sound proof drywall. It has a layer of steel sandwiched in the gypsum layers for added density.
Step 6: Seal the gaps and edges with sound sealant to prevent noise vibration penetrating the wall.
Step 7: Apply green glue soundproofing compound to the back of the second layer of drywall after it’s been measured and cut. The acoustic mixture should be at least 0.5mm thick and helps to decouple the wall layers preventing impact and vibration noise transfer.
Step 8: Install the second drywall layer after the noise compound has been applied. The gypsum sheets should have a 1/4” space where it meets other walls, the ceiling, and the floor.
Stager the sheets, so seams don’t line up. Make sure the screws again miss all studs, so all your work isn’t wasted.
Step 9: Caulk all seams and gaps with acoustic caulking to reduce or prevent flanking, mechanical and airborne sound from finding a way in or out.
Budget Method
The Budget Method begins with the same steps as the Best Method. You have to plug all holes that sound could get through using acoustical sealant and the other methods suggested. Next, you insulate the wall with a minimum of R11; the higher the R-value, the better the sound absorption.
Put a pencil or chalk mark on the floor and ceiling to identify where the studs are. Cut and install the first layer of 5/8” drywall.
You can use 1/2,” but it isn’t as dense, so adds less soundproofing. Make sure there is a 1/4” gap at the ceiling, floor, and corner walls, it will help separate some of the mechanical noise.
Seal all gaps, edges, holes, and seams with acoustic sealant using . This will help prevent airborne sound and vibration from sneaking in or out of the room.
Cut the second layer of 5/8” drywall, so the seams don’t line up with the first layer. Make sure there is a gap at the ceiling, floor, and corner walls.
Apply a layer of Green Glue to the back of the second layer. It should be at least 1/8” thick. Green glues isn’t a glue, it is a viscoelastic material that helps decouple the two gypsum layers and helps break any sound paths.
Install the second layer of sheetrock, so the seams don’t align with the first layer. Screw the second layer to the first, so no screws go into the studs. This will further help to separate the vibration paths through the wall.
The last step is to seal all gaps and around outlets, switches and other holes with acoustic caulk. You’re now ready to mud and tape your new wall.
Premium Methods
The Premium Method is more expensive and labor intensive. It involves different interior wall construction techniques that aren’t standard practices. They also make for thicker walls that eat up square footage – a problem in some structures.
The first decision is wood or metal stud construction. Metal studs have better STC ratings than wood since the thinner metal doesn’t transfer sound vibration as well.
The next consideration is the type of construction – staggered stud wall or double wall construction. The double wall wood stud can achieve an STC of 64, while a staggered stud wall with the same drywall configuration gets an STC rate of 55.
Staggered Stud Walls
The staggered stud wall technique uses a 2×6 top and bottom plate, with 2×4 studs miss-aligned on opposite sides at 24” centers. This creates a structural gap between the two sheetrock sides and breaks the sound path. Unfortunately, the plates still permit mechanical and airborne sound transfer.
Insulate one wall side with sound insulation is more effective than insulating both sides. The uninsulated cavity helps reduce and deaden the sound. Use to insulate around electrical boxes for added sound protection.
The internal wall separation makes resilient or hat channels unnecessary, but hanging MLV will block more sound. Finish each wall face similar to the Budget drywall practice.
Double Walls
The double wall style is like building a room within a room. Build a 2×4 stud wall with 2×4 plates. Build a second 2×4 wall beside it, leaving a 1/2” gap between the top and bottom plates – the walls do not touch anywhere.
Note: For more information, please see our article How to Build a Soundproof Room-Within-a-Room.
The separate walls effectively stop any airborne or mechanical vibration. The studs should be at 16-inch centers. Insulate one wall only, and apply sheetrock the same as the staggered wall technique.
Another soundproofing strategy is to use two layers of 5/8” gypsum on one wall face, and a 5/8” with a 1/2” layer on the other face. This adds to the decoupling effect by changing up the wall densities which affects the movement of resonating frequencies.
Cheap, Easy and Quick Ways to Add Soundproofing to a Wall
Install Acoustic Foam Panels
can help reduce reverberation, slap, feedback, and echo in a room. The idea is to stick or hang them on the walls of a room to most effectively absorb noise.
Placed across from speakers and next to them, they help improve the sound quality inside a room and decrease low-frequency resonance. Use in media rooms, home theaters, even the living room conversation quality.
I like . The panels are high density and have a high NRC rating. They reduce feedback, echo, and absorb noise where needed. They are easy to install and available from Amazon.
Absorb Sound with Acoustic Panels
Acoustic panels come in different sizes and composition. They range from 12”x12” up to 4’x10’ or larger. Most have high NRC ratings and can be hung anywhere to absorb echo and reverberation in a room.
Some are fabric covered frames; others are fabric wrapped wall panels that have a sound barrier sandwiched between two fiberglass sheets which also block sound traveling through.
For the home theater room or office, my preference is . They are 2’x4’, have an NRC rating of 1.0, and improve the sound quality in a room by reducing echo and reverberation. They are available from Amazon in different fabric covers to compliment your décor.
How to Soundproof a Wall Cheaply with Soundproof Curtains
Heavy thermal blackout curtains can be used to block noise coming through windows, doors, and even walls. The dense fabric absorbs sound and reduces noise, echo, and bounce. Hang on a noisy wall to improve and enjoy some more quiet.
NICETOWN has a product I like on Amazon. It’s a that absorbs and blocks sound. It can be used to reduce noise in a variety of ways, plus offer visual privacy.
Hang Moving Blankets
Moving blankets come in different colors and can be hung to block and absorb sound entering or leaving a room. They’re a dense quilted cotton polyester fabric that can be used for sound damping.
Acoustic blanket material is also available in 4’x8’ blankets or 4’x25’ rolls and comes in 4 colors. It’s made of two layers of fiberglass cloth coated in vinyl with denser fiberglass quilting in between. It has an STC rating between 29 and 33, it absorbs and blocks sound.
Amazon carries which are my choice. They’re more versatile and can be used in multiple locations. Good for absorbing, blocking, and damping sound. There’s also less risk of fiberglass particles floating around.
For more information on soundproof blankets please see our article Soundproof Blankets for Windows.
Install Window Inserts
Add a window insert on the inside of your window frame. They can be attached with screws or adhesive magnetic strips. The inserts help to block street and neighborhood noise from outside getting in.
from Amazon looks like a useful product to me. The kit will do windows up to 4’x4’, so could do several smaller windows.
You have to supply the plastic or acrylic sheet and cut it to the dimensions you want. It’s a good product for renters who don’t want to screw into window frames.
Weather Stripping for Windows and Doors
Adding thick weather stripping to windows and doors helps prevent drafts, and block sound waves from breezing in.
I like from Amazon. It comes in different thicknesses and lengths for windows and doors. It blocks air getting through; therefore noise will be reduced too.
Add Solid-Core Doors
Replace hollow-core interior doors with smooth-faced, solid-core MDF doors. They’ll damp sound transfer and are cheaper than solid-core wood or steel doors. They help prevent flanking and absorb sound.
Install Stoppers for Doors
Install to exterior metal doors. The magnet seals the door and to the frame creating a weatherproof and soundproof seal.
Adding a rubber door strip to the bottom of the door finishes the door seal. It prevents sound and weather from blowing in under the door. Both work together to block out airborne noise and flanking sound.
Amazon has two products I like that will work for homeowners and apartment dwellers. M-D Building Products has magnetic weather-strip for steel doors. They even have multi-packs available for conscientious apartment owners who want to reduce the noise going into their tenant’s apartments.
The other product is a . It has a 39” rubber self-adhesive sweep strip to seal the bottom of the door.
Plus, 16’ of self-sticking wind, dust, and noise strip for door and window frames. Anything that prevents wind from getting in also prevents sound from getting in.
Myth-Information About Some Wall Soundproofing Methods
Soundproof Paint
To have any effect on noise, paint would need to be at least 1/8” thick. It normally is less than 1/30,000” thick. That’s a long way from being soundproof. It may seal a pinhole, but most paints will do that.
Soundproof Wallpaper
Wallpaper isn’t much thicker than paint. Sound proof products may have thin foam or other noise reducing backing, but again, it’s not thick or dense enough to have much effect.
Foam Rubber
Acoustic foam rubber is very different from your exercise matt, underlay or mouse pad. To be effective, it must have a dense mass or MLV layer.
Carpet on the Wall
Carpet on the walls may take you back to the ‘70s, but you should leave it there. It doesn’t have the mass or density to do anything but attract bugs. If you use thick adhesive caulk to glue it to the wall, it’s the glue that will reduce some of the reverberation, not the carpet.
Egg Carton Soundproofing
One of the biggest myths about soundproofing is egg cartons. See more in our article Egg Carton Soundproofing – It Doesn’t Work. Better Options Here.
Conclusion
Soundproofing walls doesn’t have to be expensive. The 7 factors I’ve explained should provide you with a starting point.
A homeowner has a budget and investment to consider; the tenant has their landlord and neighbors to consider. Much depends on what kind of noise you need to reduce to be comfortable, how much you’ll have to do, and what you’re willing to do.
The homeowner and builder have more options to choose from, and the renter may want to focus on the cheaper and easier options discussed. Hopefully, you’ve found some information you can use. Please share it with others who may find it helpful. Your feedback is always appreciated.
Related posts:

HI Eugene,
Great blog & info, thank you! I’m building a room in a room drum studio. The outer wall will be stud, but was considering a concrete block inner room (isolated wall / ceiling.) Any thoughts on this vs double stud walls? I thought the additional mass would provide better soundproofing assuming all the other precautions are the same…
Thanks again,
Jeremy
Hi how can I sound proof a wall which has a radiator on it?
Hi Toni,
Best option is to move the radiator away from the wall, then soundproof it. Although this might be an expensive option involving plumbers and/or electricians–depending on the type of radiator. Other than that, you can soundproof the entire wall around the radiator, which should be 80% – 90% of the area. If you have even 3/4″ clearance behind it, you should be able to slide a sheet of drywall behind it to add some mass to that area of the wall. With any luck, you could even get a sheet of Mass Loaded Vinyl between the existing drywall and new drywall.
Terry
Thanks for the great articles!
Question: for a drum studio, in a room in a barn, with a wall-within-a-wall design (both walls will be insulated, and innermost surface will be 2 layers of 5/8″ sheetrock with either green compound or resilient channels in-between), would adding 1lb MLV in between the 2 walls help, or just be overkill?
Very specific information, helpful for me! Thanks for sharing
Hi,
Good to hear it was helpful.
Thanks,
Terry
Thank you for sharing such detailed article. I will follow to create such a good space
Good to hear it is helpful.
Terry
Hi, I have 2 rooms with pocket doors in between, I need a solution to soundproof between the rooms at the times I need the door closed , but be able to remove the soundproof when I need the doors open, I was thinking about some type of easily movable panel ( maybe those pink insulation panels) do you have any ideas? thank you
Hi Tyba,
You can consider soundproof curtains, or blankets which can slide out of the way, Acoustidoor from Residential Acoustics. You may also get more ideas from our articles Soundproof Blankets For Windows and How to Soundproof Pocket Doors.
Terry
really good shares. I succeed
Thank you.
Terry
good solution. I am also planning to use these solutions
Hope they work well for you.
Terry
I’m planning to soundproof my bedroom walls. Thanks for sharing, it really helped me out.