When I was finishing soundproofing my office, I needed to know how to soundproof a door. It was the last part of my project, and as I researched my options, I realized it should have been one of the first things I did. There was some work I should have done before the walls were closed up, which would have made it easier to soundproof the door.
I discussed my solutions with some friends and even some clients who were interested, and they wanted information for their projects. I figured if I was putting it together for them, others might be interested, so I decided to share my findings here.

For even more information on soundproofing swing doors and pocket doors, please see our articles, How to Soundproof a Bathroom Door and How to Soundproof a Pocket Door.
Door Glossary
There are several parts of door installation, so for discussion purposes, I thought I should list and explain the parts, so we have a common understanding.
Door: also called a slab,
Threshold: a piece of wood, metal, plastic or stone under the door opening – also called the sill,
Hinges: a movable mechanism that connects the door to the jamb and allows it to open or close,
Lockset: the handle or knob for opening, closing or securing the door,
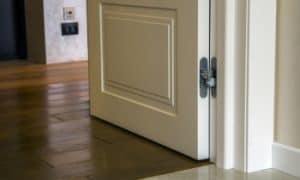
Jamb: the vertical parts of the door frame; the door is hinged to one, and latches to the other,
Head: also known as the head jamb or header; the top of the door frame,
Door Stop Molding: strips of molding on the jambs that the door stops against when closed,
Door Casing: trim around the jambs where it meets the walls.
Why Door is the Biggest Sound Leak
When soundproofing a room, whether during construction or after construction, we tend to focus on the walls and ceiling. We know that any hole, crevasse, or crack will permit sound waves to enter or exit a room.
We insulate the walls and ceiling, use MLV to block sound, decouple the drywall from the framing, and damp it with a viscoelastic material.
We can increase the STC (sound transmission class) of a room from less than 30, to more than 60 or 70. However, all that effort goes out the door, literally, if we forget to soundproof the door.
A cheap hollow core door has an STC of 20 or less. That means the door should be a high priority when decreasing sound movement. Remember, the larger the opening, the more difficult controlling noise movement will be.
Most doors, especially interior doors, are poor sound insulators. However, even a solid core door will only block so much sound.
Door jambs, thresholds, stop molding, and casing also often let light or air through, which means noise can penetrate too. They allow flanking noise to penetrate.
The larger the doorway, the easier it is for sound to glide through.
Door Frames
Interior (and exterior) door frames in many residential and commercial structures are normally rough framed with wood or metal studs during construction. The opening is often 2-inches or larger than the door to allow it to be slid into place and be shimmed level.
The walls are usually drywalled to the door opening before the doors are inserted. This protects the door from damage during the construction phase.
When the door jambs are shimmed into place, a relatively large gap is left all around the door frame which permits light and thus flanking sound movement. You won’t see the gap since it is covered with the casing molding, but it is still there.
Door Jambs
The next major flanking pathway is where the door slab meets the jambs. To visually see the problem, put a bright light source outside the door, so it shines on the door.
Darken the inside of the room as much as possible, and close the door (and turn off all the lights inside the room). When you look at the closed door from the darkened side, any light you see is a sound path.
Flanking Paths
Sound waves travel in a straight line direction. Flanking noise are sound waves that bounce or ricochet around corners, sneak under doors or through electrical boxes, or reverberate through solid mass like concrete or wooden floors, and doors. A straight path from the noise source is often more “forceful” than a redirect.
To check how well your existing doorway stops sound, set a radio at conversation level inside the room and about 3-feet from the door – it should be facing the door. Go outside the room, shut the door, and listen to what you hear.
Put your ear against the door, if the sound diminishes, what you may have been hearing was coming through the jamb and casing. Do the same on the left and right side of the door casing too. If you can discern any of the words coming from your radio, others can too.
Materials
Choosing better sound rated material for casings, jambs, stops, and doors will improve the transmission loss (TL). Plywood (1/2”) and solid wood have an STC between 15 and 20, while 1/2” MDF is closer to 25. The thickness of the door doesn’t seem to make much difference either, the thicker the door, the higher the resonant frequency.
Understanding Sound Reduction Ratings
To understand sound reduction ratings, you need to know and understand the jargon used and their abbreviations.
STC – Sound Transmission Class is a numeric system rating how well walls, doors, windows, floors, ceilings, and other materials or combination of materials decrease the transmission of sound. It rates the sound decrease (TL) in decibels (dB) of 16 standard frequencies between 125 Hz and 4,000 Hz. A reference curve is compared to the graphed results you may have from testing your wall, door, ceiling, etc.; the higher the STC, the better.
NRC – Noise Reduction Coefficient is a value, usually between 0 and 1 and rounded to 0.05 of the nearest increment. It is used to identify the soundwave absorption or reflection of a material based on 4 frequencies ranges common in speech. They are 250 dB, 500 dB, 1000 dB, and 2000 dB.
SAA – Sound Absorption Average is a rating system similar to the NRC. However, it uses 12 different 1/3 octave bands between 200 Hz and 2,500 Hz.
TL – Transmission Loss is the decrease of intensity of a soundwave as it moves from the source through the air and other materials. The values are between 0 and 1 in increments of 0.1, with 1 signifying 100% of the sound being absorbed.
Hz – Hertz is a measurement of frequency based on one cycle per second. One cycle in a sound wave represents one crest to the next or one valley to the next. It is used to measure sound waves, alternating electrical current and cyclical waveforms. It identifies the number of hills or valleys in one second. Low frequencies like a drum have a low number of hills per second, and a whistle has a higher frequency with more hills per second. Humans can commonly hear frequencies between 20 Hz and 20,000 Hz, depending on age and other factors. Some people can hear lower than 20 Hz, and some up to 28,000 Hz.
dB – Decibels are used to measure sound intensity. Humans can hear from near total silence, 0 dB, for example, skin lightly brushing a surface, to the loudest noise like a jet engine which is a trillion times louder. The decibel scale is more a comparative scale. A noise 10 times louder than 0 dB, is 10 dB, while 20 dB is 100 times louder, 30 dB is 1000 times louder, and 40 dB is 10,000 times louder than total silence. Exposure longer than 8 hours to sounds over 90 decibels can cause hearing damage. 90 dB is 1,000,000,000 times louder than total silence.
Sound Transmission Loss (TL)
Sound transmission loss (TL) is measured in decibels (dB). It is based on how well a material or structure, like a wall or door, blocks a specific 1/3 octave frequency range or band.
This is important when considering STC and TL since a material may block mid-range frequencies, but not low or high frequencies; or a combination of ranges.
A half inch of plywood has a transmission loss of about 15 dB at 125 Hz, 20 dB at 250 Hz, 25 dB at 500 Hz and dips back to 20 dB at 2,000 Hz. While the same thickness of drywall is similar from 125 Hz to 500 Hz but reaches 30 dB at 2,000 Hz. They are both around 25 dB at 4,000 Hz.
An octave band refers to all the frequencies in an octave. Two sound frequencies an octave apart will sound the same to most of us. The musical note “A” is the lowest on a piano, and has a frequency of 27.5 Hz – so it has 27.5 wave crests per second.
One octave higher, and the “A” has a frequency of 55 Hz. The next octave is 110, then 220, 440, 880, and so on. Each octave doubles the previous one. Each “A” note will sound the same to most of us, just louder.
Sound Transmission Class (STC)
There are guidelines that identify acceptable minimums of STC ratings within the building industry for residential and commercial structures. They also include ratings of impact insulation class (IIC) between floors and ceilings of separate dwellings, like apartments.
The ASTM (American Society for Testing and Materials), now the ASTM International and the IBC (International Building Code) are the two key bodies that set the standards.
The STC of a wall, ceiling, floor, and partition are derived from lab testing of assemblies commonly used in construction. The assemblies should have an STC rating of 50 or greater according to Section 1207 of the IBC and ASTM E 90 and E 492.
However, it is recognized that actual buildings versus lab conditions aren’t the same. ASTM E 336 and E 1007 accept an STC of 45 for field tests of walls and partitions, and floor and ceiling assemblies.
OITC or Outdoor/Indoor Transmission Class
Outdoor-Indoor Transmission Class was developed in 1990 to measure exterior sound penetration through exterior walls, glazing, or barriers into interior living or workspaces. Outside noises more often are lower frequencies than inside sounds, so OITC focusses its calculations on low-frequency noise.
OITC measures TL from 80 dB while STC measures from 125 dB. OITC isn’t commonly used but does provide useful information when looking at products like windows and exterior doors.
Main Principles of Soundproofing Doors
Doors are part of a wall assembly and an integral component in soundproofing. Doors that prevent sound penetration are heavier and require stronger wall construction.
Walls that flex every time a door is opened or closed will cause door seals and gaskets to move out of alignment. Even a small crack or opening can open the floodgates of sound transfer.
Interior and exterior doors usually have an STC rating. The greater the value, the better it will decrease sound transfer. To better understand the part the door plays in soundproofing a room, here’s a look at some typical doors and interior wall construction:
Typical residential hollow core door: STC of 20 to 25
Standard hollow metal door: STC of 20 to 29
Solid particleboard core door: STC 30
Solid core acoustical door: STC 55 to 66
A hollow 2×4 wall with 1/2″ drywall on both sides: STC 33
An insulated 2×4 wall with 1/2″ drywall on both sides: STC 39
An insulated 2×4 wall with a double layer of 1/2″ drywall on each side: STC 45
When selecting a door assembly, the door is the first consideration as it fills a hole in the wall 16-sq ft or bigger. The four soundproofing principles that are applied to the walls, ceiling, and floor should be applied to the door.
- Mass: Interior residential doors commonly are hollow and very light. Sound waves are vibrations, the lighter hollow door vibrates more easily, and the sound travels through.
- Damping: If the door is layered construction with acoustic damping material applied between layers, vibrational sound movement is reduced.
- Decoupling: A door is connected to the wall at the jambs, so it is already partially decoupled from the wall. Preventing sound vibrations to travel through a barrier is the purpose of decoupling.
- Absorption: Hollow doors have no material to absorb sound energy. Doors with cores that absorb the vibrations will decrease sound transfer.
The best way to decrease noise transfer is to ensure the four principles of soundproofing are met for the door and door assembly.
Types of Residential Doors
Interior rated doors are commonly lightweight and hollow. They are made of wood veneer or molded fiberboard faces attached to a finger-jointed softwood frame (rails and stiles). Most are hollow but may have an internal support network of cardboard. They aren’t usually fire rated.
Exterior rated doors are usually heavier and stronger than interior doors. They are designed to stand up to the weather conditions and to provide security. Exterior doors are often made of solid wood, steel, or fiberglass. They are usually fire rated.
Hollow Core Doors
The two independent faces of a hollow door resonate with sound vibration like a drum. They frequently have an STC rating between 20 and 25.
Solid Wood Doors
Doors made of solid wood are often denser and heavier than hollow core doors. They usually have solid stiles and rails, with 2, 3, 4, 6, or 8 solid panels. The thicker the wood, the more noise transfer it reduces. A solid wood door can have an STC of 30 to 35, although some can be as high as 45.
Solid Core Doors
Doors with solid cores made of particleboard or fibers may have STC rates between 30 and 35. They do a fair job of stopping sound. Doors with cores filled with wooden blocks, or other solid wood, are denser than particle board and can have STC values between 55 and 60.
Suitable Wood For Soundproof Doors
Doors made of solid hardwoods like maple, oak, and walnut are strong, solid, substantial doors. They will block more sound than solid doors made of pine or cedar. Thicker (1-3/4”) doors tend to be used for the exterior, and also have a higher fire rating.
Hollow Metal Doors and Frames
Hollow metal doors can be used for interior or exterior applications. It has an STC between 20 and 29, depending on the thickness. A three-piece molded knock-down frame for either drywall (interior) or masonry walls (exterior) is normally included. The frame is available in different dimensions to wrap around the wall material for greater security, weather and soundproofing, and a higher fire rating.
Sliding doors
Sliding doors are commonly interior door panels mounted on overhead rails for a closet or pocket door. They may also be hooked onto barn door hardware as an exposed feature door. Sliding doors can also be glass with wood frames, solid core, solid wood, and even metal doors.
Glass patio door
Glass patio doors may be sliding, folding, hinged, or pivot-glide doors. They have a wood, plastic, metal, or resin frame around the edges of the glass panel. They are frequently used for exterior doors, and to bring in more light and air.
Single pane glass has an STC of 26 to 28, double pane between 26 and 32, while soundproof panels are between 48 and 54. However, the seals around the door frame impact how well the whole door assembly works to decrease sound transfer.
What Type of Door Is Best for Soundproofing?
The best door for soundproofing is a solid core door. It has heavier mass and can reduce sound transfer. Even a cheap particle board door costing $110 is 5 to 10 points higher on the STC ratings than a hollow core door.
A more substantial core of wood blocks can have STC values of 55 to 60 and set you back for $500 to $1,000. If you feel like spending $2,500 to $3,000 for an acoustical core door, then you can get better ratings of 65 to 70.
There are several other factors to consider, however. If your walls are standard gypsum construction with a rating of 33, a door with a higher value isn’t going to help much. Matching the door rating to the wall, ceiling, and floor values make more sense.
Additionally, consider how the door jambs are sealed to the wall assembly, and how the door seals with the jambs, and the knob and lock mechanisms.
How to Soundproof a Door
The best way to soundproof a door is to install a solid core door to decrease sound transfer. Then work to sealing gaps between the wall and jambs. Once those are done, work to seal gaps between the door and jambs, and floor.
Soundproofing a door is easier if done during the construction phase. A 3-1/2” wood stud wall, insulated with fiberglass, and with 1/2” drywall on both sides has an STC of 39. Install the door frame before the drywall instead of after it, and fill the gap with insulation.
The gypsum can then be carried flush to the jambs and caulking used between the jamb and drywall to further decrease sound transfer.
Unfortunately, most of us have doors and jambs that were installed after the drywall. Here are some ways to soundproof existing doors.
Cheap and Easy DIY Ways to Soundproof a Door
If you’ve already remortgaged to soundproof a room to an STC between 65 and 70, hopefully, you installed the jambs before the drywall. There are less expensive ways to decrease sound transfer around the door than ripping it out and starting over.
Remember, a 2×4 stud wall with no insulation, and 1/ 2” drywall on both sides has an STC of 33, whereas the same wall with stone wool or fiberglass insulation is rated at 39.
An increased STC of 1 point isn’t noticeable, 3 points is barely noticeable, while 5 is noticeable, and an improvement of 10 points is twice as noticeable. To go from an STC of 33 or 39 to 43 or 49 takes you above the threshold of privacy at 40.
When purchasing soundproofing materials, purchase products that will help your door and doorway damp, decouple, absorb, and add mass to control sound movement.
#1 Seal The Gaps And Cracks Around the Door Frame
The objective is to seal all gaps where light, and thus air, can sneak through between the wall and door frame, and jambs and door. Anywhere light can travel, so can sound.
The door casing or trim is an obvious place to start. It may hide gaps between the wall and jambs that allow sound to travel.
Step 1: Carefully remove the casing trim from around the jamb if you plan to reuse it. If the drywall goes to the jamb and is caulked, you had a forward-thinking builder. In most cases, there will be an empty gap.
Step 2: If there is a large gap, use fiberglass, rock wool, rigid insulation or backer rod to fill it. For smaller spaces, insert pieces of neoprene rubber strip or mass loaded vinyl to fill the gap.
For even smaller crevasses, or to fill remaining openings that aren’t very big, use Green Glue sealant. Fill any remaining space with Green Glue acoustic caulk to maximize the effectiveness of soundproofing.
Prop Tip: Do not use expandable spray foams to fill gaps for soundproofing. It doesn’t have the mass or density to provide real sound absorption.
The following are some products I recommend using to improve door and window frame soundproofing:
Soundproofing Rubber.
A of rubber for filling sound leaking gaps in window and door frames. It can be purchased in different widths, lengths, and thicknesses.
Backer Rod.
A used to fill gaps and reduce that amount of caulk required. Soft, pliable, and water resistant, it won’t swell or crack. It is available in different diameters and lengths.
Green Glue Noise proofing Sealant.
is applied like caulking to fill gaps and cracks that noise could penetrate. It creates a vibrational break in the sound path. It doesn’t shrink and stays pliable when dry.
Step 3: After the gaps and cracks are filled and sealed, attach door casing or trim to finish the wall-door jamb seam. Use MDF or solid wood as it is denser, and will add to the sound reduction. The edges can be sealed with acoustic caulking too.
#2 Apply Weatherstripping Tape or Door Gaskets
With the door frame and wall sealed, the next gaps to fill are those between the door and the jamb where sound leaks. You want to seal it so no sound or air can penetrate when the door is closed.
The door should compress the seal when it closes, so it will take some push effort to close it, and it should pop open when the knob is turned. The nice thing about this job is that it’s really easy. All you need is the weatherstripping, a utility knife or scissors, and a tape measure.
Weatherstripping Tape
Step 1: Weatherstripping comes in different sizes and thicknesses, so measure the door thickness and the gap at the top of the door to the frame. You don’t want it too big, or it’ll interfere with closing the door.
Also, measure the length of the three jambs and purchase the length and width of self-adhesive soundproof neoprene foam rubber you need.
Step 2: You don’t want any gaps where the weatherstrip meets in the corners of the door jambs. Measure carefully and cut the 3 pieces.
Begin with the top of the door frame or head jamb. You’re facing out, so the door will push against it when it closes. Peel the first couple of inches of the adhesive backing protection paper; stick it tightly in the corner.
Pull off more paper as you move along and push the foam into the corner edge of the door stop molding and the jamb.
Step 3: Repeat with the two other vertical jambs, remembering to start at the top and push it tight into the header piece. Press the strips tight into where the door stop and jamb meet.
Two products I’d recommend for decreasing sound movement between the door and jamb are and .
Door Gaskets
The door threshold is the last part of the door opening to seal. Interior doors often do not have a door stop on the bottom or a weather seal. Many doors also have carpet that they sweep over.
While carpet and underpad are good at impact sound absorption, they don’t block much sound under a door. Carpet will also interfere with a bottom gasket on a door, so it doesn’t seal properly.
#3 Seal the Gap at The Bottom of the Door
The objective of soundproofing is to prevent sound from entering or leaving a room. The space between the door and the floor needs to be sealed when the door is closed. There are different ways to do that, depending on the type of threshold the opening has.
Soundproof Door Sweep
.
It is a flexible 2” x 39” self-adhering silicone weatherstrip that attaches to the bottom edge of the door. The flexible sweep has 3 independent layers that work together to block sound movement.
.
The Draft Stopper is two foam tubes, wrapped in microfiber. It slides under a 36” wide or smaller door, so a tube is on the inside and one on the outside. The Stopper blocks light, air, and sound movement through gaps up to 1.2” high to effectively reduce sound transfer. It is adjustable for door thickness, and available in 4 or 5 colors.
.
A metal rail attached to a rubber filled loop that gets screwed to the bottom of the door to seal the air gap between the floor and the door. The rubber compresses against the floor if it is uneven.
General Instructions for purchase and installation:
Step 1: Measure the bottom of the door opening. Remember, the door stop molding already has a seal on it, and some sweeps will interfere with closing the door if they are too long. Also, measure the height of the gap, then purchase the one that best suits your needs.
Step 2: Mark the exact length on the draft stopper or sweep if it’s not an exact fit. Cut off the excess with a utility knife, scissors or hacksaw (follow manufacturer’s instructions).
Step 3: Slide the sweep into place and secure as per the instructions.
Step 4: Test that the door closes and opens without problems. Trim or adjust if necessary.
Acoustic Thresholds
To properly seal the bottom of the door acoustically it needs to have a smooth surface beneath it when closed. Carpet, tile, and even hardwood can leave gaps which will allow sound to penetrate.
A saddle threshold with a smooth surface should be used with acoustic doors. It should be higher than the carpet and be wide enough to sit under the door, plus an equal width on both sides of the closed door, so the seal can work correctly.
Automatic Door Bottoms
Automatic door bottom seals are available in three different installation options. One is fully inserted into the bottom channel of the door, another is recessed into the inside face of the door bottom, and the last is mounted to the inside surface of the door.
The first two options require modifications to the door itself. They all require a smooth, flat threshold to seal against.
How to Install an Automatic Door Bottom
To install an automatic door bottom, it’s best to review and follow the manufacturer’s instructions.
Step 1: Measure precisely and cut with a hacksaw or other metal cutting device.
Step 2: Install the opener into the prepared recess in the bottom, edge, or to the face of the door following instructions carefully.
Step 3: Once fastened into place, close the door to check that the seal drops. If it doesn’t, adjust the mechanism as per instructions. Some installations include a small plate that secures to the door stop molding or jamb to prevent wear.
When the door closes into place, it presses on the release button/screw, dropping the seal into place. When the door opens, the seal retracts into the housing.
#4 Use a Soundproof Door Cover – Blanket
Soundproof door blankets are available in different compositions. Some are like quilted over an insulating material.
Another product has MLV sandwiched between insulation and covered with quilted vinyl. The latter also has cut-outs for hinges and knobs and is more expensive.
It also has an STC of 29 and an NRC rating of 0.75.
#5 Hang Multilayered Soundproofing Curtains
Covering the doorway with an acoustic or blackout curtain will further decrease sound transfer. The multi-layered curtains are available in multiple color options and are easy to install.
It isn’t a noise barrier. They absorb sound and help control sound reflection. You can spend a lot of money, or buy a .
#6 Add Another Layer of Sound Absorbing Material to the Door
Adding a layer of MDF, drywall, or MLV to the door will increase the mass of the door and decrease sound transfer. Ensure the hinges and jambs are substantial enough to hold the extra weight of the added material.
Medium density fiberboard (MDF)
Adding a layer of 5/8” (16mm) MDF adds an STC value of 25 to your door. To further improve the soundproofing, coat the door or fiberboard with Green Glue acoustic compound. Remember, 5/8” plywood and wood have an STC of 15 to 20, which is much less than MDF.
Step 1: Measure the door, or lay it on the MDF sheet and trace it. Cut it out and smooth the edges. Remember to notch for hinges and cut out the hole for the knob. Predrill holes 3/4” around the perimeter and countersink them.
Step 2: Coat the MDF or the door with . Lay the MDF onto the door panel. Align them, and secure with 1-1/2” screws. I suggest beginning in the middle of each side and working to the corners.
Wipe off any glue that squeezes out. Sand and finish to suit, and re-hang the door.
Mass Loaded Vinyl
is available in thicknesses of 1/4” (2-pound) with an STC of 32, 1/8” (1-pound) has an STC of 27, and 1/16” (1/2-pound) an STC of 20. It is heavy material, so ensure the hinges and jambs will support the additional weight. The door should be a slab door, not a panel door.
Step 1: Remove the door from the frame and remove the knob and any locking hardware. Clean and lightly sand the surface. MLV is expensive, so measure two or more times. Cut with a strong utility knife or shears.
Step 2: Apply construction adhesive evenly over the door surface. With a helper, place or roll the MLV onto the door, ensure the edges are aligned and there are no air pockets. Once the glue is hardened, reinstall the door.
Drywall
Adding 1/2” to 5/8” drywall to one or both sides of a door panel will also improve the mass and decrease sound transfer. Drywall isn’t lightweight, so ensure the hinges and frames can hold the extra weight.
A 2×4 wall with a sheet of 1/2” drywall on only one side has an STC of 25, while 5/8” is 28, so they should decrease sound movement.
Adding will further improve the soundproofing, giving a potential STC rating between 35 and 38; possibly higher depending on the door.
Step 1: Take the door off the hinges and remove the knob and any locks. Clean the door. Measure or trace the door and knob holes onto the drywall. The inside sheet should be flush with the door edges, and the outside should have space for the door stops around the perimeter.
Step 2: Spread an even layer of Green Glue compound onto the inside door surface. Lay the drywall on it, align it, and screw into place with drywall screws around the perimeter.
On the door stop side, tape the perimeter to protect it, and then apply the Green Glue. Place and align the drywall with the tape, and secure with drywall screws. Seal the edges of the drywall, and rehang the door.
#7 Change the Door to Solid Core to Block Sound
There are different types of solid core doors available – some work best as after construction replacements and others for the construction phase.
Solution 1
Changing interior doors to solid core doors is a quick fix to reduce sound transfer. Hollow core doors have no internal mass, so nothing to stop or block sound.
Most metal doors are filled with foam, which is a good temperature insulator but doesn’t have the mass to absorb sound. Try solid wood or wood block core doors to add mass, and also go to 1-3/4” thick slabs too.
Smooth slabs are better than panel doors which vary in thickness and are thus less effective. A flat surface is also easier to add MLV or a layer of MDF or drywall to.
If you can slide in a pre-hung solid core door and frame into the opening, that usually means the frame is heavier. Add seals and gaskets to the jambs and further decrease sound loss.
Solution 2
Skip the box stores and go to a door manufacturer. Most towns have at least one that has a wider variety of door and frame options.
Pick a smooth surface solid core wood door and have it installed in an exterior frame. The frame is heavier and has the wind and weather seals already.
Most also have an aluminum or wooden threshold for the floor; this could be positive or negative.
Solution 3
Buy a pre-hung exterior door. They are usually foam filled within a formed steel or fiberglass shell. Get the heaviest doo you can find – it has more mass, so it is better at soundproofing.
Additionally, the frame is also sealed for weather and thus sounds. The threshold could be an issue in some installs.
Solution 4
Install a prehung solid core interior door is another works too. Add seals, gaskets, or weatherstripping makes it more soundproof. However, the gap between the floor and door bottom remains also needs to be sealed.
Get a Soundproof Door
If you aren’t interested in creating your soundproof solution and want the best results, you can purchase an interior door designed to be soundproof. In this case, you pay for what you get. It can reach an STC rating 56, is 2-3/4” thick, and has soundproof jambs.
The 300-pound door is made of 13 layers and needs 4 heavy duty hinges to support it. The door also has an automatic sill and 3-point closure system.
Advanced Door Soundproofing Methods for Better Results
There are other ways to improve further decrease the sound loss from a room or office, and the noise from outside in. They are more enhancements to how you enter or exit a room than strictly door improvements.
Cut Down Noise By Positioning Doors Properly
When designing a new build or renovation, understand that sound travels through any opening and will bounce around until it finds one, or is absorbed or blocked. If there are multiple doors in a hall or foyer, stagger them.
Also, alter the swing of the door to prevent sound ricocheting from the room to the room next door. The same applies to office windows in halls, staggered is better.
Doors that are hinged are better than sliding panels, bi-folds, or pocket doors which make their own noise, and are very difficult to seal. Windows in doors may be nice and do have a use.
However, they make it difficult to soundproof. If you want a window in a soundproof door, custom soundproof doors with soundproof glass are available but pricey. Additionally, if you want a pet door, you can’t have soundproofing.
Communicating Door System – Install an Extra Door
Properly soundproofing a door opening, sealing the gaps between the door and frame, and installing a solid core door with a bottom seal or sweep will reduce sound loss.
If you double that, you even further improve the soundproofing. You are adding a second solid door and frame to the opening decreases sound movement.
The idea is to have one door in one frame open inward, and the other door opening outward in a separate frame. The hinges and knobs are diagonally opposite each other.
The two frames have to be separate to decouple sound transfer; otherwise, it is a weak link in your soundproofing efforts. This arrangement won’t work in commercial settings where doors must open outward for emergency use.
It is possible to install such an arrangement in a 6-inch thick wall opening. A minimum of a 12-inch thick wall allows the doors to be far enough apart that they don’t acoustically interact with each other.
The two-door arrangement works for walls 6-inches to 24-inches thick, any wider spacing and you might as well have a hallway.
Use Small Lobby
Not everyone has the space for a 12-inch thick wall, and if you have to meet fire codes for business applications, that solution won’t work. An alternative is to make a small 6’x6’ or 4’x6’ vestibule or lobby. It’s best to check with local building and fire codes for commercial applications first though.
The concept is similar to the two communicating doors 6 to 12-inches apart, just adding more space between. Building soundproof walls (and ceiling) around the access door, with another door opposite it or in a different wall, will decrease sound loss.
It will also act as a baffle room for heat and air-conditioning, which can save on energy costs too. Decorate it, add coat hooks to the wall and boot mats beneath, and you have a mudroom as a bonus to your soundproofing efforts.
Conclusion
Soundproofing a door starts with sealing the framework and includes sealing any gaps between the door and the jambs. The heavier and more solid a door is, the better since it has more mass than a hollow door.
The last part is to seal the space beneath the door at the threshold. You can spend lots of money, or go with a budget plan. Whatever you do should decrease the sound loss.
I hope you found the article informative. If you know someone who might be interested, share with them.

Thank you Eugene for a comprehensive and educational write-up on sound proofing a room. The exact details and product names are much appreciated. Please continue to share your knowledge.
Hello Eugene,
Could I tap your expertise on this idea? For an existing bedroom closet wall next to a busy and noisy hallway, I want to add a coat of Green Glue to the inside closet wall, then a layer of MLV, then another layer of Green Glue, then a 5/8″ drywall. That way I can leverage the damping property of the first GG layer, the mass and damping of MLV, more damping of the second GG layer and finally more mass with the new drywall.
Compared with this another idea of GG, drywall, GG and drywall on top of the existing wall. This will be less expensive, I think but would it be more effective?
Thank you.
Daniel
Eugene, Thank you for composing and posting this comprehensive guide. Excellent in so many ways.
Hi Gilbert,
Glad you liked it.
Terry
Dear Eugene,
Thank you very much for your comprehensive information. I am still confused. What are the cheapest and most effective materials to buy for insulate the existed doors in order to reach at least SFC 50? One door gasket costs $280. I appreciate your help. Sophia
Hi Sophia,
I am not sure what kind of door gasket costs $280. A door gasket to me is weatherstrip costing about $12. About the only way of getting a door to an STC of 50 or better is to buy a studio soundproof door–STC of 56 and a cost over $2000. If you buy a solid core or solid wood door, a proper frame, weatherstrip and sweep and fill all the gaps, you may get to STC 42 – STC 45. Hanging a moving blanket or soundproof curtain in front of it will also help.
Terry
This was the great article on this topic I could find! Super informative. One question Terry – I have a metal exterior door on the interior of my house between suite and rest of house. It is only 24 Stc as it is polyurethane foam core. I am debating shelling out for a 45 stc rated door vs gluing MLV to my current door. In both situations I would do auto door sweeps and gaskets around the sides and top, and green glue trim. Is adding the MLV to current door additive – I.e. the current 24 stc + 30 stc from the MLV = 54 or what is your opinion on this decision?
Hi Trevor,
Unfortunately, you cannot add STC ratings. They do not work that way. You will probably only get an STC rating of around 32. Which is still fairly significant. You could try that first and see if you are satisfied and save the replacement option for later. Have you considered hanging a curtain over the door. You might want to take a look at AcousticCurtain by Residential Acoustics. Roll up curtain. Many colors. Custom sizing. Reduces noise by up to 25 decibels.
Terry
Hi Terry, thanks for this excellent write-up. Is solid wood better than a wood block core door for soundproofing? Also, can you send me (or link) any examples of a “wood block core door” from Home Depot or Lowe’s?
Brian
Hi Brian,
Glad you liked the article. A solid core door (wood block or MDF) is a little better at soundproofing than a solid wood door. You can check out Masonite Doors site. Hopefully I linked them properly. They have a dealer finder on the website but I know that Lowes handles Masonite doors.
Hope that helps,
Terry
I want to stop some noise from coming from one room out to main area of home. Coughing noise is the problem, farmers lung. Do you think one of those blankets would be sufficient. Just the coughing 24 7 is driving me nuts even with the bedroom door for that person being closed . Door is a hollow door at present. Thanks
Hi Dianne,
A soundproof blanket will help quite a bit, but take a look at AcousticDoor by Residential Acoustics. It is custom made and will block about 21 to 25 decibels.
Terry